One thing that we’ve always been known for at IFAST is our assessment process.
We’ve had people come from all parts of the world (including Japan, Bulgaria, Europe and Australia) to have us take a look “under the hood.”
However, I’m a firm believer that just because you’re good at something doesn’t mean you can rest on your laurels and hang out.
In fact, I’m a big believer in maximizing your strengths while minimizing weaknesses.
As such, we’ve been putting a ton of time an effort into streamlining our assessment process the past couple of months, and I think it’s really paying dividends.
If you want a sneak peek into our assessment process, here are the four big rocks that we’re going to use to assess our athletes.
Step 1 – Joint Mobility and Position
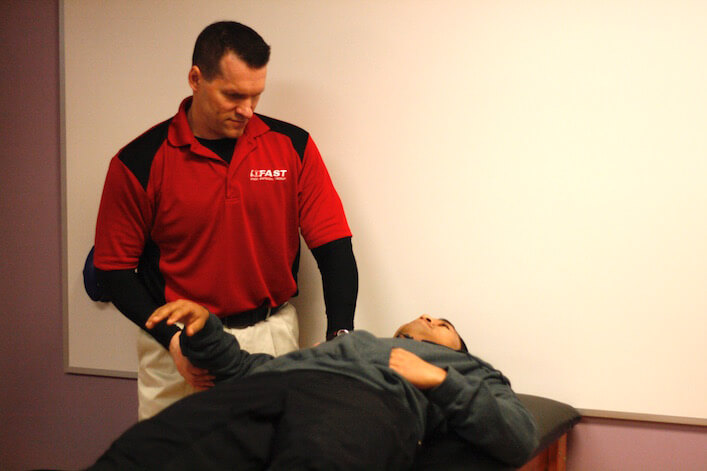 Joint mobility and positioning is the first step in our assessment process, as this gives us an overview of the overall movement capacity of the athlete.
Here are some things I’m looking to tease out:
- What position(s) are the various joints in?
- What kind of movement capacity do we have at each joint?
- Side note: I put a big emphasis on the ball-and-socket joints, and assessing rotation there.
- If a joint feels restricted, what is the end-feel like?
- And lastly, what patterns do I see with regards to restriction?
All this is fine and dandy, but as a physical preparation coach I can’t stress strongly enough that I’m not a physical therapist or athletic trainer, and I don’t claim to be.
My goal with this portion of the assessment is to determine specific movement limitations, and then relate that back to how this will most likely manifest in their sporting movements.
Case and point: I assessed a young baseball pitcher a few weeks back who complained of medial elbow pain. He had very limited internal rotation through the right shoulder, so I described to him how that lack of rotation (or follow through, in the pitching motion) was causing his elbow joint to take on excessive stress, strain and load.
So key point here – it’s not about putting someone on the table and showing them how dysfunctional they are! I don’t know about you, but the last thing I want to hear someone tell me when I’ve just met them is that I suck.
At this point I’ll take a few minutes to determine if any positional breathing exercises or “resets” will unlock motion and help them move better.
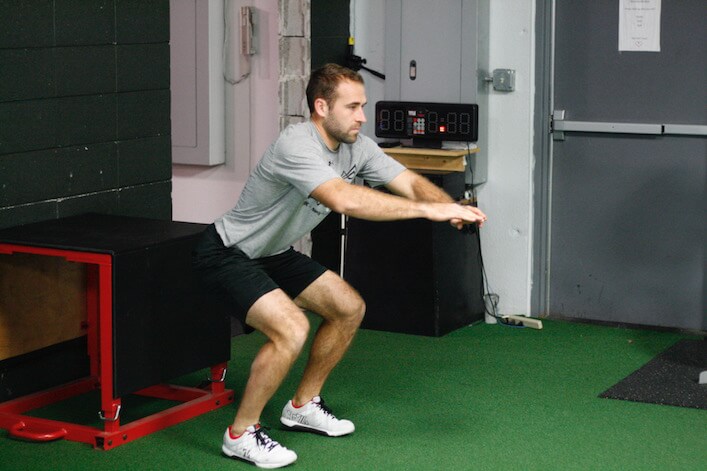
Step 2 – Movement Capacity
Once we have an idea of isolated joint positions and freedom of motion, we need to start putting those pieces back together.
After all, just because an ankle or hip joint is locked up doesn’t mean someone can’t squat – it just means they’ll find a different (and possibly less efficient) strategy to make it happen.
This is where I simply want to watch my athletes perform basic motions – squatting, lunging, pushing up, etc.
If you use the FMS, this would be an ideal place to put it.
Here’s a critical point: When you assess someone on the table and find limitations, take that knowledge and always relate it back to their movement capacity.
If someone is blocked in their hip rotation, show them how this limits their squatting range of motion.
If someone is very extended through the pelvis and lower back, show them how they sag in their push-up to create stability.
And if you have a toned up bro, show them how all that tone is blocking their ability to flex their spine and touch their toes.
As Coach Kenn said in our EADS 2.0 DVD’s, the physical preparation coaches are the smartest guys in the room.
And I tend to agree with that sentiment 100%.
But at the same time, I don’t care how smart you are – if you don’t show an athlete how lack of motion, poor stability, etc. affects their movement and sports performance, they probably aren’t going to care!
This is a critical component of the buy-in process.
Explain how those resets, correctives, or whatever we’re calling them these days are affecting their movement and performance. If you do this I guarantee you’re going to get a much more motivated athlete than if you don’t.
Step 3 – Speed, Strength Power and Explosiveness
The third phase is where things start to get fun, and where you’ll being to “profile” the physical traits of your athletes.
At IFAST we use a mix of speed, strength and power tests to get an idea of how this athlete likes to generate and absorb force.
Again, here are some things you may be looking for:
- How do they jump? And perhaps more importantly, how do they land?
- Are their significant differences in power production between limbs?
- What are their splits with regards to linear speed?
- Are they a more muscular-dominant athlete (with slow RFD), or a springy, explosive, more tendinous athlete?
- How well do they change direction?
 As you can see, a well-thought out athletic assessment can give you a ton of feedback with regards to the type of athlete you’re coaching. But here’s where the big payoff comes in:
The more you know about an athlete going in, the less time you have to waste trying to figure out what they really need from your programming!
Case and point, assume you have a very muscle-dominant athlete. They are brutally strong in the gym and pretty good at acceleration drills and exercises.
However, when it comes to anything that involves elasticity (i.e. depth jumps, top-end speed, etc.) they are riding the struggle bus.
And all that strength and tone has locked them up through their hips, so their ability to change directions is poor as well.
When you have all this information up front, you don’t need to spend 2-3 blocks building more and more strength (a quality they already possess in spades), and can get into the “good stuff” far sooner than before.
The end result is a program that’s hyper-specific to athlete standing in front of you.
Step 4 – Energy System Development
Last but not least, we need to respect the fact that conditioning and energy systems development is a critical component of athletic success.
The first two steps of the assessment process focus on movement quality and biomechanics, which I feel are critical for injury reduction.
However, as Keith D’Amelio pointed out in our podcast a few months back, there are athletes out there with awful biomechanics that get by simply because they have such an amazing ability to resist fatigue.
I hate to put this out there, but I think this is a big reason we don’t see LeBron James injured more than we do. His right tibia has such a ridiculous torque through it that I’m shocked he hasn’t had significant right knee issues.
However, maybe it’s simply the fact that he’s got such a ridiculous work capacity that he stays healthy. I’m in constant amazement that a guy who is 6’8″, and 260 pounds can consistently play 35-40 minutes per night, 100 games each year.
When you sit back and think about that, that’s just freakish. But I digress…
There are several things I want to flesh out in my conditioning tests:
- How developed is the aerobic energy system?
- What is their anaerobic threshold?
- How fast do they recover from maximal workloads?
- How much fatigue or drop-off do we see between repeated efforts of sprints, jumps, etc.?
As you can see, there’s a ton of cool information we can pull from here. And this comes back to my previous point as well.
If you have an aerobic monster standing that can run for days standing in front of you, you may not need a ton of extra conditioning built into their programming.
Instead, you can put an emphasis on the sexy stuff like speed, strength and power instead.
But on the flip side, if you have someone that doesn’t move particularly well, they’re strong and explosive as hell, but they make two or three runs up the court/field and they’re gassed, then you know two things:
- This person needs a serious movement and conditioning base (to improve efficiency first), and
- They’re probably going to hate you, because the program will feel incredibly slow at first.
But again, this is where it always comes back to giving an athlete exactly what they need to get to the next level.
Summary
As many coaches love to say, “there’s nothing new under the sun.”
The assessments I outlined above are there for anyone to perform. The key is taking all the information that you find and then asking yourself one easy (but not simple) question:
“What does all this information tell me?”
Once you have the answer, your ability to write a great program will be light-years ahead of where it was before.
All the best
MR
3 DAY COACH'S CAMP:
 Write better programs
  Learn how to motivate clients outside the gym
  My most popular resets for instantly improving movement quality