 Warming up is a critical starting point for an optimal workout.
Can you get by without one?
Sure.
Can you do some arm circles, leg swings, and jump right into your session?
I guess.
But if your goal is to improve your performance in the gym or on the court/field, you need to use proven warm-up principles that have stood up to the test of time.
Here we go!
Why Should I Warm-up?
There are several issues with the current warm-ups that are out there:
- You’re not hitting all the necessary joints,
- If you are hitting all the necessary joints, you’re not hitting all the specific movements/patterns you want,
- You’re not addressing all the key areas (movement, physiology, etc.),
- You’re not warming up at all!
When done effectively, a warm-up provides numerous benefits:
- Improves alignment and posture,
- Decreases viscosity of synovial fluid (i.e. it makes your joints feel good!),
- Increases muscle temperature, and therefore flexibility/extensibility,
- Releases catecholamines (epinephrine, norepinehrine, etc.), and
- Increases nervous system conductivity.
If we want to jump over the geek-speak, a smart warm-up squares your body up, gets it loose, and primes it to run fast, jump high, or lift heavy things.
With that being said, I feel there are three key components of a smart warm-up.
3 Critical Steps to a Better Warm-up
An intelligent and comprehensive warm-up covers three primary areas:
- Reset,
- Readiness, and
- Specificity
If you review different warm-up protocols and products, there’s a ton of great information out there. However, none of them seem comprehensive.
More specifically, all of them seem to leave something out.
Let’s address each of the three areas I mentioned above, as well as why it would be important to have in your warm-up.
The Reset
If you come to IFAST, the first thing we’ll address (if necessary) is a reset.
What is a reset, you may be wondering?
I’m glad you asked!
A reset is a specific exercise or movement that is utilized to restore optimal posture or alignment.
Often, key structures like the hips, pelvis, or ribcage aren’t properly aligned, which reduces mobility.
And as well all know, poor mobility drives poor motor control and stability.
And if you’re immobile and unstable, good luck demonstrating strength, power, endurance, and everything else that is cool in your workouts!
So the reset is thrown in first, before you do anything else, to make sure you’re square up and ready to go.
Resets are a very specific thing, so it’s impossible to tell you exactly which reset would work best. However, one of our favorites is simply a squat hang reset, where we work to reset your ribcage and push some air into the right side of your chest.
Again, this is just one reset that we use in our gym, but without a comprehensive assessment it’s hard to tell exactly which one you need.
Once you’re optimally aligned and squared up, it’s time to focus on actually warming up.
Readiness
Readiness is the next component of our warm-up.
While the entire warm-up can and should be focused on good biomechanics, movement quality and alignment, we can’t forget about the need for driving good physiology here as well!
Old-school warm-ups like random calisthenics, jumping jacks, burpees, etc. may not have been ideal for instilling proper movement, they did the trick when it comes to simply getting the body tissues warmed up and ready to train.
In our case, there’s no issue whatsoever with a quick and dirty 5-10 minute walk on the treadmill, cycle on the AirDyne, or just some rowing on a Concept 2 rower.
From there, however, we need to progressively move through larger and larger ranges of motion, doing our best to address all the joints that we’ll be using in our training program.
Luckily for you, we’re going to give you a comprehensive warm-up a bit later on.
Specificity
The final component of our warm-up is the specific component.
If you’re going to run or perform feats of athleticism, you need to get into some form running drills, low-level plyos, etc. to prepare you for the task at hand.
If you’re hitting the weights, you’re going to perform some light technique sets to work your way up to your desired training weights.
The goal here is to start priming the pattern, or “greasing the groove,” as Pavel would say.
If your end-goal is to simply lift weights, I give some specific examples in the FAQ below on how to perform a specific warm-up for maximum effectiveness.
Bonus: The Passive Warm-up
Ever noticed how quickly you can warm-up in the summer? Or when the gym is really warm?
What about on the opposite end of the spectrum; ever trained in a really cold gym? Or worse, in a cold gym in the winter?
If you want to fast-track your warm-up, do so by using passive means to keep yourself warm.
It’s quick and easy, but wear extra layers when training. In the winter it’s not uncommon for me to have on sweat pants, shorts, compression shorts and the unmentionables all at the same time.
It’s not that I necessarily need it, but it expedites my warm-up and keeps me warm in between sets.
Another age-old trick used by powerlifters is heating balm/liniment. The jury is still out here, as these items don’t typically get deep enough to warm the actual muscle itself, but anecdotal evidence would tell us this is an option as well.
Last but not least, simply drinking a hot cup of tea or coffee pre-training isn’t just great for the caffeine boost, but I feel it expedites the warm-up as well.
Joint-Specific Warm-ups
Let’s examine each joint in your body, as well as what I feel it needs from not only a training but warming-up perspective.
The Foot
Primary Needs: Stability and Control

The foot is literally your first source of feedback from the ground up.
Quite simply if your foot is giving your body poor or altered feedback, or your foot is unstable, you’re not going to perform at the level you’d expect.
I’ve been a huge proponent of barefoot training and/or minimalist shoes in the past, but I’ve softened my stance a bit recently.
Minimalist shoes and barefoot training are great if you have a stable foot and calcaneus. If you don’t, minimalist shoes may not be the best idea for you.
I’m sure I’m going to get burned at the stake for throwing this out there, but hopefully you can realize that we’re all unique individuals, and we can’t simply say barefoot training is ideal for everyone.
The key is to figure out what type of shoe you need, where you need support or reinforcement, etc. This is an entire post in and of itself, so I’ll be putting that on my to do list for 2013.
There’s another critical step, though – you can’t just get in the right shoes and expect magic to happen.
Well, I guess you could…but you’d probably be pretty disappointed with the result!
Instead, you’ll need to get in the right shoes and focus on what we call tripod foot. In case you’re unfamiliar with the concept, here’s a quick video explaining what tripod foot is and how to use it in your warm-up and training sessions.
With a combination of appropriate footwear and a focus on neutral foot, chances are your body is going to be in a great position from the ground up.
The Ankle
Primary Needs: Dorsiflexion

If we test 100 people at IFAST to determine their ankle mobility, my bet would be that 80-90% of them will show reduced (or limited) ankle dorsiflexion.
The real question is, why is this occurring?
One of the biggest issues we find in our gym is that people with poor ankle mobility have one or two other postural flaws:
- An anterior (forward) center of gravity, and/or
- A ton of tone on the backside of their body.
Why is this?
Poor core stability, stiff hip flexors, and an anterior pelvic tilt could all be contributing in some form or fashion.
We could wax philosophical as long as we’d like, but ultimately if we don’t correct the issue, the ankle mobility restriction won’t help.
While I’m going to give you my go-to ankle mobility drill below, if someone has other postural flaws that needs to be addressed first and foremost.
You might find as a result that you don’t necessarily need more ankle mobility; you simply need to learn how to access what you already have.
The Knee
Primary Needs: Knee Flexion/Extension

I’ve talked extensively about the knee-joint in the past, but that doesn’t mean I’m going to skimp on it here!
The knee is a condyloid joint, not a hinge like most would think. While the knees primary motion is flexion and extension, there are small amounts of rotary capacity at the knee-joint as well.
Here’s the big thing: Many people have gotten so caught up in joint-by-joint training that they’ve totally lost sight of the importance of the knee.
However, Dr. Shelbourne (one of the leading ACL docs in the world) will tell you that poor extension through the knee is a major factor in degenerative changes at the knee.
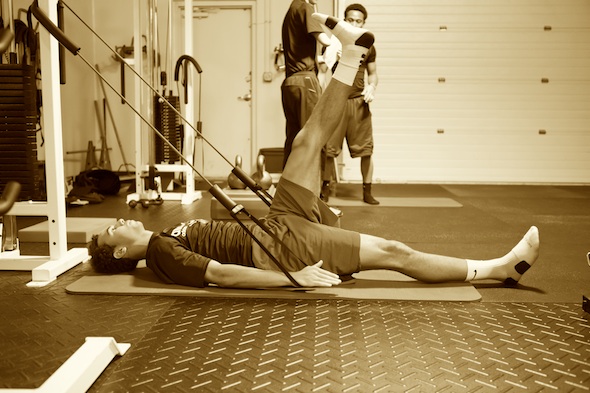
In the warm-up provided below, you’ll notice I have a core-engaged straight leg raise. In this exercise, make sure to focus on keeping both knees straight, using the quads to lengthen the backside of the knee-joint (gastroc, hamstrings, etc.).
If nothing else, you need normal and symmetrical flexion and extension at the knee. That alone will go a long way to keeping your knees healthy over the long haul.
The Hip
Primary Needs: Multi-planar mobility and stability, hip extension, hip separation

The hip-joint is arguably the most important in our body. As a ball-and-socket joint, it enjoys tons of freedom of motion.
The issue is when we start to lose that mobility through the hips.
Furthermore, when you start to lose mobility you see this negative cascade of events.
Poor hip mobility leads to poor feedback to the brain.
Altered feedback leads to poor motor control and/or stability.
And poor motor control/stability will directly impact strength.
If I teach you nothing else, respect the fact that the hip-joint is critical for quality movement throughout the body. Mobility is the cornerstone, but stability (and eventually strength) should be focal points as well.
I’m going to throw it in here, but the 90/90 (or half-kneeling) position is something that we should all be addressing. In a half-kneeling set-up, you’re developing core stability, hip stability in the “up” hip, and hip flexor extensibility in the trailing leg hip.
The Pelvis
Primary Needs: Stability and Neutrality

The pelvis is an oft-forgotten joint.
However, when we take a step back we realize that pelvic alignment drives position both up and down the kinetic chain.
If you’re in an anterior pelvic tilt (tipped forward), your lumbar spine is going to extend and your hips are going to internally rotate.
And on the other hand if you’re in a posterior pelvic tilt, your lumbar spine is going to flatten out and your hips will externally rotate.
To optimize movement quality, we want our pelvis to be level/neutral, and from there we need to be able to stabilize or control that position.
Often, you’ll find people with very stiff hip flexors or quads who can get themselves into a relatively neutral position when standing, but asking them to lunge or split-squat just isn’t going to happen.
And don’t worry – if that describes you we’re going to address it in your warm-up! J
The Lumbar Spine
Primary Needs: Stability and Neutrality

The lumbar spine is always a hot topic.
When you hear 80% of the population will suffer from lower back pain at some point in time, or some guru pimping their ab-shredding product, it’s no wonder we’re still talking about the low back.
Dr. Stuart McGill has done a fantastic job of espousing the need for a neutral spinal alignment. If you follow McGill’s work, you know he’s all about avoiding loaded lumbar flexion, as well as repetitive flexion and extension cycles in the lower back.
Both have been shown to herniate discs, which definitely isn’t a good thing.
However, I’ve seen a lot of people going too far in the opposite direction. While these people are doing their damnedest to avoid flexion, they’re overreacting and going into hyperextension through their lumbar spine.
Unfortunately, going too far either way is not a good thing.
If you want a quick overview on how to pattern neutral spinal alignment, watch the short video below. I also discuss this fairly in-depth in my Round Back Deadlift post.
Last but not least, once you’ve achieved this neutral alignment, you want to be able to stabilize and control that while going through various ranges of motion. Whether it’s a squat, deadlift, or just normal athletic movement, a neutral and stable spine is a happy spine.
The Thoracic Spine & Ribcage
Primary Needs: Thoraco-Lumbar Flexion; Ribcage/Apical Expansion

I guarantee the “Primary Needs” I’ve listed above are going to cause some controversy, so let’s back this up with some practical thoughts on training this often-confusing area.
The thoracic spine is another joint that’s gotten more and more publicity lately, and for good reason.
Optimal thoracic spine positioning is critical for good shoulder biomechanics.
What we’re seeing a lot of these days are clients who actually have a thoracic spine that’s too flat. Remember that the thoracic spine should have a natural kyphosis to it, and this is critical because the scapulae (shoulder-blade) has a slight curve to it as well.
I covered this in-depth in my scap stability post a while back, so be sure to check that out for a more thorough overview.
If you want the Cliff Notes version, here goes…
If you have a slightly curved shoulder-blade resting on a slightly curved spine, you have good natural stability.
However, if your thoracic spine is too flat, and you lay that curved shoulder-blade on top, you have the recipe for an unstable shoulder.
The shoulder-blade doesn’t physically attach to the upper back – it’s totally reliant on muscles to do that for us. So if your upper back is too flat, you’re at an increased risk of shoulder pain or dysfunction down the line.
Here’s the pinch – for years we’ve talked about getting more extension in the thoracic spine. Now we’re talking about getting more thoracic flexion.
What gives?
I think we’ve gotten more specific not only in our assessment skills, but also in our prescription of appropriate corrective exercises.
Remember that we have individual structures in the thoracic spine and rib cage. The absolutely work together, but they can also do their own thing individually.
What we used to classify as an “excessive kyphosis” is (more often than not) a flat thoracic spine in conjunction with a a sunken chest wall on one our both sides.
Instead of torquing our bodies over a foam roller to get more extension, what we should be doing is restoring flexion through the thoracic spine (to get it back to neutral) and then filling one or both sides of the chest wall.
Think of it like this – if you can’t fill up the front side of your chest wall, you’re going to have that forward/slouched shoulder position we’ve always discussed.
It’s like a flat tire, and the goal is to pump it back up with air.
When you refill the chest wall, this will also improve and restore your natural thoracic kyphosis, giving you a stable foundation for your scapulae to rest on.
Here’s the bottom line…
In the warm-up, your goal is to optimize the position of your thoracic spine and filling of your upper chest with air.
And, if you have an excessively flat upper back, you need to work on getting some thoracic flexion back to restore that natural curve. Again, we typically do some focused breathing exercises into a rounded upper back, and hopefully the videos linked below will suffice until I can write a full post on this topic.
The Neck
Primary Needs: Neutrality
The neck is a very touchy joint, and as a personal trainer/strength coach I’m remiss to talk about it too in-depth here.
Bottom line – if you’re a coach or personal trainer and someone comes to you with neck pain, refer them to your physical therapist ASAP.
When it comes to good alignment and a proper warm-up, I’m always focused on getting into a neutral neck position. If someone presents with a head forward posture, you can cue them to “pack the chin” or even “pull the head back.”
My personal favorite is simply slapping a PVC pipe along their spine, letting them find neutral from top to bottom, and then coaching them through the desired movement.
From a trainer’s perspective, the neck is pretty simple – get it in neutral and keep it in there.
The Scapulae
Primary Needs: Stability and Upward Rotation

Working our way outward from the thoracic spine, the next stop is our scapulae. The scapulae are “slave” to the position of the thoracic spine; if you don’t have good t-spine positioning you need to address that first.
Assuming you have good alignment at the thoracic spine, the two primary needs of the scapulae are stability and upward rotation.
Let’s start with upward rotation.
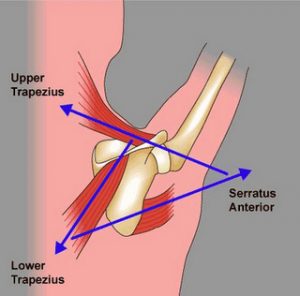
Three muscles that drive quality upward rotation of the scapulae are the
- Upper trapezius fibers,
- Lower trapezius fibers, and
- Serratus anterior.
If someone has a long upper trap, this is often due to poor apical expansion of the chest wall.
Fill the chest wall with air, and the upper trap position/length improves.
On the other hand, the serratus anterior and lower trapezius are quite often weak. I find this is due to several factors:
- Stupid programming,
- General unawareness of the need for strength in these muscle groups, and
- Poor starting posture/position.
We’re going to hit both of these muscles numerous times in the warm-up, with exercises like push-ups, forearm wall slides, etc.
And again, if you haven’t checked out the scap stability post, it’s a great read and will give you more insight as to why this stuff is actually important.
The Gleno-Humeral/Shoulder Joint
Primary Needs: Rotation and Reflexive Stability

Last but not least, we have the gleno-humeral or shoulder joint.
This guy is a major player (just like the hip), because it’s a ball-and-socket joint, and therefore critical for mobility.
And while I’ve definitely got some great shoulder mobility drills in the warm-up, you’ll notice it’s not over the top.
Why?
Because when you understand the anatomy, you realize that the shoulder joints mobility is predicated on not only a well aligned thoracic spine and rib cage, but a scapula that is stable.
What we find more times than not is that if we can restore optimal position through the thoracic spine and rib cage,
Here’s another cool thing – when we get full shoulder mobility back, stability comes back quickly to boot. And we don’t have to jack around with ridiculous Theraband internal and external rotation exercises; we’re talking true shoulder stability where the rotator cuff is working like a tractor beam to pull the shoulder into the scapula.
Your New Warm-up Exercises
We’ve covered all the things your body needs to move effectively, now it’s time to put all those pieces together into one kick-ass warm-up.
The warm-up below is something myself and my team have crafted for general use. If you have a specific weakness, limitation or dysfunction, you need to address that first and foremost.
But, if you generally move pretty well and want a warm-up that covers all the major bases, you’re going to love this!
Straight Leg Raise
What it trains: Hip extension through the down leg, knee extension in the “up” leg, core stability and activation.
Using a band of your choice, pull the band over to engage the abdominals. We will often coach to exhale hard to engage the core/abs first, as well as shut off the lower back.
With the core engaged, pull both toes/feet back towards the face. Keeping one leg straight and the heel dug into the ground, raise the opposite leg straight in the air. Make sure to keep both knees straight/locked throughout, and do not allow the back to arch.
Goblet Squats
What it trains: Mobility through the knees, ankles and hips; core stability.
How to do it: Grab a kettlebell by the horns and hold it against the chest. Set the feet approximately hip/shoulder width apart, with the toes turned out slightly.
Sit back and push the knees out to the sides. Squat as low as you can without losing the natural curve in your lower back, and then return to the starting position.
Reverse Lunge with Twist
What it trains: Hip stability on the stance leg; hip mobility/extension through the back leg; thoracic rotation.
How to do it: Stand up tall and place the fingertips behind the head. Take an exaggerated step back, so that the trailing leg knee ends up directly underneath the hip/shoulder.
Once in the back lunge position, rotate over the lead leg, and then return to the starting position.
Half-Kneeling Rotation
What it trains: Hip stability on the stance leg; hip mobility/extension through the back leg; thoracic rotation.
How to do it: Set-up in a 90/90 position, such that the front leg/hip is at a 90-degree angle, and the trailing leg knee is directly underneath the hip. Place the fingertips behind the head.
Rotate over the lead leg, making sure to stay tall throughout.
Glute Bridge
What it trains: Hip extension/glute activation.
How to do it: Lay on your back with your knees bent and feet flat on the floor. Exhale slightly and brace the core as if you’re going to be punched in the stomach.
With the core tight, extend the hips without engaging the lower back. Ideally you’ll lift to a point where the shoulders, hips and knees are in a straight line, but if your hip flexors are stiff or your glutes are weak, lift as high as you can without engaging the lower back.
Hold for a one-count, and then return to the starting position.
Broomstick Pec Mobilization
What it trains: Hip stability on the stance leg; hip mobility/extension through the back leg; thoracic rotation; pec major length; stretches the anterior fascial sling/spiral line.
How to do it: Set-up in a split-stance position with the right leg in front of the left. The right hand will be on the top of a PVC pipe, with the left hand holding it in the middle.
Engage the core slightly and use the left hand to “push” the right hand upward and back. Instead of focusing on the stretch, think about actively “driving” the right shoulder-blade down into the back pocket. Hold for a 1-count, and then return to the starting position.
Push-up to Downward Dog
What it trains: Upward rotation of the scapulae/serratus anterior strengthening; lengthening of the superficial fascial back line; pushes air into the backside of the body.
How to do it: Set-up in a push-up position with the hands just outside of shoulder width and on the toes. Perform a push-up, keeping the core engaged, and then press immediately back up into a Downward Dog pose from Yoga.
In the Down Dog position, focus on taking a full, deep breath into the back. It may also help to think about keeping the knees straight and actively driving the heels towards the ground to increase the stretch on the back side.
If you’re unable to perform the entire movement, simply go from the push-up position into the Downward Dog, skipping the push-up component of the lift.
Forearm Wall Slides
What it trains: Upward rotation of the scapulae; lower trapezius strength/motor control.
How to do it: Set-up in a split-stance position with the right leg in front of the left and the toes up against a wall. Flex the elbows to 90-degrees and put them directly in front of the shoulders on the wall.
Slide the forearms up the wall at an angle, finishing in a 10 and 2 position. As you are sliding the arms, lean the torso in as well, so that when you finish in that top position your chest is against the wall. From here, lift the arms off the wall slightly, focusing on squeezing the shoulder blades down (tucking them into the back pocket).
While performing this exercise, it may help to think about keeping the chin and ribs down. Don’t let the neck extend back, and don’t allow the lower back to arch.
Groiner with Overhead Reach
What it trains: Hip extension mobility on the trailing leg; hip flexion mobility on the stance leg; thoracic rotation; stretches the anterior fascial sling/spiral line.
How to do it: Set-up in a push-up position with the hands underneath the shoulders and feet up on the toes. Flex the right hip so that the right ankle is just outside the right hand.
From here, drive the left hand into the ground and reach the right arm towards the sky. It may help to think about keeping the back knee straight and squeezing the butt cheek as well.
Side-Lying Rotation Reach
What it trains: Thoracic rotation; length through the pecs, lats and subscapularis; lower trap strength/motor control.
How to do it: Lie on your right side with the left knee flexed and resting on a foam roller. Reach the left arm up and back to the 2 o’clock position on a clock.
From here, take a deep breath in and then exhale. With the exhale, think about driving the shoulder-blade down to stretch the front side of the shoulder.
Pull Back Butt Kicks
What it trains: Flexion and extension through the knee-joint; hip stability on the stance leg.
How to do it: Stand up tall and flex the left knee towards the left butt cheek. With the left hand, grasp the top of the foot and gently pull it back to increase the stretch on the quadriceps.
When performing this exercise, don’t get sloppy on the stance leg, either. Think about getting tall through the down leg. Intern Meadows does a good job when his left leg is his stance leg, but not as well when his right leg is down.
Boooooo Meadows!
Wall Ankle Mobilization
What it trains: Dorsiflexion through the ankle joint.
How to do it: Set-up in a split-stance position with the right leg in front of the left and the toes up against a wall. Place your hands on the wall to help you balance.
With a tripod foot, gently drive the right knee over the toes. If you reach the wall easily, scoot the foot back 1 inch at a time until your mobility is challenged. Make sure to keep the foot in a tripod position throughout.
Download YOUR Copy of the RTS Warm-up!
Now that we’ve covered all the basics (including an awesome warm-up you can start using TODAY), here’s a downloadable form you can print off and take to the gym with you.
I’ve outlined everything for you – all you have to do is fill in the blanks on 3-5 areas where you typically need some self-myofascial release/foam rolling/lacrosse ball work and you’re ready to rock.
Who says I don’t take care of you???? 🙂
The Warm-up FAQ Section
To make this post even more awesome (and interactive!), I relayed a very simple question to my followers on Facebook and Twitter:
Working on a new post about warming up…
If I could answer ONE question you have about warming up, what would it be?
— MikeRobertson (@RobTrainSystems) November 26, 2012
I got a ton of great questions, but here are the best of the best. I hope it helps!
Should your warm-up differ on upper body vs lower body lifting days?
– Kimberly Hastings
I think so, yes.
Remember in our warm-up the goal is to work from general to specific, so you may start with something non-specific (like hitting the stationary bike, treadmill, etc.) to elevate tissue temperature, release catecholamines, etc.
However, at some point you need to focus on the specific skill you’ll be addressing your workout, so you’ll move to a more “specific” warm-up from there.
How long should our warm-up be? And is it imperative to do SMR in your warm-up?
– Coach A
The length of the warm-up is very individual, and could be influenced by age, intensity level of the workout to come, external factors such as outside temperature, temperature in the gym, etc.
For the second question, SMR is imperative if mobility is one of your primary goals. If it’s not, and time is limited, SMR may be one of the first things to go from my warm-ups.
How much mobilization is TOO MUCH mobilization pre training?
– Tommy Caldwell
This is incredibly individual. Some of the powerlifters I work with simply cannot do enough mobility exercises, because they’re so big and stiff.
On the opposite end of the spectrum, some of the Yoga gals we’ve assessed should do minimal mobility drills, and instead focus much more on stability.
The optimal path for each person is specific in nature, and ultimately focused on their end needs and goals.
How do you address/program mobility issues in the warmup? One main issue at a time, or attack all mobility issues at once?
– Kyle Moran
This is a great question, and something I feel I’ve improved in recent months.
In the past, I would address everything at once and saw some really solid results. However, I think if we address the most foundational movement issue first, we’ll ultimately get a better result.
I’ve been doing this with a handful of clients and I’m seeing a really impactful change in a shorter period of time. That’s a win-win for me.
Is there an optimal way? Foam roll-static stretch-active warmup and you’re ready to go? Or increase body temp, general warm-up, then specific warm-up??
– Jeffrey Giles
I think you can absolutely do both – all of the basic physiological stuff that we know works, while still doing the things that improve movement quality as well.
What is your recommendation for the first-lift-specific warmup (ie., warmup sets) after a trainee completes the general pre-session warmup?
– Laura McNally
This is another great question!
There’s the obvious trade-off here…
…on one hand, you want to be primed and ready for the workout…
…but on the other hand, you don’t want to fatigue yourself and get tired before you actually start lifting!
So how do you accomplish that? Here are a few thoughts:
If you are doing so many warm-up sets that you’re fatigued before you start lifting, either you are just doing far too many warm-ups, or you’re horribly out of shape. If it’s the former, I’ll try to help. If it’s the latter, you need to get into better shape first!
I think the magical number of specific warm-ups is somewhere between 3 and 7 sets
Vague? Yes. But consider the difference between two lifters:
- Lifter A: 242 pound male, 700 pound raw squat, hitting 500 for 5 reps in this workout.
- Lifter B: 105 pound female, 135 pound raw squat, hitting 105 pounds for 5 reps in this workout.
Can you imagine that these two lifters may need different amounts of warm-up sets to prepare for their big set?
Without giving strict percentages, here’s how I’d warm-up each of these lifters for their specific workouts:
Lifter A
Bar x 5
135×5
225×5
315×5
405×3
455×1-2
500×5
Lifter B
Bar x 5
Bar x5
65 x 3
85 x 1
105 x 5
Remember, if you go through a thorough general warm-up, everything should be moving and shaking well.
 The focus of a specific warm-up is to groove a solid pattern and get your mind right for your work sets. That’s it.
This is a great question (and probably could be an entire blog post in and of itself!), but hopefully I’ve helped answer this age-old question.
How do you vary your warmup for different exercises (like for a bench day vs. a squat/deadlift day)?
– Taryn Wahl
I answered this above to some degree, but again, think general to specific.
A general lower body warm-up could promote an increase in tissue temperature, nervous system conductivity, catecholamine release, etc. that will benefit your upper body workout.
The difference will be in the specific portion of your warm-up.
If you are addressing some underlying mobility issue (such as shoulder mobility), you should do some corrective work to bring up shoulder mobility first, even if it’s not “specific” to your workout.
Last but not least, you could create a separate warm-up for your upper and lower body days. I’ve done this in the past, and it definitely helps break the monotony.
With SMR, is it necessary to pause on adhesions for 30 seconds or can you keep rolling out?
– Isabelle Libman
I don’t know if it’s necessary, but it definitely seems to help. The combination of pausing plus controlled/deep breathing really takes it up a notch.
Most importantly, I would recommend slowing down when you roll. Kudos to Dean Somerset for turning me onto that ninja tactic.
Would your warm-up be just mobility drills? Or would it include more dynamic stuff like jumping rope, jumping jacks, etc?
– Donovan Chee
Jumping jacks and things of that nature are fine in the general warm-up (even before the reset), where the goal is simply to prime our physiology.
I don’t think these exercises alone, however, will prepare us for our workout as the range of motion you go through is quite small.
One thing to note: The above warm-up is great prior to hitting the gym, but if you play sports, you need something more dynamic/movement oriented prior to practice or competitions.
Try using one of the above exercises, superset with something more dynamic/movement-oriented in nature (skips, bounds, carioca, shuffles, etc.)
Seriously what is the bare-minimum that I MUST be doing everyday? If worse comes to worse and i am going to train, but don’t have a ton of time what should I do?
– Wil Fleming
Another great question, and one I answer all the time.
I think the below table may help, and we’ll use it on a sliding scale between “Optimal” warm-up, and “MR is going to RAGE!”
It may look something like this:
|
Optimal |
Sub-Optimal |
Barely Tolerable |
Full on RAGE |
|
|
SMR |
5 Areas |
3-4 Areas |
1-2 Areas |
None |
|
General Warm-up |
6-8 Exercises |
4-6 Exercises |
2-4 Exercises |
None |
|
Specific Warm-up |
5-7 Sets |
3-5 Sets |
1-2 Sets |
None |
Of course there are exceptions to every rule, but the scale above is at least in the ballpark.
Which is better – static or dynamic stretching prior to athletic activity?
– Chris Strykowski
Ahhh the age-old question, and I think I have a new(ish) take on this.
If you read any pertinent literature that’s worth its salt, they’ll tell you that dynamic stretches are preferred over static prior to practice/competition. But here’s another way to think about it…
In my opinion, static stretching is either corrective or restorative in nature.
If you lack flexibility, this is something you should be doing in order to get yourself right. Before practice or a game, the goal is to dominate – NOT to constantly address issues that should be left out of the athletic arena.
It’s not that these things aren’t important – they are, or I wouldn’t have a popular blog and website that talks about these things!
But what I think is critical to understand here is the timing of when we do things. If your movement quality sucks so bad you need static stretching to get into the appropriate positions, are you really prepared to play that sport?
Think about that one for a second….
Like all of these answers, the answer is unique and situation dependent. If an NFL linebacker has crappy hip flexor length, it’s not like they’re going to sit his ass on the bench when a playoff berth is on the line.
But if your goal is to dominate a rec-league softball tournament, you’d be wise to address those little issues NOW, before they become big issues.
Does a hot shower count as a warm up before a stretch? I have seen from some “experts” it does but MR gets last word!
– Paul Ashley
I’m assuming you mean for a more “restorative” stretching session such as static flexibility before bed.
And if that’s the case, I definitely prefer a hot bath/shower before said session. I feel looser as though I can “get into my stretches” more.
Totally anecdotal, but sometimes I just roll with what works!
What’s the relative importance of raising core temp and catecholamine activation, as opposed to establishing optimal ROM and practicing specific movements?
– Lou Schuler
I think this part is vastly under-rated, and why I made it such a big part of this post.
I’m a biomechanics guy at heart – I love optimizing movement and making people feel awesome and lift heavy things.
But in order to do that, a general warm-up that addresses the underlying physiology is critical, at least in my opinion.
I don’t think it has to be an “either-or” proposition – do both, and reap the benefits.
Should a warm-up be different for different individuals, just like personal training? Or should it be more generalized?
– Hidayat Ozz
I can’t say this strongly enough…
Yes!!!!
Everyone is unique with regards to what they need – mobility, stability, motor control, etc. While the warm-up above is great and covers all the bases, you have to figure out what your specific limiting factor is, and address it accordingly.
By the way (shameless plug alert!), consider picking up a copy of Assess and Correct, where we address this stuff in-depth and help you create a customized warm-up based on your specific needs.
What are the long-term consequences of chronically warming up poorly or insufficiently?
– Brendan Kavanagh
Here are a just a few I can think of, off the top of my head:
- Increased wear and tear on joints,
- increased likelihood of soft-tissue injuries,
- decreased or sub-optimal performance.
None of those sound terribly appealing to me.
And keep in mind, there are people out there that will never warm-up a day in their life, move heavy weights with ease, and never get injured.
And on the flip side, there are people who will literally do (almost) everything right, follow this to a “T,” and will never move heavy things and always seem to be injured.
Remember, sometimes N=1.
How do we get clients to do it?! Are there 2 or 3 killer facts that help you convince them?
– James Chandler
The easiest thing to do would be to NOT make it an option! We get ZERO blowback from our clients, because they know the warm-up is a critical component of their workout.
And along those same lines, don’t forget that they came to you for your expertise!
If you value their warm-up, and know the benefits it will provide them, it should be a non-issue for you as well.
Here are a few more things you can do:
Refer them to this post. I would think that everyone could find something that benefits/motivates them in here.
Sell them on what they want.
Want to be a better athlete? A warm-up primes you for optimal performance.
Want to get healthy? This warm-up helps us address the specific issues or limitations that are holding you back.
It’s no different from selling someone on your program, services, or anything else in life – find the common ground and then build a bridge to meet them where they’re at.
Summary
In my opinion, there’s no arguing this simple fact:
Warming up is a critical component of an optimal workout.
I sincerely hope the information contained in this post helps you move, feel and perform at a higher level than you are now.
And if you liked the post, please take a moment to forward it on to your friends via Facebook, Twitter or e-mail. Your support is what keeps me motivated and I appreciate it more than you know!
All the best
MR
PS – Don’t forget – if you want to learn more about how to customize a specific warm-up for you, Assess and Correct is where it’s at. Check it out now!