Note from MR: Tony Gentilcore is one of my favorite fitness writers, simply because he makes reading a ton of fun.
In this article, he dives into three things you should consider when coaching or training the squat.
And if you enjoy this article, definitely check out Tony’s Even More Complete Hip and Shoulder Blueprint, which he co-produced with Dean Somerset.
But enough from me…here’s tony!
There are many moving parts to squat technique and I’m a firm believer that there’s no ONE right way to perform the movement.
When you take into account people’s training history, injury history, goals, ability level, not to mention their anatomy, it’s bit absurd to think there’s only one way to execute the squat that will have carryover to millions of people in the weight room.
I’m not a Sith; I don’t deal in absolutes.
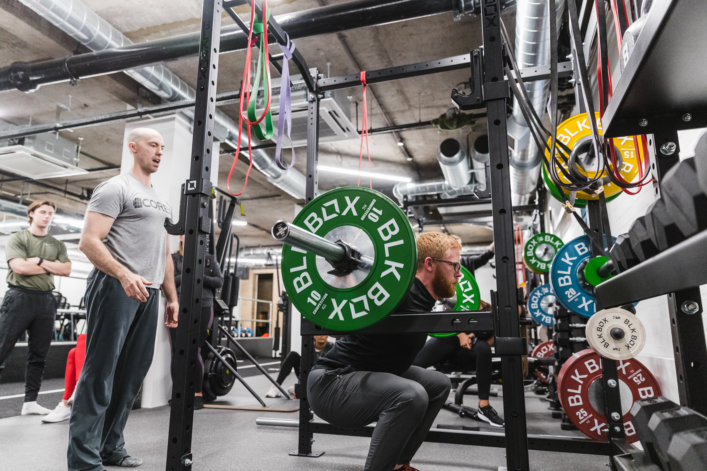
That being said, there are a handful of things I don’t want to see when I watch someone perform a (loaded) squat.
- Rounding the Lower/Upper Back (loaded flexion is a big no-no with regards to spine health).
- Heels coming off the ground.
- Explosive diarrhea.
That’s pretty much it.
Yeah, that’s right: I could care less about things like low-bar vs. high-bar position, hand position, or any other minor detail the internet likes to argue over.
To be honest, someone’s daily horoscope or the hangnail on their left index finger will have more of an effect on their squat performance and technique than anything listed above.
Okay, I’ll back track a bit. I don’t want too many people to start hyperventilating into a paper bag.
It’s not lost of me that details such a bar and hand position may allow someone to lift more weight; I get it. I just feel there are more important things – tenets – to hone in on with regards to squat technique.
And they are:
1 – Understanding Everyone is Different
I’ve read the same list of books you’ve likely read, and I believe there’s a lot of value in reading them.
They set the foundation for our understanding of anatomy and movement.
However, I’ve long championed the notion that there’s no such thing as “textbook technique.”
We don’t live in textbooks.
The set-up, stance, depth, etc that works for one individual and allows him or her to:
- Squat a lot of weight, and
- To do so pain free…
…may be in stark contrast to what will work for another individual.
Anatomy matters.
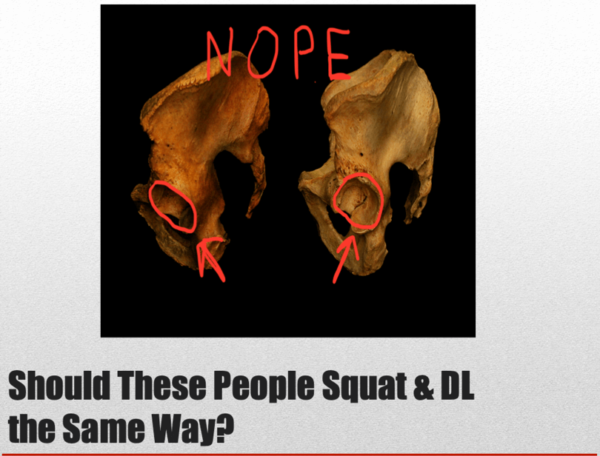
We can see, with our own eyes, that this statement has validity.
The pelvis on the left has a hip socket that’s more anteverted (front facing) compared to the pelvis on the right (retroverted). Moreover, we have no idea what’s happening on the other side.
We’re asymmetrical creatures by default.
To say both of these examples should mirror one another in terms of how each person would execute their squat (or deadlift) is cra cra.
One will have more access to hip flexion and (likely) have a deeper squat, particularly with a narrow(er) stance. (Left).
One will likely prefer a wider, more out-toed stance compared. (Right).
One is a Sagittarius while the other is a Libra. (Don’t worry, it’s science).
And all of this is just one minuscule part of the entire equation.
We’d also want to consider and respect anatomical variances in ante/retroversion of the femoral head, lengths and torsion of the femoral neck, lengths of femurs/tibias, in addition to torso length.
SURPRISE –> none of you reading is Superman and has x-ray vision, so how in the heck do we ascertain this information?
Well, you watch people squat.
You watch to see if or when they lose lumbar position as they descend lower into the squat stance.
This is their active squat.
You can then see if their passive squat “matches” their active squat by performing a basic hip scour assessment, popularized by Dr. Stuart McGill.
The objective is to see if the active movement (they’re doing the work) matches their passive (I’m doing the work). From there I’d want to compare the gap, if any, that exists between the two.
I want the gap to be as narrow as possible.
If their active squat is poor (excessive knee valgus, rounding of lumbar spine, or limited range of motion), yet when I re-assessed passively (as in the video) their range of motion improved, then I could surmise with a high degree of certainty that they’re likely not dealing with something more nefarious, like a bony block or musculature issue.
In this scenario I can do my job and coach.
I can implement the appropriate “correctives” and/or exercise progressions/regressions to help them find their squat. They showed me success passively, so I need to show them how to do the squat actively.
If, however, there was no improvement between passive and active screens then:
They’re screwed. There’s no hope.
Kidding.
- I can still work within my scope and train them with the ROM that’s pain free and that they can control.
- I can refer out for more diagnostic testing or manual therapy to compliment their ironwork.
Moreover, to add a bit more context, I am not opposed to taking more of a trial-n-error approach to squat technique and experimenting with varying (asymmetrical) foot stances or widths to see what feels better for the lifter.
If adopting a staggered stance feels better or maybe externally rotating the right foot allows for more depth then why wouldn’t I lean into this?
I don’t feel we’re doing a disservice to clients and athletes adopting this approach. In fact, I’d make the argument we’re doing more harm by pigeon holing people into symmetrical stances (jamming square pegs into round holes) compared to allowing for a bit more experimentation and individualization.
2 – Create a Flexion Moment
I want three joints to do the bulk of the work when squatting:
- The Ankles
- The Knees
- The Hips
NOT the lower back.
One common mistake I notice when coaching the squat is that many people resort to initiating the descent by “breaking” with their lower back – and sitting back – rather than squatting DOWN with the ankles, knees, and hips.
A game changer for most trainees is the concept of creating a FLEXION MOMENT with their abs and to own the canister position.
Think of the canister position as stacked joints.
Your rib cage should be “stacked” on top of your pelvis. You can get a general visual from the picture below; my bottom hand represents my pelvic floor and my top hand represents my diaphragm and ribcage

The idea is to maintain this position when lifting heavy things.
If you don’t, and you “fall” into the scissor position (where your pelvis goes into anterior tilt and your ribs flare up), Voldemort wins.
YOU’RE SUCH A JERK!!
Okay, in actuality, all that will really happen is you’ll default into a more unstable position and your lower back will eventually hate your guts.
Use your abs to create a flexion moment so that you can’t use your lower back.
You’re welcome.
3 – Find and Maintain Appropriate Foot Pressure
I will be the first to admit I don’t have a world-class squat, but one thing that’s made a huge difference in my squat – and that of my clients – is the idea of foot pressure.
Credit to Chad Wesley Smith for opening up my eyes to it.
It’s important to keep the barbell over the mid-foot when squatting. Rather than falling prey to the mental gymnastics of trying to figure out if you’re actually doing it or not, just remain cognizant of your feet.
If you place too much weight into your toes, your heels will come off the ground.
Conversely, if you place too much weight in your heels, your toes will come off the ground.
Press your big toe into the floor and then make sure you also have “pressure” on your pinky toe and heel.
Find your balance.
Now, when you descend into the hole try to stay more aware of maintaining that constant foot pressure.
If you do so, the bar path will sort of take care of itself.
I.e., the barbell will stay over mid-foot. You want fold forward and you want fall back.
The other part to consider is that when you’re in the hole, DO NOT relax. Maintain tension and maintain your foot pressure.
And That’s That
All of this isn’t to insinuate I’m right and you’re wrong. Like I said at the beginning, there are many moving parts to the squat.
That said, in terms of a few tenets or universal cues that work well for just about everyone, I hope what I discussed above makes sense and resonates.
Give them a try and don’t let Voldemort win…;o)
Tony
BTW – Don’t forget…if you’d like to learn more from Tony, be sure to check out his newly released Even More Complete Hip and Shoulder Blueprint, which is on sale this week!
3 DAY COACH'S CAMP:
 Write better programs
  Learn how to motivate clients outside the gym
  My most popular resets for instantly improving movement quality