(Photo Courtesy of Steve Gabrielsen)
The arguments for and against round back deadlifting have been around for ages. Recently, however, it seems as though the back-and-forth banter has reached epic proportions.
As a result, we’re left with numerous questions:
- Should the average fitness enthusiast perform round back deadlifts?
- Are we stronger this way?
- Are round back deadlifts dangerous for our back?
They’re all fantastic and relevant questions, so I figured I’d take the time to write-up my opinion on the matter. And if you haven’t read it yet, I’d highly recommend checking out my original Deadlift blog.
I also want to make it clear up front that while there are stronger people out there, I’m not one of those writers who pens articles and never actually lifts weights.
Last year I hit a personal best deadlift of 545 pounds at a bodyweight of 180.6, putting me into that elusive (at least for me!) “3x Bodyweight Deadlift Club.”
Basically, I know a thing or two about deadlifting, and I want to keep you deadlifting those big weights for as long as possible!
Laying the Foundation
Before I tell you whether round back deadlifting is a good idea, I want to give you a small overview of the factors that influence the deadlift.
While this may be a bit roundabout, the better your understanding of the spinal anatomy and factors that influence performance, the better you’ll be able to discern whether you should (or should not) deadlift with a round back.
Spinal Anatomy
Before we get into the meat and potatoes of the article, we need at least a cursory understanding of the spine – its alignment, its motions, and the different types of loads and stress we place upon it.
WARNING: I’m going to get a little geeky here. It’s important stuff, but if you want to skip ahead I’ll forgive you.
The spine is a series of curves. As babies, we all start in a position of flexion which is called our primary curve.
As we grow, we start to develop secondary curves, or a lordosis, in the lumbar spine and neck. If you’re a visual person, think about when a baby is laying on their stomach and wants to look up to see mommy or daddy. They have to extend their neck to do this.
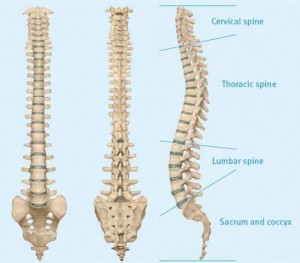
So we essentially have four different curves or sections of our spine:
- The cervical spine (lordosis). There are seven cervical vertebrae.
- The thoracic spine (kyphosis). There are 12 thoracic vertebrae.
- The lumbar spine (lordosis). There are five lumbar vertebrae.
- The sacrum and coccyx (kyphosis).
Let’s break this down even further, discussing the vertebrae themselves. Vertebrae are the bones that make up your spinal column.
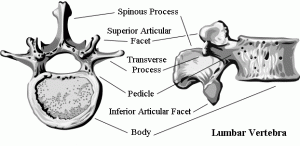
The front part of a vertebrae is called the body. Behind the body is the intervertebral foramen, which houses your spinal cord.
The back part of your vertebrae has numerous bony prominences. Extending from the back is your spinous process, and to the sides you have your transverse processes. The transverse and spinous processes are attachment points for various muscles of the back.
Finally, extending above and below you have your superior and inferior facets. The inferior facets on a vertebrae above articulate with the superior facets on the vertebrae below to build a joint.
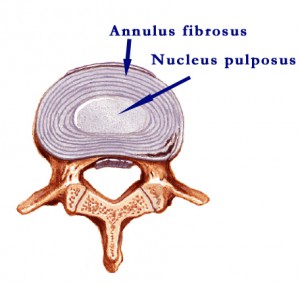
In between each vertebrae, you have what’s called an intervertebral disc. These are there not only for shock absorption, but perhaps more importantly for increasing range of motion. If the spine were simply a series of vertebrae stacked on top of each other, range of motion would be incredibly limited.
A disc can be thought of as a marshmallow with a jelly filling. The outside of the marshmallow is called your annulus, while the jelly filled center is called the nucleus. My apologies if this analogy has thrown you off your diet, or made you spontaneously rush to Krispy Kreme!
Now that you have an idea of the different areas of the spine, let’s talk about the motions you have at your spine.
Movements of the Spine
There are four primary movements of the spine. While many of these motions aren’t pure (they are actually combinations of two or more motions), I really don’t think we need to get that specific for this particular article.
If you want a great reference text on the lumbar spine, consider picking up a copy of Nikolai Bogduk’s Clincial Anatomy of the Lumbar Spine.
The four movements of the spine are:
- Spinal flexion, or forward bending.
- Spinal extension, or backward bending
- Lateral flexion, or side bending.
- Spinal rotation, or rotating your spine to one side or the other.
When it comes to the spine and the anatomy involved, each area or section of the spine is built a little bit differently. One of the first rules we learn in anatomy class it that structure dictates function.
If you examine how each section of the spine is built, it will give you a little insight as to what movements it will be best (or worst) at.
The cervical spine according to the joint-by-joint is a mix of mobile and stable segments. The lower cervical spine (C3-C7) should be stable, while the upper cervical spine (C1 and C2) should be mobile. The cervical spine is also fairly balanced in its ability to flex, extend, side bend and rotate.
The thoracic spine has direct attachments to the rib cage, making it’s ability to flex and extend quite very poor. However, that doesn’t mean it shouldn’t move at all!
The thoracic spine actually has the most rotary capacity per segment (typically 7-9 degrees), which adds up to over 70 degrees of total rotation!
Finally, the lumbar spine is primarily built for flexion and extension, and according to the joint-by-joint its focus should be on stability. While it does have some rotary capacity (0-2 degrees per segment), it’s definitely not as “rotation friendly” as the thoracic spine is.
Panjabi (1) introduced the concept of a “neutral zone” for your spine.
Quite simply, there is a zone where you should keep your spine that is within normal (neutral) limits, and the further you move away from that position, the more likely you are to get injured.
This is important to mention, as researchers such as Stuart McGill have noted that while you can injure your back at any point in time, you’re more likely to do so at the end ranges of motion. The most specific example would be if you tried to lifting something from full lumbar flexion; the technical term for this is “Bad News Bears.”
So we’ve covered your spinal anatomy and the motions you have available to you. Let’s finish off by discussing the various forces your spine has to control or absorb on a daily basis.
Forces on the Spine
Spinal compression occurs when the vertebrae are “pressed” together, or when the intervertebral disc is compressed.
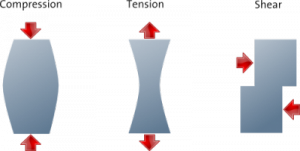
On the other hand, spinal tension is the opposing force to compression. Also known as “traction,” tension occurs when the vertebrae are pulled away from each other, or when the disc is distracted.
A great example of compressive force is when something is literally pressing down on your spine, such as when you have a bar on your back to squat.
Compressive forces are highest when you’re very upright in posture. Therefore, you’d deal with more compressive forces in a front squat versus a back squat.
Shear forces occur when one vertebrae is sliding forward or backward on the vertebrae below it. Shear forces are going to be most prevalent when you’re in a bent-over position, as the muscles on the back side of your body are literally trying to keep your vertebrae from sliding forward on one another.
Shear forces will be the highest the more bent-over you are. In a sumo deadlift where you’re more upright, there will be more compressive forces on the spine. In a conventional deadlift where you’re more inclined or bent-over, there will be more shear force.
Torsion forces occur when one vertebrae is rotating on top of the one below it.
I sincerely hope you don’t have to combat rotational forces through your spine when deadlifting, so we’ll leave that one alone.
Active versus Passive Stability
Another concept I want to discuss is the difference between active and passive stability.
Passive stability is when your body relies on bones, ligaments and joints to create stability or resist movement.
Try this: Wherever you are sitting, try to arch your back as hard as you can.
Even if you don’t currently have back pain, I hope we can all agree that this doesn’t feel good!
Depending on how old you are, sport or lifting coaches may have taught you this strategy as a way to stabilize yourself to squat or deadlift.
Here’s the problem with that…
When you arch really hard through your back, you are compressing your facets (the big, bony prominences on the back side of your spine) together in an effort to create stability.
But wait, there’s more!
When you hyperextend the lower back, you also drive your pelvis into a position of anterior tilt. When you fall into anterior tilt your abs are lengthened on the front, as well as your glutes and hamstrings on the back.
When your lengthen the glutes and hamstrings, this makes locking out those deadlifts an exercise in futility.
Instead of being in a neutral pelvic position where you activate your glutes and finish with the hips, you’re forced to continue hyperextending through the lower back to “finish” the weight.
Done repeatedly, you start to wear away and grind down those facet joints.
Unless you like the sounds of words like “arthritis” or “degenerative changes,” you’d be best served to find an alternative!
Active stability, on the other hand, is what you should be chasing. Instead of relying on bones or joints to approximate in an effort to create stability, we’re looking to utilize the muscles surrounding the midsection to support and stabilize the spine.
When we do this, our joints are in an optimal position to not only stabilize loads, but to overcome them as well.
Furthermore, ideal posture minimizes the risks associated with heavy lifting, and distributes the load more evenly across the body.
The bottom line? If you get into a more neutral alignment, you’re more likely to use active stability versus passive stability. And when you do that, you’re not only stronger, but healthier to boot.
The Breath and Stability
Hopefully we can all agree that, whenever possible, we want to rely on active stability versus passive stability.
To move the heaviest weight possible, we need maximal stability. If you want proof, just think about how much stronger you are in a leg press than you are a squat.
When you’re more stable, you maximize prime mover function.
And more prime mover function equals more strength and power!
Stability is best created from the inside out, and it may help to think of your “core” as a box.
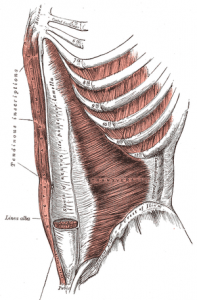
- On the top, you have your diaphragm.
- On the bottom, you have your pelvic floor.
- In the front, you have your abs (rectus abdominus, internal and external obliques, and transverse abdominus).
- In the back, you have your lower back (multifidi, spinal erectors, etc..)
- On the sides you have your obliques and quadratus lumborum.
When things are moving and shaking well, the breath initiates your stability. You take a deep, diaphragmatic breath, and then lock down or “brace” your midsection.
This combination of intra-abdominal pressure (created by the breath), combined with active muscle tension (the brace) is the best way to effectively stabilize your spine.
Here’s what you don’t want to have happen, though.
Due to ineffective breathing patterns, many will take a big breath in and immediately hyper-extend their lower back.
They then set their brace on top of this hyper-extended position, which we agreed earlier isn’t maximally effective.
Think about the typical cue that you get when powerlifting:
“Take a big breath and push your belly out into your abs.”
– Every Powerlifter, Ever
If you don’t believe me, go to a mirror and try this yourself. Trust me, I’ll wait!
When you simply focus on “pushing your abs out,” you’re creating an inherently sub-optimal stabilization pattern. You’re pushing yourself into a position of excessive lumbar lordosis and anterior pelvic tilt.
Instead of simply pushing your abs out, try this instead:
Take a breath in, and then exhale slightly, allowing the ribs to come down.
Now, while keeping the ribs down, take a fully breath into the belly. It may help to think about breathing into your back.
From here, brace your core and lower back for the best of both worlds.
The day I put all this together, I went in the gym having not deadlifted heavy for at least 2 months.
I wasn’t “training” for anything.
Yet I hit a huge 30 pound personal record (PR) on my deadlift against bands.
http://youtu.be/38x6oa05ftk&&w=590
It’s not pretty, but it worked!
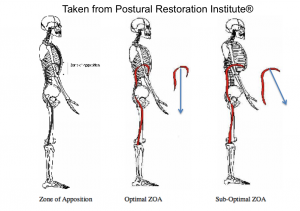
www.PosturalRestoration.com
When the ribs are down, you can get a more effective zone of apposition (ZOA). When your ZOA is dialed in, it should feel as though air is moving to the front, sides, and even into your back.
And that’s what I’d call maximal stability!
If you use a belt, here’s my good friend and business partner Bill Hartman teaching you how to brace effectively using a belt.
Ideal Deadlifting Technique
Okay enough foundation, let’s get into the heart of the matter!
When we discuss the deadlift, we have to understand that everyone reading this has a unique body, unique limb lengths, individual goals, etc.
With that being said, I’m going to outline what I consider to be ideal lifting technique for the average person that comes across this post. If your goal is to hoist a world record deadlift, then the rules are definitely different and we’ll get into that more as well.
Remembering our spinal anatomy, we know that our spine is happiest when it’s in a neutral alignment from top to bottom. Furthermore, this is also the position where our spine is the strongest and best able to resist injury.
When setting up to deadlift, your goal should be to get your hips down to a point where your spine is neutral from top-to-bottom. This quick checklist should help:
- Lower back neutral, not flexed or hyperextended.
- Chest up, without allowing the lower ribs to flare (which would indicate hyper-extension at the mid/lower back).
- The chin neutral, with the gaze looking up through the eyebrows.
I’ve covered this extremely in-depth before, so if you haven’t read my Deadlift blog, I’d start there. If you don’t want to read through all that, here are two quick video primers on neutral spine and neutral neck positioning.
Furthermore, it’s important to think about initiating the deadlift by pushing away from the floor, and/or by leading with the chest. Both will help keep your hips and torso moving at a similar rate.
What tends to happen (and what I did for years!), was to allow my hips to shoot up too fast, which would not only lock my knees out too soon, but would throw all the stress onto my lower back.
Needless to say, this is not an ideal way to finish a deadlift!
Should I Round Back Deadlift?
When you deadlift with a round back, this puts an incredible amount of stress on the posterior elements of your spine.
The round back position forces you to not only resist shear forces, but flexion as well. This compresses the anterior portion of your disc, which forces the elements of your disc to the back.
In layman’s terms, if you value the long-term health of your spine, this probably isn’t something you want to do on a daily basis!
But here’s the real kick in the pants: You would assume that if you flex or extend your back, that there is equal pressure distributed across all the individual joints.
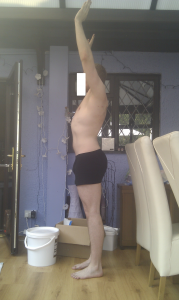
This is a dangerous assumption to make, as most people hinge from one portion of their spine. This segment is hypermobile, which means they get too much motion from one specific area and thus wear it out faster than the adjacent joints.
Think about it like this – how often do you hear about someone blowing a disc in their back?
They don’t blow all the discs, they blow one or two specific discs.
The opposite end of the spectrum isn’t a good idea, either. And in fact, this may be even more common nowadays than the round-back variety.
While you see desk jockeys that walk around in a posterior pelvic tilt/flat back alignment, what we’re seeing more and more of these days are people who are locked in lumbar extension.
These people are literally crushing the back side of their disc and spine all day, and when they go to deadlift this only gets worse. They hyperextend the spine even further, which literally compresses the facet joints together and crushes the posterior portion of the disc.
Now let’s talk about the worst case scenario, if I haven’t scared you straight already….
What you’ll see most frequently is someone who sets up in a hyperextended starting position. So before they do anything, they are crushing their spine on the back side.
Then when they initiate the lift, they lose their arch and immediately “whip” themselves into flexion. The hips shoot up, the knees straighten out, and they’re forced to rely on their lower back to finish the weight.
To put the icing on the cake, they have weak glutes and can’t extend their hips, so they seal the deal by hyperextending the spine to lock the weight out.
I hate to tell you this, but this is murdering your spine. I can’t think of any nice way to put it.
But let’s ask and answer the big question I know you’re all wondering.
What Type of Deadlift is Best For ME?
There’s a huge difference between deadlifting to get stronger and feel good, versus deadlifting to win an international-level powerlifting competition or to lay claim as the strongest man (or woman) in the world.
If your only goal is to use the deadlift as a vehicle to get a bit stronger, look or feel better, I would highly recommend keeping the spine as neutral as possible. Unless it’s a fluke accident, you should never have a client or athlete get injured deadlifting.
On the other hand if your goal is to be the strongest human being in the world, understand that there are risks associated with that.
To minimize the damage, here are a few things strategies you should employ in your training:
- Deadlift heavy less often. You simply can’t recover if you’re deadlifting heavy week in and week out. Consider doing lighter speed/technical work one week, and then going heavier on the following week. Alternating in this fashion can do wonders for minimizing stress.
- Maintain your hip mobility. So many people we work with are big and strong, but their hip mobility sucks. This puts more and more stress on the lower back, which is never a good thing. Keeping the hips mobile not only reduces stress on the lower back, but helps more effectively load the glutes and hamstrings as well.
- Keep your anterior core strong. It’s virtually impossible to keep your ab strength on par with your lower back (especially as you get stronger), but you need to keep it as balanced as possible. The more imbalanced you get from front-to-back with regards to core strength and stability, the more likely you are to get injured.
- Only deadlift with a round back on maximal attempts. Maintain neutral spine as long as possible while working up to your heavy sets, and realize that when it’s time to “perform,” your goal is to lean on the patterning you develop with the light weights.
- Avoid end-range lumbar flexion. Dr. McGill will tell you the end range of lumbar flexion (the last 2-3 degrees) are the most injurious. Avoid this at all costs, and if you get into a bad position, simply drop the weight. Better to be smart and avoid a major injury than show your buddies in the gym how you can really “grind it out.”
Mike, you’re just one of those “technique” guys – why should I listen to you?
I’m really not. I’ve competed on and off in the sport of powerlifting for 12 years now, and I’ve had my share of flat-out ugly deadlifts.
More importantly, I’ve worked with some of the strongest athletes in the wold via my relationship with Elite Fitness Systems. I realize that max effort deadlifts aren’t always going to be pretty, and the spine won’t always stay in this 100% neutral, biomechanically perfect position when the weights get to bar-bending levels.
I’m a realist here – trust me.
All I’m saying is that if you value your long-term health, and want to perform at a high level for a long period of time, follow the above suggestions.
You’ll not only be stronger, but you’ll stay healthier to boot.
Summary
Unless your goal is to become a national champion powerlifter or win the title of World’s Strongest Man, round back deadlifts probably aren’t a smart addition to your training regimen.
However, if you want to lift the heaviest weights possible, understand that keeping the spine completely neutral probably isn’t going to happen, either. Do your best to avoid end range lumbar flexion, and know when to bail on a lift when and if necessary.
Now get off the damn computer and go pick up something heavy!
Stay strong
MR
P.S. – If you enjoyed this post, please help me spread the word by e-mailing it to a friend, sharing it on Facebook, or throwing it some link juice on Twitter. I’m spending a ton of time on these and I hope you are enjoying them!
References
Panjabi, M. (1992). The Stabilizing System of the Spine. Part I. Function,
Dysfunction, Adaptation, and Enhancement. Journal of Spinal Disorders and Technique. Vol. 4(5); 383-389.

