8 years ago, I suffered a knee injury that caused me to radically changed the way I look at my body.
When you’re young and healthy, you may take what you have for granted.
But if you’ve ever had an issue with any joint in your body, you quickly realize how important it is to move and feel well. A minor injury at virtually any joint can drastically impact how you function in everyday life.
Even though I haven’t talked about it as much recently, I’m still as passionate as ever about helping people improve their knee function. And over the past few years, I’d like to think I’ve learned a thing or two about optimizing knee performance.
Rather than bore you with a long-winded build up, let’s get right into the meat and potatoes of this article. If you want bulletproof knees, you’ve come to the right place!
I can tell a lot about someone’s knee simply from looking at their static posture alignment.
While many are quick to look solely at the knee, I think you need to look both above and below to determine if someone’s knee has the foundation to move and feel great.
When looking at a new client’s static posture, I’ll look at all of the following joints:
- Lumbar spine,
- Pelvis,
- Hips,
- Knees,
- Ankles and Feet.
The entire body works as a seamless, cohesive unit, so an issue above or below the knee can drastically impact knee function.
To improve alignment, I’ve been fiddling around with what I call “The 3S’s” of healthy knees. The three S’s are:
- Stack in the sagittal plane,
- Slide in the frontal plane, and
- Swivel in the transverse plane.
Let’s look at each in a bit more depth.
Step #1 – Stack the Knee
Stacking the ankle, knee and hip in the sagittal plane is our first step towards achieving optimal knee function.
If someone presents with an anteriorly tiled pelvis, a ton of hip flexion, and they can’t fully extend their knee, I can almost guarantee their knee is going to get beat up.
An analogy that I’ve used for years is that the knee is a dumb joint. The hip and the ankle/foot complex dictate not only the position of the knee, but what it’s capable of doing as well.
Here’s another way to think about it:
We’ve all heard the saying, “If mama ain’t happy – nobody’s happy.”
In the case of your knees, if your hips and ankles aren’t happy, your knees ain’t happy!
I talked about this pretty extensively in my blog post on knee strengthening exercises, but I’ll recap here as well.
The goal should be to stack your pelvis, hip, knee and ankle on top of each other. When you combine full range of motion at all of these joints with adequate strength and control in the sagittal plane, you have the foundation for a really happy knee.
Unfortunately, a lot of the clients I’ve worked with over the years struggle to get full hip extension. This can be challenging, as a lot of our clients are using their hip flexors and lumbar extensors 20,000 times each and every day to help them breathe!
Focusing on and improving respiration has been a game changer for us at IFAST. I feel as though we were doing a lot of the right things 3-4 years ago, but breathing was the missing link.
If you’re serious about improving hip extension, you need to fix breathing patterns first. Failure to do so may lead to some progress, but ultimately, you’ll be limited in what you can accomplish.
As I sit here and write this, it’s even a bit more clear. It’s a step-by-step process:
- Improve respiration patterns, so you don’t need to use your hip flexors/parapsinals to breathe. This lays your foundation.
- Foam roll/stretch/mobilize the hip flexors and parapsinals. This will work far better, now that you’ve optimized respiration.
- Finally, strengthen the gluteals, hamstrings and anterior core.
We always did #2 and #3, but #1 is the starting point and gives us a solid foundation to work from.
More importantly, it addresses the underlying issues and allows the changes you’re trying to make stick.
Even though hip extension is critical, I can’t stress enough that knee extension is critical as well.
Too often, clients I evaluate with knee issues have horrible knee mobility. You should have 5-10 degrees of hyperextension at the knee joint, and the end-feel should be soft.
Those with knee issues not only lack this full range of motion, but also have a hard or abrupt end-feel.
Poor knee extension could be due to a handful of issues:
- Poor pelvic alignment (too much posterior tilt or a swayback posture),
- Weak quads,
- Stiff hamstrings,
- Stiff calves (gastrocnemius), or
- A stiff superficial back line (fascial).
I’m sure there’s more, but you get the point – it could be a lot of things!
And while I’d love to know with 100% certainty why someone presents that way, ultimately, my biggest focus is on getting their knee extension back at all costs.
If I work with someone who has a knee extension limitation, I like to incorporate the following modalities:
- Static stretching to shut off the back side, while giving them a chance to facilitate quad recruitment and simply get into the correct position. Focus on full dorsiflexion at the ankle, coupled with knee extension/quad contraction up top.
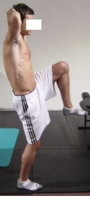
- Dynamic exercises like leg lowering drills to tie it together and reinforce it with actual movement (see video below).
- Strengthening exercises such as step-ups to further build strength in the quadriceps.
The sagittal plane is the critical first step in optimizing knee health. Without it, I feel as though you’re fighting an uphill battle.
Step #2 – Slide the Knee
Once you’ve cleaned up the sagittal plane, you need to move on to the frontal plane. Too often, someone’s knee alignment may look great from the side but when viewed straight on it’s obvious that they have frontal/transverse plane dysfunction.

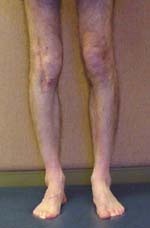
Here’s a picture of a former client we worked with at IFAST. This young man had been diagnosed as having “tight hamstrings and growing pains” by a leading knee doc, but their assessment was focused solely on the knee joint.
If you take a step back and look at the big picture, I think we can all agree this kid had some alignment issues we could address and improve upon!
When looking at the frontal plane, your goal should be to slide the knee joints so that they are directly underneath the hips and pelvis.
If the issue is solely in the frontal plane, all you have to do is balance the hip abductors and adductors. I’m going to water this down a bit, but you can put frontal plane dysfunction into one of two categories:
- Stiff/short abductors, long/weak adductors, or
- Stiff/short adductors, long/weak abductors.
For example if you are stiff on the outside of your left hip, your left hip abductors will push you over to the right. This will lengthen the adductors on your left hip. The opposite will happen on the right.
Once you’ve realized this is a problem, our standard toolbox can help lay a foundation (soft-tissue work, activation drills, etc.) to turn the appropriate muscles on or off.
But what happens when it’s time to actually do fun things, like lift weights?
The natural thought would be to do more single-leg work, right?
After all, single-leg work will maximize development in the frontal and transverse planes?
This is true – and that’s exactly why I would not start someone there.
Single-leg work maximizes stability demands. You have an incredibly small base of support, so your body is forced to “create” that stability on its own.
But if you don’t have stability, or you’ve just learned to create it, putting yourself in a single-leg environment may be a case of too much, too soon. Instead of using the optimal stabilization pattern, you’re much more likely to lean on your old, ineffective pattern.
I’d rather slow your roll a bit and make sure you’re doing it right first.
(Note: If none of this makes sense, be sure to check out my Free Single-Leg Training Video.)
To help you address frontal plane dysfunction, start off in a parallel, bilateral stance position first.
Squat using both legs.
RDL using both legs.
Deadlift using both legs.
Once you’ve started to recruit both legs effectively in a bilateral stance, then you can start to progressively challenge your stability and control on one leg.
Jumping too quickly into single-leg work is a recipe for disaster. You will exceed your ability to stabilize and control your body, and you won’t get the desired benefits.
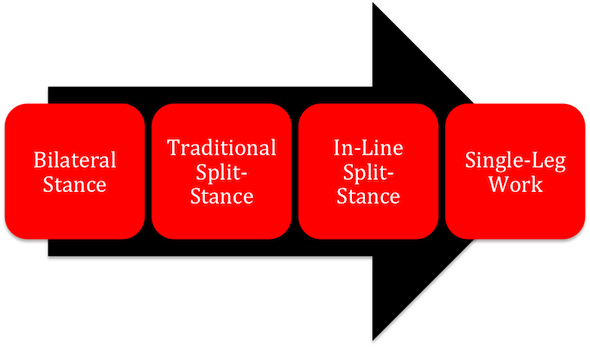
Instead, when addressing frontal plane dysfunction use the graphic below as a guideline for a more progressive and smooth transition back to single-leg training.
Step #3 – Swivel the Femur and Tibia
Last but not least, we need to swivel the femur and tibia so that they are in alignment with each other, as well as neutral to the hip.
This was a big “ah-ha” moment for me when leaving the Postural Restoration Institute (PRI) Impingement and Instability course.
The folks at PRI really put a premium on optimizing alignment through the knee joint, and I think this can explain a lot of meniscal and patello-femoral issues.
Think about it like this:
If your femur is internally rotated, and your tibia is externally rotated on that same leg, there’s a ton of torque going through your knee.
And while your knee does have a small amount of rotation, it’s not supposed to be rotated when you’re standing up!
When you have a lot of torque through your tibio-femoral joint, this could increase the likelihood of a meniscal injury. I don’t have research to back this up, but I think it’s common sense.
So we have to swivel the tibia and femur (relative to each other) to get them aligned.
Once the femur and tibia are aligned, the next goal would be to make sure that you get them both neutral relative to the hip joint.
When you look at the patella, it’s locked into that trochelear groove on the femur. Regardless of what you might hear about fixing “patellar tracking,” I think most of us who see poor alignment are focused on fixing the position of the femur instead.
When we examine the patello-femoral joint, it’s important to note there’s an inverse relationship between the position of the femur, and the position of the patella.

When you internally rotate the femur, the patella will naturally “track” laterally. The opposite is true as well – when you externally rotate the femur, the patella will track medially.
This is why getting the femur straight relative to the hip is so important. Without it, you’re more likely to suffer from patello-femoral issues.
Unfortunately, giving you specific recommendations on this goes far beyond the scope of a single blog post. Suffice it to say, if you can swivel your femur and tibia to get them aligned and neutral, your knees will be much happier in the long run.
Summary
Whether your goal is to dominate on the athletic field, squat and deadlift heavy things, or to simply move pain-free, following the 3-S approach will allow you to maximize your knee function.
Good luck and good training!
All the best
MR
P.S. – This week is “Knee Week” here at RTS, and as such, I’m offering up 15% off all of my Bulletproof Knees products.
To learn more about them, just follow the links below:
Bulletproof Knees manual (geared towards the end-user)
Bulletproof Knees and Back DVD’s (geared towards the strength coach/personal trainer)