Note from MR: Last week in my 10 Nuggets post, Tip #10 was to make energy system training fun whenever possible.
Jen Sinkler is someone I really respect in our industry, and with her background as a National caliber rugby player, I know she knows a thing or two about conditioning.
If you want some fresh ideas on conditioning circuits, I think you’re going to love this post!
—————
You compete only against yourself in the gym, right? You never go just a little bit faster or lift just a little bit more weight because the person next to you is cranking away on conditioning, right? Riiiiggght.
Some people can answer that they honestly don’t, and that’s terrific.
I am not one of those people, and neither are many of the clients I train, especially if they were or are athletes.
So, I structure these clients’ conditioning sessions in a way that allows them a safe competitive outlet. To be clear, I don’t pit people against each other, and we don’t compare rounds or reps afterward, but I do prepare for what I know will inevitably happen anyway by:
1) Programming movements those clients are already highly proficient in.
Conditioning is not the time to learn a new movement, or to perform a high number of reps of a movement they’re still clunky. I’m not against including highly technical explosive lifts during conditioning (think the power clean, snatch, jerk, etc.), but only when those performing the circuit are so well-versed in the lifts that they’d simply miss the lift rather than fail on form (and I’m a strong proponent of not getting to the point where you might miss a lift either). I also don’t tend to include rep ranges above five or six on these movements.
2) Building in appropriate rest periods.
Time-based circuits are clutch here. Rest periods are critical for maintaining form and creating physiological adaption (in other words, making progress). One of the first things to drop off with fatigue is range of motion. Decrease range of motion and you’re missing out on a lot of the strength benefits of the workout. In addition to recovery, rest provides a mental boost, too. Having a break to look forward to can motivate you to move faster, without feeling the need to pace. Repeat after me: Rest hard to work hard.
3) Balancing the body.
Sure, sometimes a quick-n-dirty finisher might involve all squat variations, but far more often, if you balance the movements involved in a conditioning circuit the same way you would a full-body strict strength workout, you don’t put yourself in the position to fail reps, flail around on form or tucker out a specific muscle group to the point that you aren’t able to perform enough reps to elicit a cardiovascular response.
Yep, I said cardiovascular response. The delineation between cardiovascular training and resistance training that has been so clearly staked out for so long — that cardio is steady-state exercise that burns fat, and resistance training is useful primarily for gaining muscle — is dissolving under scrutiny.
“These days, popular routines to boost cardio with weights tend to consist of higher reps of ballistic exercises that engage more muscle mass — think snatch and swing versus bench and curl,” says Alex Koch, PhD, associate professor of exercise science at Lenoir Rhyne University in Hickory, N.C. “Two studies I coauthored looked at the kettlebell swing, and both found that performing high rep swings increased VO2 to a level sufficient to improve VO2 max.”
Anyone who’s ever completed a five-minute snatch test, a metabolic finisher after a strength workout, or a tough circuit workout already knows what Koch is talking about.
Lifting light weights in a ballistic manner nets you many of the same upsides as more traditional cardiovascular activities — a faster metabolism, a happier heart, a better hormonal profile, more mitochondria and greater capillary density, to name just a few — with the added benefit of also preserving your existing muscle mass (and potentially even building new).
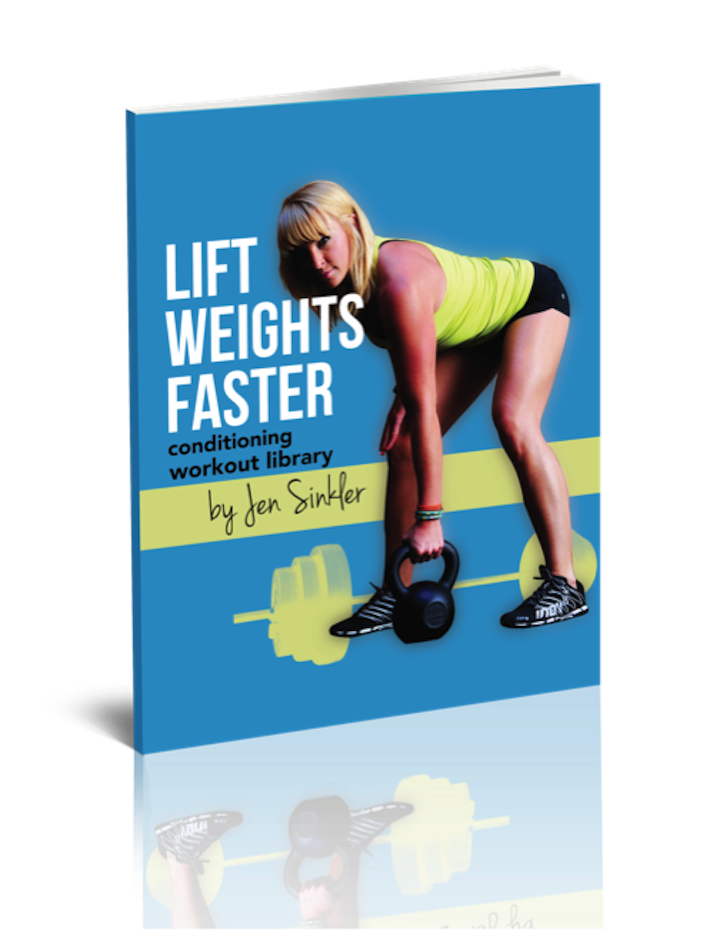
The following are two of my favorite circuits from my 130-workout conditioning library, Lift Weights Faster.
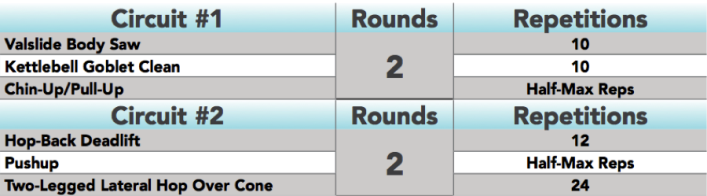
The Workout: Bottoms Up
Cheers! Now work your way up from the floor each circuit.
Equipment Required: A pair of Valslides, one moderate to heavy kettlebell, a pull-up bar and a cone.
Instructions: Do two rounds of Circuit No. 1 before proceeding to Circuit No. 2. Complete each circuit as quickly as possible. Take breaks as needed (but try to take them at the bottom of the rounds).
 Valslide Body Saw
- Assume a forearm plank position by lying on your stomach with your elbows directly under your shoulders and a Valslide under each foot.
- Raise your body so that only your forearms and the Valslides are in contact with the floor.
- Keep your midsection tight, squeeze your glutes, and slowly push your body away from your forearms.
- Only slide back as far as you feel comfortable, without piking or allowing your low back to sag. When you can’t go any farther, pull your body back up toward your forearms to the starting position.
- Repeat for the desired number of repetitions, always keeping your hips elevated in a plank position.
 Kettlebell Goblet Clean
- Stand with your feet shoulder-width apart, a kettlebell on the floor between the balls of your feet.
- Keeping your chest up, push your butt back and bend your knees just far enough that you can secure a sturdy grip on the handle.
- Stand quickly and, using the power of your hips, legs and butt, launch the kettlebell straight up as if it’s in an elevator. Use your arms to keep it close to your body as it travels up.
- When it reaches about chest height, rotate your elbows down around the kettlebell and support its weight against your chest. As you do so, the kettlebell should feel weightless. (This means you really need to make it pop with your legs!) Lower the kettlebell to the starting position and repeat.
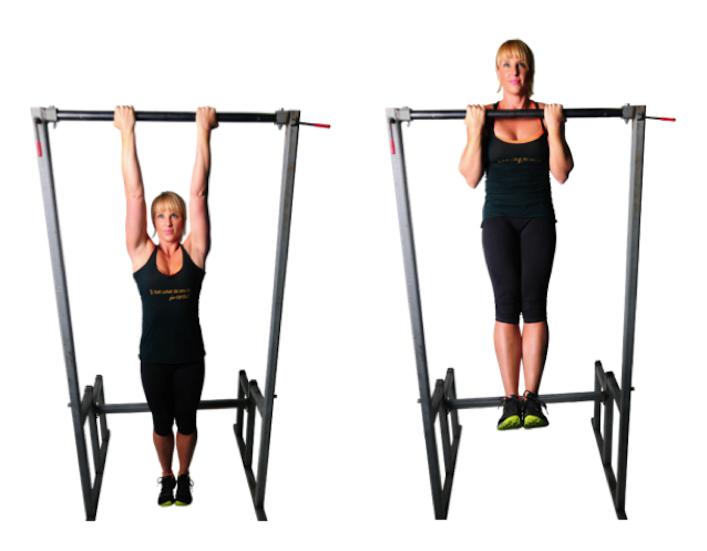 Chin-Up
- Grip a pull-up bar with palms facing you.
- Pulling your elbows down and back, pull yourself as high as you can.
- When your chin clears the bar or — even better — your chest touches, lower yourself with control. (Really, these should be called chest-ups.)
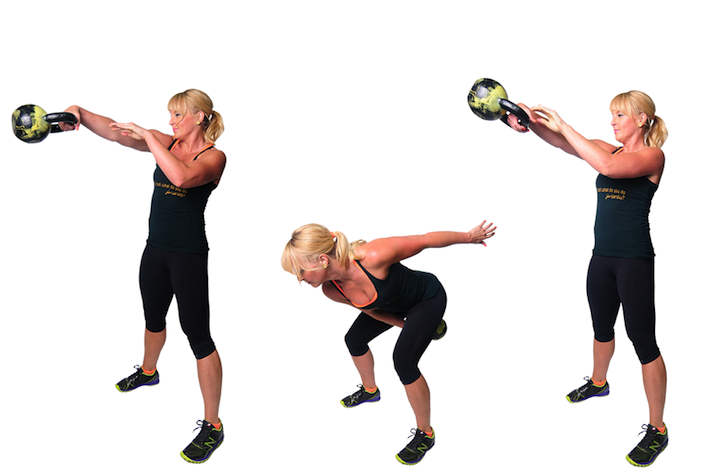
 Kettlebell Hop-Back Deadlift
- Stand tall with a kettlebell on the floor between your feet.
- Keeping your chest up, push your butt back and bend your legs until you can grip the kettlebell handle.
- Shift your weight into your hands and hop your feet back into a plank position.
- Immediately reverse the movement, hopping your feet up so that they’re again on either side of the kettlebell, your hands still on the handle.
- Holding the kettlebell and keeping your spine in neutral alignment, stand up, letting the weight hang down in front of you.
- Reverse the movement, lowering the kettlebells with control to the floor between your feet. Repeat.
- Note: If you’re working with anything less than a 24-kilogram kettlebell (53 pounds), place your hands on the floor on either side of the kettlebell.
 Push-up
- Start facing the floor in a straight-arm plank position with your body elevated between your hands and toes.
- Line up your hands directly under your shoulders, just wider than your rib cage.
- With a stiff core and squeezed glutes, lower your body down as far as you can control, angling your elbows out to no more than 45 degrees. Don’t let your low back sag.
- If you’re unable to complete a full pushup, scale the movement by elevating your hands onto a step, box, or railing.
 Two-Legged Lateral Hop Over Cone
- Place a four- to six-inch cone on the ground and stand to one side of it.
- Jump back and forth over the cone while staying on the balls of your feet.
- Move quickly and explosively throughout the set, and be sure to land with a slight knee bend each time you hop.
- Make the movement more challenging by jumping as high as you can, while still maintaining a controlled landing. You can also use a taller cone as long as you do not have to tuck your legs to clear the cone.
The Workout: The Shakedown
Your hips won’t lie after this one.
Equipment Required: One kettlebell of moderate weight.
Instructions: Complete three rounds of this circuit, completing each exercise for the required number of reps before moving onto the next. Rest at the bottom of each round for exactly as long as it took you to complete that round.


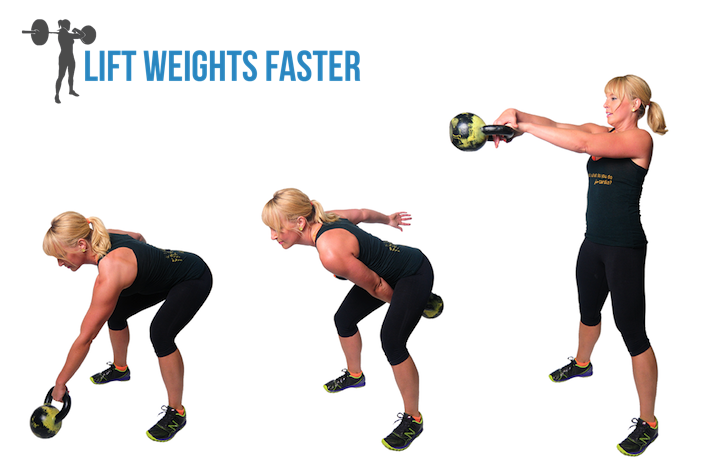
 Hand-to-Hand Swing
- To start, prop the kettlebell on the floor a few feet in front of you, one hand gripping the handle, butt high in the air and knees bent in an athletic stance.
- Hike the kettlebell up between your legs, slightly straightening them as you do so.
- Quickly stand up, using the power of your hips, hamstrings and glutes to “float” the kettlebell up to about shoulder height (but keep your shoulder pulled back). Your body should form a straight line from head to heel.
- Pull the kettlebell down out of the air, staying upright as long as possible before you push your hips backward and swing the kettlebell high between your legs. Keep your chest up as you do so (I tell my clients I want to be able to read the writing on the front of their shirts the whole time).
- Reverse the movement, again using the power of your posterior to pop the kettlebell forward and up. The kettlebell should be “weightless” at the top of the swing. At its apex, switch the hand holding onto the handle quickly before the kettlebell starts its descent.
- Repeat swinging for desired number of reps, always quickly switching hands at the top, standing, position.
- Stop after you’ve completed your final backswing, gently parking it on the floor in front of you again.
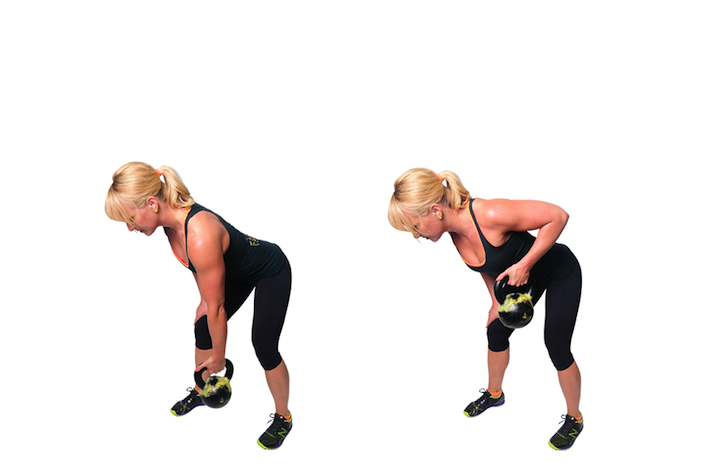 One-Armed Bent-Over Row
- Holding a kettlebell at your sides, hinge forward from the hips approximately 45 degrees while staying wide across the chest.
- Row the kettlebell up to your ribcage, keeping your elbow no more than 30 degrees out from your body.
- Keep your shoulder down and away from your ears.
- Return to the start position and repeat.
 Offset Cossack Squat
- Start with the kettlebell in the racked position, thumb near or against your chest.
- Take stance that’s nearly two shoulder-widths apart. (Exact width will vary depending on your groin flexibility.)
- While keeping your feet stationary, sit back and down on one leg, lowering your hips as far as you feel comfortable. At the same time, rotating on the heel of your outstretched leg, point the toes of that foot to the ceiling.
- Staying in this low position, begin shifting your weight over to the other leg, straightening the leg that was just squatting and pointing those toes upward.
- If you’re uncomfortable staying low between repetitions, you can return to standing back up between reps.
- Complete the desired repetitions on one side and switch sides of the kettlebell racked position between sets.
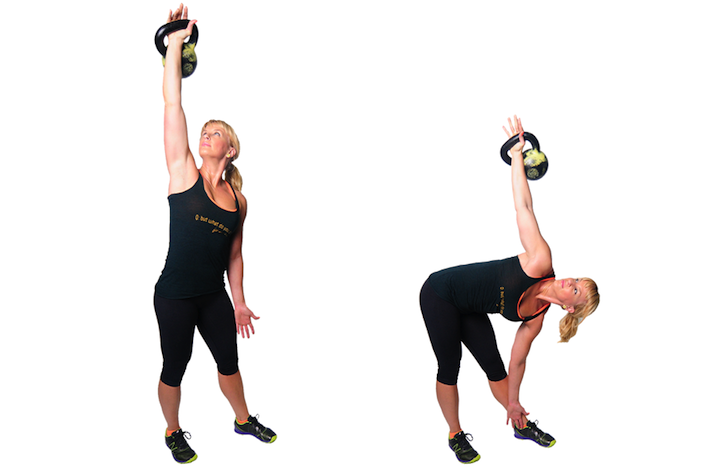 Windmill
- Start with the kettlebell in the racked position, thumb near or against your chest.
- Turn both feet so that they’re pointing away from the kettlebell. If the kettlebell is in your right hand, your right foot should be at about 30 degrees, while your left foot should be about 30 to 45 degrees, depending on comfort.
- Perform a push press to move the kettlebell into an overhead position. Look up at the bell. You’ll remain looking at it throughout the entire working set.
- With most of your weight in your right leg, push your hips back and away, tracking in line with your right foot. Keep your right leg and right arm straight, with the kettlebell pointed toward the ceiling.
- As you hinge backward with your hips, keep your left arm in contact with the inside of your left leg, reaching toward the floor. Depending on your hip mobility, you may be able to descend only slightly; or, conversely, your left hand may even touch the floor.
- Reverse the movement and return to an upright position.
- If you start to lose your back position or shoulder stability, or your elbow begins to bend, immediately stop and return to the starting position. (Ideally, you will stop before this even starts to happen.)
- After completing all repetitions on that side lower the bell down to the rack position at your shoulder, switch sides, and complete your reps on the other side.
Summary
 If you’re looking to ramp up your conditioning in other creative, productive ways, there are 130 workouts in my pick-and-choose conditioning library, Lift Weights Faster.
Complete with a full exercise glossary that includes written descriptions and photographic demonstrations of over 225 exercises (from classic moves to more unusual ones — the Jefferson deadlift, anyone?), a video library that includes coaching on 14 of the more technical lifts, five challenge-workout videos, plus a dynamic warm-up routine, I leveraged my background in magazine publishing to create a clear-cut, easy-to-use resource that you’ll want to turn to all the time.
 Every workout is organized by the equipment you have available and how much time you’ve got, with options that last anywhere from five up to 30 minutes.
For more info, click HERE.
Jen Sinkler (www.jensinkler.com), RKCII, PCC, PM, USAW, is a longtime fitness journalist who writes for national magazines such as Women’s Health and Men’s Health. A former member of the U.S. national women’s rugby team, she currently trains clients at The Movement Minneapolis.