 Everyone loves a big deadlift.
Powerlifters even have a saying – “The meet doesn’t start ’til the bar hits the floor.”
Like most lifts, though, many people miss their deadlifts before they even begin to pull the weight.
A dialed in and tight set-up will not only reduce the likelihood of injury, but I guarantee it improves your performance as well.
But First, A Disclaimer…
Today I’m going to focus on the sumo deadlift.
I know, I know – some people think this as an inferior lift, and others go so far as to call it “cheater style.”
Regardless, I’m a fan as the upright position can spare the spine. Furthermore, it tends to be a more natural set-up for many people to learn. You can teach people to sumo deadlift relatively easily early-on, while simultaneously building their conventional deadlift on the back end.
Now, let’s get into it and talk about setting up for a big deadlift!
Setting up to Sumo Deadlift
Deadlift Set-up Tip #1 – Get tight to the bar
My first thought when setting up is to crowd the bar. If possible I want to get my heels underneath the bar, and my shins touching it before I ever start to work my way down. (If this doesn’t make sense, it will after the next point).
In a conventional deadlift you’ll set-up with the shins an inch or two away from the bar. As you drop down into the starting position, you’ll have a small degree of ankle dorsiflexion (angled tibia) and you’ll end up with your shins up against the bar.
In a sumo deadlift, however, our approach to grab the bar is different, and we can set-up with a very vertical tibia.
Just remember to get your shins as close as possible to the bar, and work to get your heel directly underneath the bar.
Deadlift Set-up Tip #2 – Feet wide, toes out
To get the shins close and heels underneath, you’re going to have to externally rotate through the hips and lower extremity (i.e., turn everything out).
You’ll need to set-up with a wider than shoulder width stance, and really work to turn the toes out, while still maintaining a neutral foot-knee-hip relationship. In other words, just because you’re turning the hip out, the rest of the lower body should still be in alignment.
Deadlift Set-up Tip #3 – Exhale and brace
Now that our lower body is set, it’s time to get our core dialed into a great position.
Too often, lifters develop stability by creating a massive arch through the lumbar spine. Not only does this position but undue stress and strain on the back side of the spine, but it puts our big pulling muscles (the glutes and hamstrings) in a disadvantageous position.
Instead of arching hard, think about exhaling first and foremost to align the core properly and engage the deep abdominal wall. This video should help you better understand this concept.
I like to think of elongating the spine, versus compressing it. Don’t worry – if you get enough weight in your hands, compression is going to happen regardless.
However, by thinking of “lengthening” you tend to get a more neutral spinal position from top-to-bottom, and smooth out any excessive curves.
Once you’ve exhaled hard to get the rib cage facing down and the pelvis underneath you, take in a moderate sized breath and brace as if you’re about to be punched in the stomach. I find it’s easiest to do this when you’re standing up. When you get down to the bar, you can’t take as big of a breath and the whole thing tends to be far more difficult.
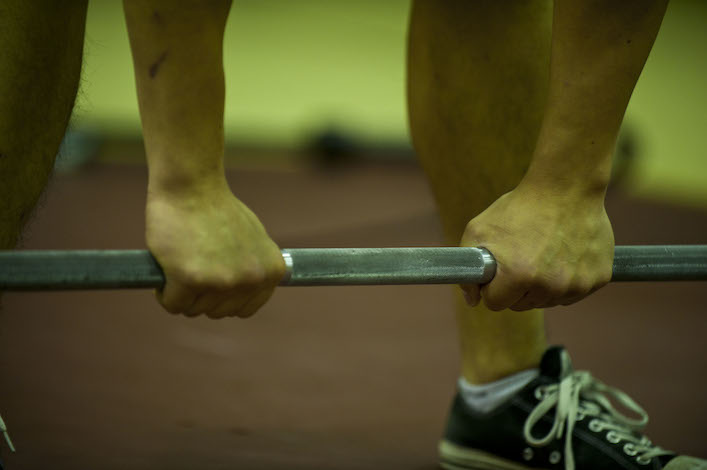
Deadlift Set-up Tip #4 – Arms straight down
The next step is simple – just let the arms hang straight down from your shoulders.
When I see people that have a very narrow hand spacing, they tend to lose some control over the bar. If the hands are close that creates long levers on either side of the bar.
And on the flip side if your hands are too wide, you’re increasing the length of your pull. Simply put, drop the arms straight down from the shoulders to grip the bar.
Whether you choose a hook grip, mixed grip, or double-overhand is largely based on comfort and preference.
Deadlift Set-up Tip #5 -Activate the lats
Okay, so maybe it’s not as easy as simply letting the arms hang down.
What I’m thinking about is using the lats (the big muscles on the side of your back), to help pull the bar in tight to my body. And more importantly, I want to keep the bar in tight throughout the course of the lift.
What you’ll often find is that as the weight gets heavy, the bar has a tendency to drift out in front of you off the floor. And as the bar drifts, the hips shoot up, the back rounds, and you make the lift far harder than it needs to be.
To remedy, this, engage the lats and think about keeping the hands and arms tucked back tight next to the body. I think about engaging the lats before I ever move down to grab the bar, and then double-check my lat tension again before I initiate or start the lift.
Deadlift Set-up Tip #6 – Knees out, drop down
This is another key distinction between the sumo deadlift and the conventional deadlift.
In a conventional deadlift, the hips will have a tendency to push back a bit as you load the glutes and hamstrings for the lift. By pushing the hips back, the torso will have more incline and be “over” the bar a bit more.
On the other hand, the sumo deadlift allows you to be more upright. This will not only load the glutes and hamstrings, but even the quads and adductors to a large degree.
To set-up in this fashion, think about pushing the knees out and dropping straight down to grab the bar. It may help to think about sitting down, versus sitting back.
This is going to be a different feeling for many of you. If you’re used to pushing the hips back, getting into this position the way I’m describing may be difficult as you need a lot of flexibility through the groin and adductors to get into a good starting position.
If you can get into this position, though, You’re in a great alignment, and the start of the lift is the hardest part. If you can get the bar moving off the floor, as long as you have some hip/glute strength you’ll be able to lock it out.
Deadlift Set-up Tip #7 – Grab the bar and pull the slack out
Last but not least, it’s time to put all the pieces together. You’ve lowered yourself down, so grab the bar tight. It should be right up against your shins, your lats should be engaged and pulling it back, and your entire trunk and lower body should be spring loaded from here.
But don’t pull yet!
The last thing to do is to take the slack out of the bar. If you’ve ever seen someone simply drop down, grab the bar and give it a tug, you’ve probably seen the bar jerk and bend.
Just like when the bar drifts, this will have a tendency to let the weight shift forward and put you in a really awkward position to finish the lift.
If you take the slack out of the bar, you’re essentially pulling up and getting it as tight as possible, so that when you do start to move the bar will not bend any further.
Another way to think about this (and further dial in the set-up), is to use the bar to help “pull” yourself down into a better starting position. I’ve used this trick time and again to coax a better starting position out of my lifters.
Summary
If your goal is to deadlift big, you need to dial in and refine your set-up.
Watching years of national-caliber deadlifts taught me that if you don’t take the time necessary to set-up properly, there’s no way you’re going to pull the most weight possible.
Give some of these tips a shot next time you’re in the gym. And don’t be afraid to let me know if you have questions or comments below!
Stay strong
MR