Note from MR: This was originally posted in February, 2014.
This week, some of the baddest mofos on planet Earth will descend upon Indianapolis for one reason:
To show just how bad ass they are!
The NFL combine has become not only an awesome event for pro teams and scouts to evaluate potential talent and draft pics, but one of the coolest spectator sports for geeks like me to watch at home!
But before I get ahead of myself, let’s start with a brief overview of what the NFL combine is.
What is the NFL Combine?
The NFL combine is a series of tests to determine how athletic a potential draft pick is.
While NFL scouts have spent hundreds (if not thousands) of hours reviewing tape on specific players, sometimes it’s hard to tell what kinds of raw materials you’re working with.
Consider this – in the NFL you should (theoretically) have the best football coaches in the world.
The key, then, would be to find some of the best athletes possible to hone and develop their skills. You could have the smartest football player known to man, but if they’re jump 20 inches or running a 5.5 second forty, they simply aren’t going to be successful at this level!
The combine allows NFL scouts and coaches to see a ton of high-level prospects over the course of 4-5 days.
The NFL Combine Tests
As mentioned above, there are six tests that everyone goes through in the NFL combine:
- The 40-yard dash,
- Pro agility,
- 3-cone drill,
- Vertical jump,
- Broad jump, and
- The 225-bench press repetition test.
Below, we’ll examine each test in depth so you have a better understanding of not only how to perform the test, but what it’s actually measuring.
The 40-Yard Dash
Performing the 40-Yard Dash
The 40-yard dash is the simplest NFL combine test to understand.
The athlete will approach the starting line and crouch in their starting position. They have to hold this position for two seconds, before exploding out and running straight ahead for 40-yards.
Here is a short video of Chris Johnson (running back for the Tennessee Titans) who is on record with the fastest 40 time ever, clocking in at a blazing 4.24 seconds.
What does the 40-yard dash test?
The 40-yard dash by itself is a great measure of overall speed. And along those same lines, someone that is running a very fast 40 with little training probably has a very elite nervous system, which is nearly impossible to develop. 
However, as you’ll see in the adjacent picture there are timing lights at the 10, 20, and 40-yard line. If we break the test down, it may look something like this:
- 10-yard dash – Big body lean, “acceleration” mechanics, and quad/glute strength and power
- 20-yard dash – More upright position, blend between “acceleration” and “top-speed” mechanics, and quad/glute/hamstring strength and power.
- 40-yard dash – Upright position, “top-speed” mechanics, and glute/hamstring strength (think of “pulling” versus “pushing)
Many football purists would say that you rarely, if ever, run 40-yards straight ahead in a game and that this test isn’t specific to the game.Instead, the game is played in a 5-to-10 yard box, and the ability to make a decision, plant and cut quickly are far more specific to the actual game.
If you’re looking at a composite score of all the tests, we have to remember that the 40-yard dash is just one test. However, the fact that’s it’s easily understood (and easy for coaches and scouts to fall in love with!) is both a blessing and a curse.
Notes from Nick Winkelman, Combine Speed Development Coach, EXOS
“The 40 yard dash provides a 3-component profile of an athletes linear speed. The components include:
- The start/acceleration zone (0-10 yards),
- transition/max velocity zone (10-25 yards), and
- max velocity/speed endurance zone (25-40 yards).
The start/acceleration zone of the race provides an indication of the athlete’s overall relative and explosive strength characteristics in addition to being a strong indicator of horizontal jumping capabilities.
By 10 yards athletes are transitioning from acceleration mechanics (i.e. aggressive lean with piston-like leg drive) to max velocity mechanics (i.e. upright posture with cynical leg action).
The transition/max velocity zone is the most neurologically demanding as stride frequencies approach 5 contacts per second. This zone is a measure of an athletes overall reactive strength and provides a good indication of vertical jumping capabilities.
Finally, the max velocity/speed endurance zone provides an indication of the athlete’s maximal velocity capabilities as athletes will achieve 85-100% of their true maximal velocity by this point in the race. (Note: The best 40 times are achieved in less than 21 steps).
However, in heavier athletes who do not have elite sprint capabilities (ex. lineman) this zone will provide an indication of their speed endurance and their overall capacity to maintain maximal velocity over the last 10-15 yards.”
Training for the 40-Yard Dash
If your goal is to run a faster 40, you need to start by breaking the test down into bite-sized pieces.
In other words, you don’t just go out and run 40’s every day and hope that your 40 time drops!
It might (especially if you’ve never trained specifically for the 40), but there are far more sophisticated ways to go about this. A typical 40-yard dash program may include any (or all) of the following:
- Priming the start. Quite simply if you get out of the gate slow, you’re not going to run your best time. Working on the set-up and start (repeatedly!) to explode out of the box is critical to running a faster 40.
- Acceleration mechanics. Whether it’s wall drills, pushing a Prowler, etc., the goal is to get a great forward lean so that you can really drive the first 10 to 20 yards.
- Lots of 10’s and 20’s. The 10 and the 20 set-up the 40. Again if you’re slow out of the gate, or if you transition from acceleration to top-end mechanics too quickly, you won’t run your best time.
- And then, finally, 40’s. At some point, you need to practice the actual test. The other skills and drills give you a foundation, but once you have that foundation you need to cement it and work on finishing the race.
Pro Agility (aka 5-10-5 or 20-yard shuttle)
Performing the Pro-Agility Drill
The pro-agility drill starts with the athlete in a crouched position, in between two cones which are 10-yards apart. The test goes as follows:
- From the crouched position, the athlete explodes to the right and touches the line with his right hand,
- He explodes out of this cut and sprints 10 yards, touching the line with his left hand, and then
- Explodes back through the middle cone.
- After a short break the test is the repeated, but starts by going to the left first.
The fastest record pro agility drill was by Jason Allen, who put up a ridiculously fast time of 3.81 seconds. Here’s how the test looks in real-time:
What does the pro-agility drill test?
The pro-agility drill is a great test of multi-directional speed and agility.
As I noted above, it’s rare that you get to crank it up and run 40 yards in a straight line.  Instead, football (and field/court sports) forces you to accelerate, decelerate, plant and then cut, and accelerate in a different direction.
In this way, the pro-agility drill is a great overall measure of an athletes ability to change direction.
If you want to be great at this test, you’ll need a few specific physical traits:
- Explosive strength and power in the hips and thighs,
- Eccentric strength (especially laterally) in the above muscle groups, to help you load and explode out of the cuts, and
- Stability and control in the foot, knee, hip, and core. More stability = more control in and out of cuts.
The downside to this test is the fact that it’s a rehearsed drill. In a live game, you have to make a decision and then react in any number of ways, so there isn’t the same level of cognitive function.
Notes from Pete Bommarito, Bommarito Performance
“The shuttle run for the NFL combine focuses on and tests several critical components of athleticism:
- Lateral power at the start,
- Which transitions into lateral speed,
- 180 degree changes of direction, and finally
- Linear speed.
In our training we not only use power exercises but bounding and carioca stepping as well. These not only build athleticism, but also transfer well to the shuttle run.”
Training for the Pro Agility Drill
If you want to shed time from your pro-agility drill, here are a handful of things you can work on or address:
- Drill the start. The lateral push can be challenging for some, as it’s not as natural as the forward push in a 40. It may help to think “quick hands” or to “get the hands” moving to get more push from the hips and legs.
- Deceleration mechanics. If you’re slow in and out of the cuts, this test is going to eat you alive. To fix this, work on quality deceleration mechanics, such as getting the core/trunk stiff and setting a hard edge with the foot.
- Quick cuts. As important as it is to have good mechanics coming into cuts, you also have to work hard to explode back out of the cut. Don’t just use the feet – think about using the eyes and torso to drive back in the opposite direction.
- Put it all together. Just like any test, after you’ve broken the drill down into its constituent parts, you have to put it all back together.
The 3-Cone Drill (aka L-Drill)
Performing the 3-Cone Drill
The 3-cone drill is the most complex of the combine drills. Here’s how it plays out:
- The cones are put in an “L” shaped formation, with each cone 5 yards apart.
- The athlete starts in a crouched position, and explodes to the cone directly in front of him.
- Next, the athlete turns and goes back, touching the line of the starting cone.
- From here, the athlete heads back to the front cone, and performs a 90 degree cut to the left or right.
- The athlete goes to the inside of this cone, and curls around (essentially performing a 180 degree cut).
- The athlete finishes by going around the outside of the 1st cone, and then sprints through the finish line.
The fastest 3-cone drill was performed by Jeffrey Maehl, at 6.42 seconds. While there’s no video of Jeffrey’s test, here’s one of Joe DeFranco’s athletes running a very fast 3-cone drill.
What does the 3-Cone Drill test?
 The 3-cone drill is similar to the pro-agility drill, in the fact that an athlete has to explode for 5 yards, and then turn on a dime and go back in the opposite direction.
However, what’s unique about the cone drill is the second component of this test. The 90- and 180-degree turns are far more similar to what you might see in a football game.
At its core, the cone drill looks at acceleration, deceleration, and change of direction in a multitude of ways. If you want to be good at this drill, you’ll need to address the following:
- Explosive strength and power in the hips and thighs,
- Multi-planar eccentric strength in the above muscle groups, to help you load and explode out of the cuts,
- Stability and control in the foot, knee, hip, and core. More stability = more control in and out of cuts.
Notes from Nick Winkelman, Combine Speed Development Coach, EXOS
“The 3-cone or L-drill provides an strong indication of an athletes ability to move in space.
The first two 180 degree right-side cuts provide an indication of an athlete’s change of direction capabilities. Each cut has to be executed in a fraction of a second which demands an ability to to rapidly flex through the hips, knees, and ankles while expressing high levels of relative and reactive strength to get off the lines.
The second half of the drill demands 90-180 degree turns and provides an indication of high speed cutting and body control. If the athlete doesn’t use their eyes and body position to guide their footwork on the ground then the times will be slow.
Finally, once the athlete has navigated the final cone then they have to run an arching 12 yard sprint. This last element is a reinforcement of the athletes ability to accelerate on a curvilinear path which is often the case when navigating traffic on the football field.”
Training for the 3-Cone Drill
The cone drill can be a challenging, as there’s a ton going on. Again, it helps to break the test down into more manageable bits and pieces:
- Explode to the first cone. Like all of these tests, a slow start is the kiss of death. Work to explode off both legs and get to that first cone in 2.5-3 steps.
- Tight in the 180’s. If you’re drilling the pro-agility, you may not have to work too hard on this in it’s own right. However, work to get clean 180-degree cuts, and set a hard edge with the foot to explode out from.
- Short and choppy in the 90’s and 180’s. There’s definitely a happy medium on the second half of the drill – you don’t want to take a ton of steps to round the cone, but you don’t want to take a thousand either. Work to find that happy medium that allows you to make tight, consistent turns.
- Sprint and lean. The final stretch is essentially a 10-yard arcing run. Again you’ll have to chop the steps up a bit, but perhaps more importantly, work to lean into that final turn so that you can finish strong and fast.
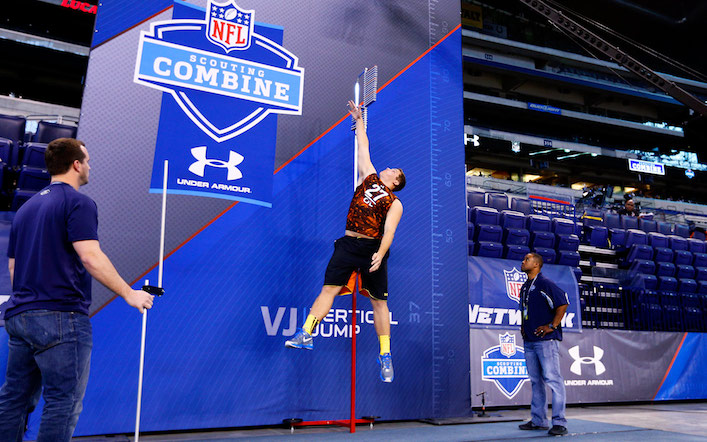
The Vertical Jump
Performing the Test
 The vertical jump test (like the 40) is pretty darn easy to understand.
Prior to jumping, the coach/scout working the station will get a vertical reach for the athlete. The athlete will stand tall and reach their arms as high as possible overhead. The measurement runs from the ground up to the top of their middle finger.
Once their reach has been measured, the athlete will stand underneath an apparatus called a Vertec, which is essentially a column with little sticks poking out to the side.
The athlete will reach up high, then rapidly descend and explode straight up, attempting to touch the highest stick possible. The best vertical jump to-date was set by Donald Washington in 2009, where he soared a whopping 45 inches!
The below video is a great example of technique, too. Watch how the athlete “swats” at the sticks on his first attempt. As I’ll describe below, you don’t need to do that!
What Does this Test Look At?
The vertical jump looks primarily at explosive/reactive strength in the hips and thighs (more so in the anterior chain). Another way to look at the test is the vertical jump is a great indicator of an athlete’s ability to display vertical power.
While it’s not as multi-layered as some of the other tests, the vertical jump is a great indicator for raw or natural athleticism and a “fast” nervous system.
Notes from Pete Bommarito, Bommarito Performance
“The vertical jump is a great test of lower body power, and specifically, vertical power.
Vertical power is the most basic form of power expression, and our goal is to develop general power first and foremost. Once you have general power, then you can work on developing or converting that into a more sport- or game-specific style.”
Training for the Test
How you train for the vertical jump test is largely dependent upon what kind of athlete you are training. It may help to think of a spectrum; on one end you have the fast, springy athlete and on the opposite side you have the slower, stronger athlete.
The fast, springy guy is already reactive and can use his connective tissue and stiffness to be explosive. In this case, your time would be best spent getting this guy stronger in the weight room. I’d tend to spend my time on lifts that hit the anterior chain hard, like squats.
On the other hand, the strong, slow athlete would benefit more from learning how to be reactive. This athlete should spend time working on jumping variations (landing on a box to eliminate eccentric stress), med ball throws, Olympic lift variations, etc. The goal here is to harness that strength and teach them to express it more rapidly, which will help them jump higher.
Last but not least, here are a few quick notes on performing the actual test:
- Think about having quick arms. If you think too much about the legs, it will slow you down and decrease performance. Let the quick arms drive the legs.
- “Just a little tap.” Channeling my inner Happy Gilmore here, you don’t have to swat at the sticks. This will actually decrease your touch height. Instead, think about reaching as high as possible and gently tapping the stick instead.
The Broad Jump
Performing the Test
The broad jump is another very simple test. In this case, the athlete will stand at the starting line, dip quickly with the hips and thighs, and then explode as far forward as possible.
One key to the broad jump test is that the athlete must stick the landing. The best broad jump on record is from Jamie Collins, who jumped 11 feet and 7 inches. Here’s a clip of him jumping:
What Does this Test Look At?
The broad jump is similar to the vertical jump, in the fact that it’s a great representation of total body power and explosiveness. However, there are a few key distinctions here:
- The vertical jump is focused more on the anterior chain (i.e. quads), where as the horizontal jump is focused more on the posterior chain (glutes and hamstrings).
- The vertical jump expresses vertical power and explosiveness, while the broad jump is focused on horizontal power.
- Last but not least, the athlete is forced to “stick” the landing in the broad jump.
Therefore, while the vertical jump may be the more popular test, the broad jump may be a better indicator of how explosive an athlete is on a football field.
Notes from Chip Morton, Strength & Conditioning Coach, Cincinnati Bengals
The Standing Broad Jump is a test used to measure leg strength & power via distance covered in the horizontal plane.
The athlete is instructed to assume a position with their toes behind the line. When the athlete is set, he jumps horizontally, taking off from both feet on his own command. The distance jumped is recorded from the start line to the point of heel contact.
An important performance point in the Broad Jump is the ability of the athlete to “stick” the landing, a great indicator of an athlete’s eccentric strength or ability to decelerate. Proficiency in the Standing Broad Jump is highly correlated with sprinting ability as measured by 10-, 20-, & 40 yd. sprints (1).
Training for the Test
While there’s more room for interpretation in how to prepare for the vertical jump, in my opinion, the broad jump is a bit more straight ahead (no pun intended).
Quite simply, if you want a big broad jump, you need to build a strong backside. This is done in the weight room, and then expressed when jumping. A few quick notes:
- The program should be built around posterior chain exercises: Deadlifts, RDL’s, and the like. This is why powerlifters often have awesome broad jumps, without any specific training.
- Much like the vertical jump, think about having quick, choppy arms. Allow the arms to drive the legs.
- Last but not least, make sure to do some specific training on the jumps, with a big emphasis on the landing. This is a different animal from the vertical jump in this regard, so don’t lose precious inches because you haven’t worked on sticking the landing.
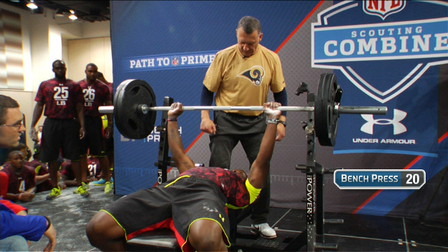
225-Bench Press Repetition Test
Performing the 225-Bench Press Test
The 225-bench press test is the final test in the Combine, although it’s typically performed first on the actual test day.
The athlete will lie on their back, unrack the bar, and bench press 225-pounds as many times as possible. Here are a few things that the judge will be looking for:
- The hips must stay on the bench (i.e. you can’t lift the hips or “thrust” the weight up with your lower body),
- You must lock out the elbows at the top of the lift, and
- You can take a breath or pause at the top in between reps.
Stephen Paea has the current record in the 225-bench press test, cranking out an astonishing 49 reps!
What Does the 225-Bench Press Test look at?
The 225-bench press test isn’t an ideal test for football players, as it looks more at strength or power endurance, versus pure strength or power.
 Think about it like this: How often is an athlete required to repeatedly press something (or push something/someone) for 30, 45 or up to 60 seconds in a football game?
I’ll tell you the answer: Never.
However, the test is what it is, and at the very least you have a general idea of an athletes upper body strength, power and endurance as a result.
If your goal is to dominate a bench press rep test, here are the physical qualities you’ll need:
- Maximal strength in the upper body – namely the chest, shoulders and triceps,
- Once base strength is built, then strength endurance will be laid on top.
The bottom line is you want/need to get strong first.
Consider this – who is going to rep 225 more – the guy who can bench press 250 pounds? Or the guy who can bench press 350 pounds?
It’s a no-brainer.
But at the same time, you can’t focus on maximal strength while excluding either the skill or endurance side of the equation. Both are important, but should be focused on towards the end of the program.
Notes from Pete Bommarito, Bommarito Performance
“The 225-bench test at the NFL Combine is a pure test of strength endurance. It’s definitely not a test of pure or maximal strength, but it’s a safe weight that they can use from year-to-year to compare prospects.
Even though some people have issue with the test, strength endurance is still an important quality for athletes to possess.”
Training for the 225 Bench Press Test
How you train for the 225-bench press test is really dependent upon how long you have to train.
Ideally, you have several months to prepare. This will allow for an accumulation phase, one (or more) maximal strength phases, and then you can finish off with an endurance and test-specific phase.
If you’ve only got 8 weeks (as you do in most combine-prep programs), it may look more like this:
- Weeks 1 & 2 – Accumulation and work capacity,
- Week 3, 4 & 5 – Maximal strength, and
- Weeks 6, 7 & 8 – Strength endurance and taper.
The focus during each block would be on pressing power in the chest, shoulders and triceps. Depending on where an athlete misses or fatigues, you could also throw in any number of assistance exercises to build up weak or lagging areas.
Skill-Specific Tests
The combine is finished off by athletes performing skill or position specific tests.
Quarterbacks throw and demonstrate their footwork.
Wide receivers run routes and catch balls.
While this may be the least focused on aspect of the combine, it helps give a better representation of how an athlete looks and moves on the football field, as these drills are unrehearsed and/or more reactive in nature.
Why Did I Write All This?
Now I’m sure some of you are reading this and thinking to yourself:
Why in the heck did Mike write all this out?
The reason I’m so interested in the combine these days is because I’m currently training a young man who will be doing a pro-day in March.
If you’re unfamiliar with the term, a “pro-day” consists of all the same tests as the NFL combine, but it’s for athletes that aren’t considered blue-chip prospects. Think of it as a minor-league combine.
So for the last five months I’ve been learning everything possible about the training and testing for the combine tests to give this young man the success he deserves. He’s a phenomenal football player on the field, so my job is to give him the athletic “resume” necessary to get him looked at by professional teams.
Initially, I wasn’t sure how to feel about the series of tests – after all, they’re rehearsed drills, and they don’t necessarily reflect someone’s ability to be a successful football player.
But then my competitive juices kicked in.
It’s kind of like powerlifting – you can complain about certain elements of the sport all you want, but at the end of the day, you either got better or you didn’t.
That’s what I’ve enjoyed about this process. At the end of the day, either our training will be a success and he’ll hit new personal bests in his respective tests, or he won’t.
I’m banking on the former, but I’ll wait until his pro-day before I say anything further 🙂
Regardless, this has been not only an amazing learning experience, but a really fun challenge as well. Hopefully he kicks ass and I get the chance to refine my process with more athletes in the future.
Summary
So there you have it – a massive overview not only on the NFL combine, but some key tips and tricks to help you improve your athletic performance and development.
I sincerely hope you enjoyed the post, and make sure to either watch (or record) the combine. It’s going to be an awesome couple of days!
All the best
MR
Our Experts
Nick Winkelman, MSc, CSCS*D, USATF
Director of Movement (Combine Speed Development Coach) EXOS (Phoenix, AZ)
@nickwinkelman and @TeamEXOS
Pete Bommarito
Owner, Bommarito Performance
@BPS
Chip Morton, CSCS, RKC, USAW
Strength & Conditioning Coach, Cincinnati Bengals
References
1. McGee, Kimberly J. and Burkett, Lee N. “The National Football League Combine: A Reliable Predictor of Draft Status?”, Journal of Strength & Conditioning Research, 2003, 17(1), 6-11