
When it comes to speed development, no topic is more polarizing than the wall drill.
(Except maybe the speed ladder, but that’s a discussion for another day.)
Some coaches love wall drills and use them as their go-to tool when teaching acceleration mechanics.
Others feel that they are absolutely worthless, and would never consider using them in their programming.
So what gives?
Like most exercises and drills, I think there’s a time and place for using the wall drill. As Nick Winkelman of EXOS is fond of saying (and I’m going to paraphrase here a bit):
The wall drill creates context. Going forward, the athlete will have a better understanding of the torso position, and the leg action that I want to get during acceleration mechanics.
More than anything else, I think it largely comes down to coaching and execution of the exercise.
In this article I’m going to discuss what a good wall drill should look and feel like, and then break it down piece by piece to show you the most common errors we see.
Let’s do this!
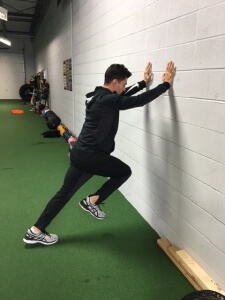
Building a Solid Wall Drill
The first question we should ask when it comes to the wall drill is this:
What is the goal of using this exercise?
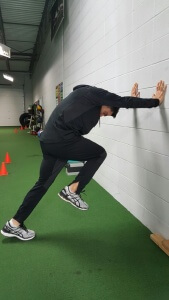
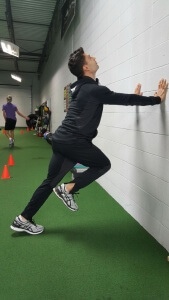
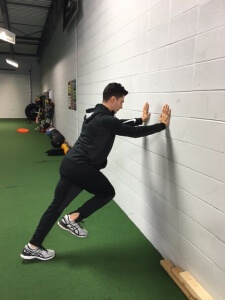
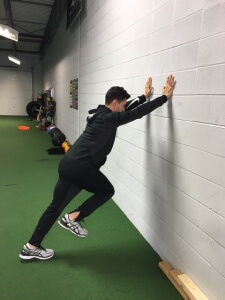
The goal of a wall drill is to create context with regards to body lean, angles, and leg action.
I’ll break this down in far more depth below, but for now, here’s a brief overview of what a good wall drill should look like.
- A natural lean (or inclination) of the body. A cue I learned from Lee Taft years ago was to “chase the shoulders,” but the shoulders should be in front of the body throughout.
- A neutral spinal alignment, with a stiff core. The spine should be in a fairly neutral position throughout. The core shouldn’t necessarily be braced like you’re doing a 1-RM squat, but there should be some stiffness to improve the transfer of mechanical energy up and down the chain.
- Active flexion on the “up” leg. To create a piston (or driving back/down action), then you need to actively flex the up leg. This would include hip, knee and ankle dorsiflexion.
- Active extension on the “down” leg. Last but not least, there should be an active drive or “push” through the midfoot on the down leg.
Now that we’ve covered the basics, let’s break down the most common errors we see in these drills.
Dissecting Head Posture
In good acceleration mechanics, you want a (largely) neutral neck position. There might be a slight degree of flexion or extension, but not so much as to affect the mechanics down the chain.
With that being said, there are two primary issues we see here:
- A posture where the head and neck are flexed, and
- A posture where the head and neck are extended.
Head Mistake #1 – Head and Neck Flexed
 You’ll often see a neck flexed posture in an athlete who has a weak anterior core.
Instead of using the obliques and deep core muscles to support the trunk and pelvis, they attempt to “shorten” the core by using rectus abdominus and even the deep neck flexors.
This athlete will also typically have a head forward posture, so it only makes sense that they’ll fall deeper into this posture when doing something fast or explosive.
The Fix: Place a PVC pipe on the athletes back and have them get comfortable in an angled posture with both feet on the ground. Once they’ve felt this position, it should be easier for them to hold it during the drill.
Keep in mind that in both this and the next exercise, some smart core training will go a long way to improving the posture and pelvis.
Head Mistake #2 – Head and Neck Extended
 When you see the head and neck extend, again, your first thought is weak core – and you’re absolutely correct.
The key here is in how they choose to compensate. The neck flexed is using the deep neck flexors and rectus abdominus to help you stabilize, while this athlete is using a gross extension pattern to help them create stability.
Obviously, this isn’t the best thing for our spine, but this extensor tone will also negatively affect the body’s ability to flex and get that piston-like action on the front side of the movement.
Either way, you’re not getting what you want to out of the exercise!
The Fix: Again, I love the PVC pipe to provide a kinesthetic sense of where the entire spine is in space. Once this is felt, then you can slowly progress the exercise via increased range of motion, speed, etc.
Dissecting Arm Posture
When it comes to arm posture on a wall drill, I like to emphasize a degree of r-e-a-c-h-i-n-g. I’ve talked about this time and again, so here’s a quick recap if you’ve missed this.
When you actively reach through the arms, this helps reposition the ribcage (diaphragm) over the pelvis (pelvic floor). This creates a cannister effect which stabilizes the core, and allows us to become a pusher.
One of the keys in acceleration training is creating a piston-like action through the lower extremity. If we can get into a strong and stable position through the midsection, then a wall drill immediately becomes more effective.
Arm Mistake #1 – Not Actively Reaching
 If you’re in agreement that many of our athletes are very stiff and extended through their upper back, then this mistake should make perfect sense.
Someone that is very extended does not like to reach. They don’t like to open up the upper back.
Because it’s hard friggin’ work!
Instead of an active reach, what you’ll often see is a sagging (or “hanging on”) through the middle back.
The Fix: Simply cue the athlete to reach long, or to push their body away from the wall. This should not only create a more optimal position, but it should engage the core and midsection to a high degree as well.
Arm Mistake #2 – Reaching Too High
 If an athlete is working too hard on their lean, their may be a natural tendency to reach too high on a wall drill.
But let’s use simple biomechanics here. We know a lot of athletes aren’t winning the lat-ab battle through their midsection. The higher they reach overhead, the greater the likelihood that they will fall into extension.
The Fix: This is actually a simple fix, as the primary issue here is in the set-up.
Have the athlete take a step in closer to the wall, which will slightly reduce their body lean. From here, think about having them reach long through the upper back, just like they would at the top of a push-up. If the hands are above shoulder level, than bring them down a bit further still.
Once you’ve got the set-up dialed in, chances are this issue will fix itself in the drill. However, you’ll still need to do some work throughout the rest of your programming to create better balance throughout the midsection.
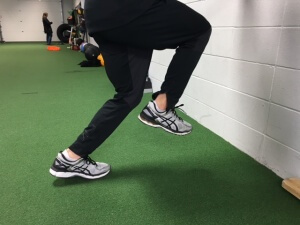
Dissecting Core and Trunk Posture
As we work our way down the chain, the next step is getting the core and pelvis where we want them.
Core Mistake #1 – Being Sloppy Through the Core
This mistake is hard to see in a static picture, but an athlete that gets sloppy through the core is generally loose and unstable throughout a wall drill.
You might see excessive flexion through the trunk and hips, a lot of lateral or side-to-side motion, or just a general inefficiency in the movement as a whole.
The Fix: The fix here is going to be multi-pronged.
- Get this person some abs. This won’t magically occur in a wall drill, so you’ll need to include a slew of good core training exercises to build general strength and tone through the midsection.
- Get them to reach. Simply cuing the client to reach long prior to starting the drill will reposition the rib cage and get the abs in a better position.
- Stay tight. This is sort of a misnomer, but there is a degree of tension you need in the abdominals during sprinting. The key here is not to bear down like you’re a powerlifter, but to keep enough tone/tension to improve mechanics and movement quality.
Core Mistake #2 – Pelvis Swayed Forward
 A pelvis that’s swayed forward in a wall drill is generally due to:
- An athlete that has a bit of swayback to begin with, and
- An athlete that doesn’t understand the correct starting position.
What you’ll see is this drives issues up and down the chain. Not only will they have a tendency to be loose and saggy through the core and lower back, but it will also affect their ability to really extend and push through the down leg as well.
The Fix: The PVC pipe is going to be my starting point here to create context as to the proper body alignment. This athlete may be neutral up top, but the goal is to have the back of the head, upper back and buttocks in a straight line throughout.
What I find is that this posture will show up time and again throughout their training sessions as well. This person loves to hyperextend through their hip, so cuing them to bring the shoulders forward while simultaneously bringing the hips/pelvis back will be huge for them.
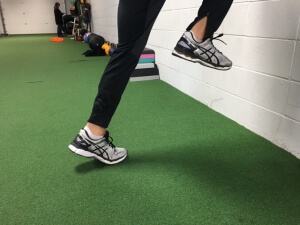
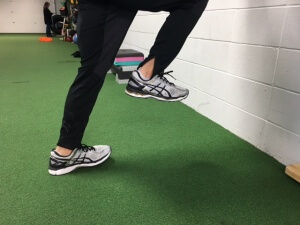
Dissecting “Up” Leg Posture
The up leg sets the table in a wall drill. If you get the up leg in the right posture, then that piston-like action of driving back/down into the ground really takes care of itself.
As such, here are two of the big mistakes we see through the “up” leg in a wall drill.
Up Leg Mistake #1 – Getting Loose Through the Shank
 As a rehabbing “strength coach,” I’m the first to admit that I’ve probably put too big of an emphasis on strength with my athletes over the years.
Don’t get me wrong – strength is critically important. However, a quality that all of us should be working on with our athletes is elasticity.
Improving elasticity makes our athletes more springy, explosive, and even improves efficiency.
If an athletes is getting loose, or not actively flexing the shank on the “up” leg in a wall drill, you’re going to lose out on the elastic component and be forced to muscle all of your accelerations.
The Fix: The fix here is fairly simple, and it often comes back to the athlete understanding what you want from them.
I’m not sure you even have to coach/cue this much during the exercise; rather, make the athlete aware that they are loose and not actively flexing, and the issue should itself up more times than not.
Up Leg Mistake #2 – Excessive Hip Flexion
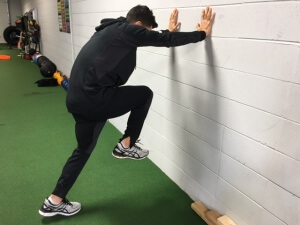 Athletes love to please us. We could ask most of our athletes to do damn near anything, and if it’s possible, they will try to do it.
However, this can go too far sometimes. For example we know that we want active hip, knee and dorsiflexion in a wall drill.
That’s all fine and dandy, until they start to exhaust their natural range of motion. What ends up happening is the athletes runs out of hip motion, and starts to sacrifice lumbar spine posture and positioning as a result.
The Fix: If your athlete is lower level and has poor body awareness, then place a PVC pipe on their back and really slow things down. Allow them to feel the difference between hip and spine motion.
For more advanced athletes, this probably isn’t necessary. Make them aware of the issue, and then cue them to be a bit “shorter” or “choppier” with their hip action.
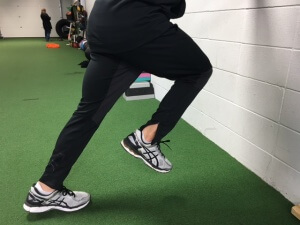
Dissecting “Down” Leg Posture
The last piece of the puzzle is the down leg action on a wall drill. While a lot of focus is placed on the down leg, the fact of the matter is if you did all the right things up to this point, it should fall into place quite nicely.
Down Leg Mistake #1 – Not Extending Through the Knee
 The end goal of an acceleration drill is to teach our athletes to push the floor or ground away.
If we push down and back, we develop a nice body lean and get our center of mass moving in the appropriate direction.
However, sometimes in a wall drill athletes are thinking about a thousand other things – torso position, flexing the up leg, cycling the legs quickly, etc..
And as a result, they forget to actually push and finish with the down leg!
The Fix: Start by having an athlete extend the down leg fully so they can feel this position. The should be pushing through the midfoot, with the knee and hip extended.
Once the final posture/position is locked in, speed the drill back up and simply cuing the athlete to “push” the ground away.
Down Leg Mistake #2 – Landing on the Toes
 To drive good mechanics through the lower extremity, the goal is push through the midfoot.
However, whether it’s due to poor technique or poor previous coaching, a lot of athletes come up excessively on the toes when performing wall drills.
The Fix: Again, context is key here. It may help to have the athlete roll excessively towards the toes initially, so they can feel how off balance and uncomfortable they are.
Then, have them put the foot back down and feel the midfoot. In this position they should feel not only more stable, but powerful and locked in as well.
Pull this all together by having them repeat the drill, with an awareness of striking with the midfoot on each and every rep.
Down Leg Mistake #3 – Landing on the Heel
 Let’s be honest – most athletes know they aren’t fast or explosive when they run on their heels.
However, just because they know this doesn’t mean they always do it!
If an athlete is ending up on their heels in a wall drill, that means either they set up incredibly poorly, or they are doing far too much volume.
The Fix: The only way to get on your heels in a wall drill is to set-up too close to the wall. Simply having the athlete move back a foot or so could make all the difference in the world.
The other possibility is that the athlete is fatigued and doing too much. I can’t imagine this happening too often, but remember the goals here are: 1) to work on skill/technique, and 2) to be explosive.
This is speed work, not conditioning work. If someone is fatigued and falling into this posture, shut the session down and move on to something else.
Summary
So yeah – that was a lot more exhaustive than I thought originally!
![]() However, I think breaking all this down is beneficial not only for better coaching of the wall drill, but for most acceleration drills as well.
However, I think breaking all this down is beneficial not only for better coaching of the wall drill, but for most acceleration drills as well.
If you really want to take your speed and agility game to the next level, Lee Taft just opened up the registration for his Certified Speed and Agility Coach Certification. Lee has mentored me for many years (both directly and indirectly), and I can’t speak highly enough about his work.
Quite simply, if you train athletes, this is must-have resource in your collection.
Okay enough from me – thanks for reading and go out there today and make someone faster!
All the best
MR