
One of my favorite days in every IFAST internship is “Program Defense Day.”
Here, our young coaches are put to the test.
We get to see what they’ve really learned about program design during their 3-month internship.
And trust me – I’ve seen the good, the bad, and the ugly.
From the programs that are incredibly well thought out and put together, to ones so bad they didn’t even get through their warm-up before I stopped them and made them start over!
But here’s the thing:
I don’t care how long you train clients or athletes, you can always get better at designing programs.
In fact, every serious trainer and coach I know wants to learn more about program design and refine their approach.
So being a man of the people, I figured it was time to write an in-depth article on how I design programs.
We’ll start with some of my big-picture, overarching philosophy and then dive into some of the nitty-gritty details and specifics.
So if your goal is to write better programs, you’ve come to the right place.
Let’s dive in!
Step 1 – Have a Philosophy and Big Rocks
I know this article is about program design, but before you write a program you have to have a philosophy.
And whether you know it or not, you already have a philosophy – or at least the start of one!
Your program design philosophy is based on a ton of different factors:
- Your life experience as a whole,
- Coaches and mentors you’ve had along the way,
- Your experience, background and preferences in training, etc.
So even if you haven’t taken the time to write your philosophy out or explain it to someone else, that doesn’t mean it’s not being shaped or formed on a daily basis.
It was probably dumb luck, but I honed in on my overarching training philosophy pretty early on:
My goal is to build movement efficiency FIRST, before trying to develop physical outputs like speed, strength, power or conditioning.
 This actually goes all the way back to my first job out of college, when I was a competing in powerlifting and working in a rehab facility.
Sure I wanted to be bigger and stronger, but not at the cost of my movement.
After all, I’d seen some of the best lifters in the world compete, and while I had a deep level of respect for the strength they’d cultivated, I also knew I didn’t want to sacrifice my movement just to lift more weight.
So if you haven’t already, I’d start thinking about what YOUR overarching philosophy is.
Ask yourself, what really matters to you as a trainer or coach?
Start by just jotting down any thoughts, notes or ideas that come to mind. It doesn’t have to be pretty, just work to get it out of your head.
Next, take all those thoughts and ideas and start to see if there are any common themes or ideas.
But once you can take all those thoughts and ideas and whittle them down into a couple sentences or a short paragraph, I think you’ll definitely be on the right track.
Step 2 – Assess Your Client/Athlete
It’s shocking to say this, but even in 2023, many trainers and coaches STILL aren’t assessing their clients and athletes before they start coaching them.
And if this includes you, there’s no shame in that – because we all have to start somewhere.
BUT I’ll also tell you this:
If your goal is to become a great trainer or coach, you must adopt a sound assessment process if you want to see long-term success.
Assessing your client could mean a lot of things, depending on the facility you’re at, the people you train, and the resources you have available to you.
- If you train gen pop fat loss clients, it could mean filling out a Par-Q, doing a lifestyle questionnaire, and then getting baseline numbers for their scale weight, body composition, and total inches.
- Or if you train athletes, it could be doing performance tests like 10-yard dashes, vertical jumps, and general strength testing .
 But here’s the thing – regardless of who you train, there has to be a movement component to your assessment!
Think about it like this…
If your car started making a random rattling noise and you took it to the dealership, you wouldn’t like it if the mechanic just immediately got under the hood and started messing around. Right?
You’d want the mechanic to run a diagnostic and figure out exactly what the issue is.
So why would we do anything different with the clients and athletes we train?
That’s why the movement assessment is such a big deal for us at IFAST.
We want to know what movements our clients and athletes can do safely and effectively on Day 1.
And perhaps most importantly, we want to know what exercises or movement THEY CAN’T do well, so we can either work on building those patterns up over time, or eliminating them from their programs all together.
But quite simply, you HAVE to assess your clients and athletes if you want to get the most out of your programming.
Step 3 – Develop a Short- and Long-Term Vision
One of the biggest issues I see with trainers and coaches alike is focusing too much on the short-term.
For example, if someone comes to you with a goal of shedding 50 pounds, it makes sense that you want to see some positive changes on the scale as quickly as possible.
And if you crush them in the gym for a week or two, you might see some of those changes – but at what cost?
Maybe they get injured.
Maybe they feel rundown or beat up.
Or maybe they just decide that this is too hard and quit all together!
Instead of focusing on short-term wins, think about how you can create long-term success for the people you coach.
That’s why I actually like to think big picture first.
Instead of thinking about losing that first 2-3 pounds, think about what the end goal looks like:
- What will they look like when they’ve lost those 50 pounds?
- How will they move and feel?
- What will their energy levels be like?
Once you to start to create that long-term vision, it’s actually easier to write those short-term programs that get them there.
So if someone wants to lose 50 pounds, it’s not about crushing them that first week – because literally anything you do will make them sore!
Instead it’s about getting them to show up and work with you 2-3x that week without skipping a session.
It’s getting them to take an extra 1,000 steps on their off-days, or building some low-level aerobic development.
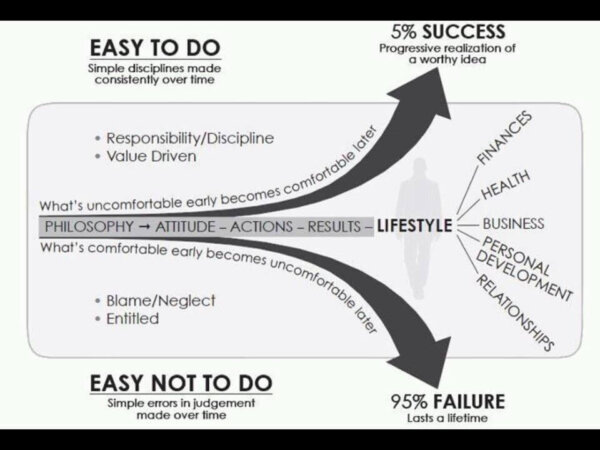
These small habits, when stacked consistently over time, create what author Jeff Olson calls, The Slight Edge: Small habits and wins stacked progressively over weeks, months, or years lead to some pretty amazing results!
So start with your long-term vision, and then plan backwards from there.
And perhaps most importantly, remember that you don’t have to use all your cool tips and tricks right off the bat.
The farther someone is from their fitness or athletic goals, the more general and basic your program can be while still delivering massive results.
Step 4 – Use a System for Program Design
Now that we’ve covered some of the more philosophical elements of program design, let’s dive into the nitty gritty details.
For years I used a somewhat random approach to program design, simply throwing exercises, sets and reps together and hoping it would all come together in the end.
But in 2012, all of that changed.
Myself, Bill Hartman and Eric Oetter sat in a room for a day to hash out our program design process, and we came out with the beginning of the R7 System.
In case you’re unfamiliar, here are the 7 R’s:
- R1 – Release
- R2 – Reset
- R3 – Readiness
- R4 – Reactive
- R5 – Resistance
- R6 – Resiliency
- R7 – Recovery

Here’s a brief overview of each:
- R1 (Release) – Foam rolling, lacrosse ball, or any kind of soft-tissue work
- R2 (Reset) – Breathing exercises, rolling/crawling, “corrective exercises, etc.
- R3 (Readiness) – Any warm-up activities you want to include
- R4 (Reactive) – Speed, power or explosive exercises
- R5 (Resistance) – Strength training
- R6 (Resiliency) – Conditioning and metabolic work
- R7 (Recovery) – Breathing activities, compression boots, recovery modalities, etc.
I’m confident you’re already using most (if not all of these) activities in some of your programs, which is great!
But here’s the thing…
I want you to use a system for program design so every program you write is consistently great!
If you’ve been doing this long enough, you know that sometimes you write a program and you’re like, “Yep – this is a great one!”
And others? Well, they’re just kind of “Meh.”
But when you use a system to help you write programs, you hedge the bets in your favor – to make sure that every program you write has the chance to deliver great results to your client or athlete.
Now there are a lot of reasons I like R7, but here are just a few:
Better Communication with Clients & Athletes
One of the biggest issues for me early-on was clearly explaining the “Why” behind certain elements of the program.
For instance, why do we foam roll?
What’s the point of all those breathing exercises?
Or why do I make you chill out and relax at the end of every session?
By using this specific terminology it helps explain the thought-process behind every step of your training program!
For instance, when someone sees or hears the word “Release,” they know that they’re doing that foam rolling to help loosen up their tight quads or calves.
When they see “Readiness,” they know that’s the warm-up that gets them ready for their training session.
And of course they know “Resistance” is where they get strong and build muscle!
So improving communication was great for the clients, but I think there was even more value in it for me.
Scalable to YOUR Clients and Athletes
A common question I get asked is this:
How do your programs differ between gen pop and athletes?
And the simple answer is not much!
The great thing about the R7 system is that you can scale and adjust the workouts based on the person standing in front of you.
For instance if you have a gen pop fat loss client who is 50 pounds overweight and hasn’t trained seriously in their life, you probably don’t want them doing box jumps or sprints in that R4 (Reactive) section of their workout!
But maybe you DO want them to throw a medicine ball or swing a kettlebell instead.
Without going on a tangent here, the biggest differences between gen pop and “athletic” programs are:
- The amount of volume/intensity they can tolerate,
- The amount of power/explosive work they do, and
- The complexity of the exercises I prescribe.
Training is training, and using the R7 system can help you scale your training sessions up or down based on the person standing in front of you.
Consistently Great Programs
One of the biggest issues for me early-on was writing consistently solid programs.
Some would be great, but then others I would make some major blunders.
But when you have a SYSTEM to help you write programs, immediately you’re more consistent.
By using those 7R’s, I knew exactly what could be in every program – so even if I left something out, it was willful omission versus simply forgetting!
Step 5 – Determine the “Style” of Program You Need to Write
I’m not sure if you’ve ever thought about it like this, but basically every program you write will fall into one of three categories:
- Neural programs,
- Metabolic programs, and
- Mixed-method programs.
Like it or not, program design is slave to certain physiological rules.
You might WANT to hit repeated 1-rep maxes on your squat while taking 30-seconds rest in between, but you’ll be lucky to get two or three before intensity starts to suffer.
In contrast, doing a high-volume set of squats is great if your goal it to shed body fat, but if you take 10 minutes in between sets scrolling through IG or hitting on the girl on the elliptical, that’s not going to lead to great results, either.
That’s why you have to adhere to the Neural-Metabolic continuum – something I was lucky to learn about in the early 2000’s from strength coach Ian King.

If you want to write successful programs, you have to adhere to the principles outlined above.
But let’s dive in and look at each of these goals in a bit more depth.
Neural Programs
Neural programs are focused on creating adaptations that are more focused on the nervous system, versus the muscular system.
(Yes I realize you can’t have one without the other – just think about where the emphasis of the program lies.)
Neural programs are generally focused on speed, strength or power development.
![]() If you go back to your trusty ex phys textbook, it’ll tell you that three things happen when you start a resistance training program:
If you go back to your trusty ex phys textbook, it’ll tell you that three things happen when you start a resistance training program:
- Increased neural drive to agonists/inhibition of antagonists (think efficiency),
- Improve rate coding (think speed),
- Improved motor synchronicity or sequencing (think timing).
And nervous system focused training programs have to follow a couple of rules:
- Lower overall/total volume,
- Higher intensity, and
- Full/complete rest.
Ever wonder why a powerlifter takes 5-10 minutes to rest in between heavy lifts? (And no, the answer isn’t just “they’re lazy” – there’s physiology behind those rest periods!)
Or why a sprinter might take 10, 15, or even 20 minutes between runs?
Simple: Because high nervous system outputs require a tremendous amount of time to recover from!
So if you want to get someone faster, stronger, or more explosive, you have to adhere to those rules.
But what about someone that wants to shed body fat or build muscle?
Metabolic Programs
If neural programs fit on one end of the spectrum, metabolic programs fit squarely on the other.
For instance if your goal is to shed body fat or build muscle, you’ll need to check a few boxes when compared to neural programs:
- Higher total volume,
- Lower relative intensity, and
- Incomplete rest.
Now there’s a whole host of issues I see when people fail with metabolic programs, but too often they’re working on the ends of the spectrum versus finding the sweet spot.
Issue #1 – Way Too Much Daily Volume
If your goal is to lean out or add muscle, you have to use a respectable amount of training volume to spur that adaptation.
But when it comes to fat loss, I see a lot of people absolutely killing themselves with volume.
As a result, what you see are people that have a great training session on Monday, but then they’re so smashed they can’t do anything else of substance until the next week!
When it comes to training volume, be smart.
Realize that most fat loss clients aren’t in great shape to begin with, so anything you do early on with work towards developing a training adaptation.
Once the foundation has been set, then you can build from there.
Issue #2 – 0 or 100 Intensity
No, I promise I’m not channeling Drake here.
Promise 🙂
Another common issue with fat loss programs are when clients trend towards the ends of the spectrum with regards to intensity.
For instance, on one end you have the client who is not getting any intensity in their program.
Their heart rate never crosses 80, they bounce from exercise-to-exercise, and they can carry on a full conversation while doing their workout.
Obviously this is less than ideal!
On the other end, you have the person who wants to punish themselves every time they’re in the gym, so they go 110% balls to the wall at each and every session.
As you can imagine, neither of these options are ideal if you want consistent, long-term results.
Instead, for most of my fat loss programs I like to coach my clients to leave 1 (or maybe 2) reps left in the tank every set.
For your low-intensity person, this helps them get the intensity up and start working a bit harder.
For your high-intensity person, this helps them throttle back and work at a level that they can maintain more consistently across multiple training days.
But perhaps most importantly leaving a rep or two in the tank ensures that movement quality stays high, while still allowing your clients to push themselves on each and every set.
There is definitely an “onboarding” period here as you help your clients understand what it means to ramp up or dial down their intensity, but this alone can work wonders and help your clients see more long-term, sustainable progress.
Issue #3 – Spanning the Spectrum on Rest
 The final issue I see in metabolic programs are clients who trend towards one end of the spectrum or the other with regards to rest.
On one end, you have what I deem the “Cardio Bunny” – they literally perform a set of one activity, and then without resting, go immediately into the next activity.
And while this might be great for keeping the heart rate elevated, when you take absolutely ZERO REST in between sets, it’s ultimately going to limit your intensity.
On the flip side, you’ve got Leisure Suit Larry – the guy who does one high-intensity set, and then proceeds to watch Sportscenter highlights or chat with his bros for the next 10 minutes.
I think an approach focused on moderation works best here – you need enough rest to maintain intensity, but you still need it to be incomplete to develop those metabolic adaptations.
So our first two programs cover the ends of the spectrum, but what about those programs that fit somewhere in the middle?
Mixed-Method Programs
Mixed-method programs are for those clients and athletes who want it all.
Strength.
Conditioning.
Body composition.
You know the drill!
Here’s the thing:
Mixed-method programs are great for newbies and/or maintaining physical qualities, but they’re not great for moving the needle significantly in any one direction.
Let’s take our newbie – when they’re just starting out you can make them squat heavy, run for distance, and do “mobility training” daily and see improvements in all of those physical qualities.
But if you keep doing that for an extended period of time?
The gains are going to come to a screeching halt quite quickly, my friend.
As the infamous Dan John is apt for saying, “Every program works – but no program works forever.”
As well, there are certain times where your clients or athletes are simply looking to maintain.
Maybe they’re practicing hard and in the midst of their competitive season.
Maybe they’re busy at work or school.
Or maybe training just isn’t the 1A priority in their life right now, and they want to maintain for a bit before making their next big push!
So if you’ve got a total newbie or someone looking to maintain, mixed-method programs will do just fine.
Just remember that if you’re looking to achieve some specific-training adaptations, you simply can’t ignore the rules of the Neural-Metabolic Continuum.
Now that you’ve outlined the style or program you have to create, it’s time to get to the fun stuff – choosing exercises!
Step 6 – Pick Your Exercises
A lot of people I’ve mentored struggle to come to grips with the fact that exercise selection isn’t the first thing we do when writing a program.
As you can see, it’s actually the sixth!
There are a whole host of things we have to do first, to determine what exercises will best suit our clients and athletes based on where they’re at, their needs and goals, etc.
One of the most important things we need to do is make sure we choose activities that are congruent with the style of program you’re writing.
For instance, if you have a client who wants to get really strong, choosing a reaching squat with a plate for their “main lift” probably isn’t congruent with their goal.
And along those same lines, here’s something it took me quite a while to figure out:
If someone is looking to shed body fat, build muscle, or become a better athlete, there are literally no exercises you HAVE to choose to help them get there!
Being a powerlifter, I used to think everyone had to back squat, barbell bench and deadlift from the ground regardless of their goal.
Want to shed body fat or build slabs of muscle? Back squat, barbell bench press and deadlift from the floor.
Want to get really friggin’ strong? Squat, bench and deadlift.
Want to become a competitive basket weaver or elite E-Gamer? Back squat, barbell bench press and deadlift from the floor.
Now keep in mind there’s nothing wrong with those exercises and they can absolutely help you get bigger, faster and stronger.
But unless you’re training a competitive powerlifter, no one HAS TO back squat, barbell bench press and deadlift from the floor.
If you want to squat, try goblet squats or 2-KB front squats to keep your clients more upright and reduce loading on the spine.
If you want to deadlift, try using a trap bar or elevating the plates to find a more optimal hip and spine position to pull from.
And if you want to bench, consider using dumbbells and/or alternating to keep the shoulders feeling great!
So if we can agree that there are very few – if any – lifts your clients or athletes have to do, here’s a way we can kill two birds with one stone.
To help them not only achieve their desired physique or performance goals, but to help them move and feel better as well.
I call it the Exercise Selection Matrix, and it works like this….
The Exercise Selection Matrix
The exercise selection matrix helps us understand what activities we can choose at every level of a program to help move the needle with regards to our client’s movement issues.
So I start by simply listing R1-R7 at the top, and then we build it out from there.
![]()
Once you’ve gone through your assessment, you should know the major movement and/or postural issues your client/athlete is dealing with.
I start by labeling all of those and putting them in the left-hand column like this:

In this case, you can see that our client has four issues I want to address:
- They have a large anterior orientation/anterior pelvic tilt I want to help them control.
- Their squat is “hinge-y” versus “squatty.”
- I want to shift them from their right side back to their left.
- They have an exaggerated kyphosis or down pump handle.
Once you’ve got the major issues in place, it’s time to start brain-storming activities throughout your program that could help address the issues.
Let’s take that hinge-y squat and tease this out so you can really see how this works.
Generally this client has a significant anterior pelvic tilt/orientation (as we already noted), is compressed on the back side of their body, and their pelvis is back/behind them which forces them to squat in this manner.
So if I want to make real, impactful change in their programming, I can’t just foam roll their quads and hope it’s going to make a big difference!
Instead, I need to address these issues at every step of their programming if I want to create meaningful change.
It might look something like this…
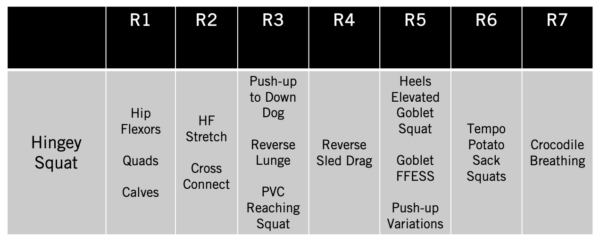
Now let’s break this down at every level:
- R1 Release – Foam roll the hip flexors and quads to reduce anterior orientation of the pelvis; lacrosse ball on calves to improve ankle dorsiflexion
- R2 Reset – Hip flexor stretch to improve hip extension; supine cross connect to reduce lumbar extension and shift center of gravity (COG) back
- R3 Readiness – Push-up to downward dog to create posterior expansion/shift COG back; reverse lunge to improve hip extension, PVC reaching squat to improve A-P expansion, increase dorsiflexion, and improve squat pattern
- R4 Reactive – Not truly “reactive” in this sense but backwards sled dragging to get pelvis underneath thorax, reduce posterior compression and shift COG back
- R5 Resistance – Heels elevated goblet squat to get pelvis underneath thorax and shift COG back; ditto for Goblet front-foot elevated split-squat (FFESS) which will also improve hip extension; push-up variations to create space front-to-back through the torso, etc.
- R6 Resiliency – Tempo potato sack squats with heels elevated to stay tall and continue to pattern upright squat pattern
- R7 Recovery – Crocodile breathing to create posterior expansion and help kick-start recovery process!
Using the exercise selection matrix will not only give you a massive amount of exercises you can choose from, but every one of those activities will help your clients and athletes move better as well!
Last but not least, once you have some idea of the exercises you’re going to choose, I want you to make me a promise.
Promise to underwhelm your clients early, versus overwhelming them.
Here’s what I mean by that…
If you’re working with 75-year-old grandma Betty who has never trained in a gym before and you give her a reverse lunge to overhead press, chances are she’s not going to be successful.
But if you teased those activities out and maybe gave her a supported split-squat and a half-kneeling landmine press, she could do either of those just fine.
But there’s psychology in here – clients and athletes want to feel successful.
If you start them off with activities that are too challenging or complex and then have to regress them, from a psychological perspective they feel like a failure.
Instead, start with less complex activities early-on, and if they do the trick, great.
And if it’s too easy, you can progress them in a session or two – along with reminding them about how awesome they’re doing and that they’re crushing this program!
At this point you should have the Big Rocks figured out in your program:
- You know the major issues your client has, and you’ve chosen exercises to address them.
- You know whether you have a neural or metabolic program, and you’ve picked a set/rep scheme and rest periods that are congruent with those goals.
So what do we have left to do?
Two final steps that may not sound important, but will really seal the deal when it comes to writing a GREAT program…
Step 7 – Crack the Window in the Warm-up
It’s funny, but one of the questions I get asked the most is:
“Mike, what activities do you put in your warm-ups?”
It’s funny because while so many athletes are apt to skimp (or skip altogether!) on their warm-up, great coaches know that a solid warm-up sets the stage for the rest of the training session.
When it comes to the warm-up, one of the primary goals is to restore movement options before the client starts training.
If someone comes to you with poor hip rotation, dodgy knees, or a stiff back, we all know that letting them jump right into the session is definitely a bad idea.
But in that same vein, just taking that client and dumping them on the spin bike for 5-10 minutes pre-session isn’t going to move the needle all that much, either!
Instead, we need to use the warm-up (R1-R3) as an opportunity to crack the movement window.
Going back to our Exercise Selection Matrix, if someone is dealing with a knee issue you might have to do the following:
- R1 Release – Foam roll hip flexors, quads, calves and upper back
- R2 Reset – Hip flexor stretch to improve hip extension; hip lift activities to engage hamstrings
- R3 Readiness – Pull-back quad stretches, Inchworms, Reverse Lunges/Split-Squats, PVC Reaching Squats, etc.
As you can see, we’ve taken their knee pain and addressed it head-on in the warm-up – because we know if we can get those dodgy knees feeling better, they’re going to be able to train harder and get better results!
Once you’ve dialed in the warm-up, it comes to the final step in our program design process…
Step 8 – Check Your Work!
Every teacher growing up probably asked you the same question before you turned in your homework:
“Did you check your work?”
And while it might’ve been annoying then, it’s no less true now that we’re writing programs!
And I don’t know about you, but I’m not always dealing with the most pristine work environment when I’m working.
Sometimes my son is telling me about how he just unlocked the Master Sword in Legend of Zelda.
Random telemarketers are spamming my phone.
And sometimes Finn the dog just gets bored and wants to get up and bark at people who are quietly walking by outside!
So checking your work may seem mundane, but can make a big difference in your final product.
Here are some of the biggest issues I see when programming:
Not Thinking About Set Duration
Set duration is a biggie, especially when we start talking about split-stance, single-leg or unilateral activities.
Take the following example:
 Split-Squats, 2x15e, 301 tempo, 60 seconds rest
Now if someone is trying to shed body fat, at first glance this may not look too bad.
After all, they’re doing higher volume in the set, and they’re working on an appropriate rest period.
But when you start to do the math, things get a bit hairy.
If your client adheres strictly to the tempo prescribed, each rep should take ~4 seconds.
And you’re doing 15 reps, so 4 seconds/rep x 15 reps = 60 seconds.
But here’s the rub – that’s only for one leg!
So in this case, you either need to drop the reps, drop the tempo, or some combination of the two.
Because it doesn’t take 22 years of experience to know that no client in the history of every wants to do 2 minutes of straight split-squats!
Prescribing Too Many Activities
Another common issue is prescribing too many activities.
Here, you’ll see coaches who want to check every box, every time they get a client in the gym.
They want bilateral quad dominant work.
They want bilateral hip dominant work.
But you’ve got to get some split-stance activities in there, so make sure to throw that in.
Oh and single-leg work is important as well! So throw one of those in.
And they’ve got some minor issues they’re working on, so make sure to get some isolated, single-joint activities in there as well!
Do you see where I’m going with this?
This is how you end up with a Frankenstein program – all kinds of random parts, none of which really flow and work together.
Focus on maximum efficiency – 80-90% of my training programs only include 4-6 activities in the R5 (Resistance) section of the workout.
Can you do more? Sure.
But make sure that every exercise you prescribe has a place, and most importantly, that it’s moving your client or athlete towards their goals – not simply checking a box.
Which actually leads me to my next point…
Programming Exercises YOU Like to Do
This comes back to my time in powerlifting.
Since I was a powerlifter and loved to back squat, barbell bench press, and deadlift, I assumed everyone needed to do that.
Now the training landscape was a lot different 20 years ago, so don’t roast me too bad for my flawed approach back then!
But one of the keys to becoming a great trainer or coach is disconnecting YOUR training likes, dislikes, and goals from that of the people you train.
If you want to be a world-class bodybuilder, powerlifter or Olympic lifter, that’s awesome – but that doesn’t mean the methods that work for you will work for the people you train.
Instead, program activities that meet them where they’re at, both with regards to their movement competency and their goals.
It might be harder than you think early-on, but I guarantee you’ll get better results in the long run.
Typos and Grammatical Mistakes
Last but not least, take a few minutes to review little things like typos, grammatical errors, etc.
For instance, theres’s a big difference between straight and strait.
Capitalize the names of your exercises.
And overall, do your best to ensure that the finished product is a reflection of the time and energy you put into creating it.
Summary
So there you have it, 5,000+ words on how to write a better program!
 I know there’s a lot in here, but I truly hope that the steps I’ve outlined above will help YOU write consistently better programs.
And if you’d like to learn more about how I write programs, the assessment process I use, or how I coach and cue my clients and athletes, be sure to check out my Complete Coach Certification.
This product is the culmination of my 20+ years of experience, and I really think it can help you become a better trainer or coach.
Thanks so much for reading – now go write some amazing programs!
All the best,
MR