 What is a superior cue to the strength coach or trainer?
“Arch” or “Brace”?
After discussing this via e-mail with my good friend Wil Fleming last week, I felt it was finally time to sit down and put this blog together.
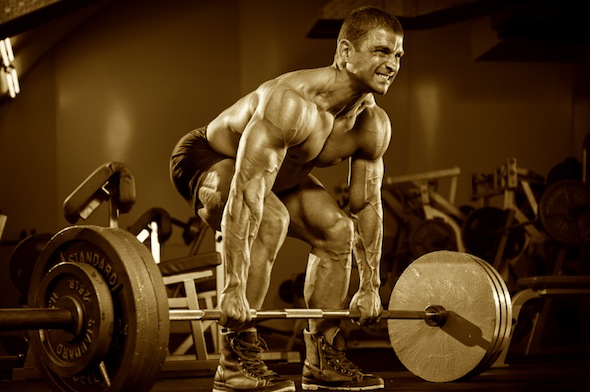
A cue that we’ve all used in the past when teaching someone how to squat, deadlift, or Olympic lift is to “arch.”
In fact, I remember when I first started powerlifting the cue wasn’t just to arch, it was to arch hard.
Then we took it even further than that – now it’s not just arch the lower back hard, we need to arch the upper back hard as well!
Or if we want to drive extensor-tone through the roof, we can arch the upper back, lower back, and use our neck and eyes to look at the ceiling as well.
And trust me, I’m not throwing stones here. I clearly remember a time when squatting my goal wasn’t just to look up, but basically drive my eyes towards the ceiling to keep from getting caved over!
The question is, why do we want to arch in the first place?
This may be the only simple question I can answer in this post:
We want to have a rigid spine when squatting, deadlifting or Olympic lifting to maximize force transfer to the bar.
But is it really that simple?
Do we just need a stable spine?
Or do we want a spine that is not only stable, but optimally aligned as well?
Let’s begin by examining the posture of a typical athlete, and from there we can see how this will affect lifting and athletic performance.
The Scissored Static Posture

Many of you reading this have an idea of what an “ideal” posture looks like, even if you don’t see it all that often.
If we want to base this off a standard static posture assessment from the side view, here are a few things we’d like to see:
- Lateral ankle, knees, hip, shoulder, and back of the ear in a straight line and perpendicular to the ground.
- Normal lordosis/kyphosis.
When you’re in this position, a few things to note:
- Their pelvis is neutral, or slightly (approximately 10 degrees) anteriorly tilted.
- The lower ribs are down.
- With both of the above in place, your diaphragm and pelvic floor are directly facing each other. This builds a “canister” and allows for maximal intra-abdominal pressure/stability.
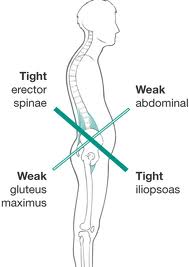
However, what we tend to see in an athletic/powerlifting/Olympic lifting population is a scissored posture throughout the core and pelvis.
Some might refer back to Janda’s lower crossed syndrome as an example.
At the joint level, the pelvis is excessively anterior tilted, the lumbar lordosis increases, and the lower ribs are flared in the front.
This poor joint position drives sub-optimal positioning of the diaphragm and pelvic floor as well. No longer are they facing each other (allowing for that nice canister effect), but now they’re both facing forward.
And moving even further from the center, when you’re anteriorly tilted you lengthen the glutes and hamstrings, making them less efficient to demonstrate strength and power.
(For a more thorough and lengthy discussion on this topic, be sure to check out my article Hips Don’t Lie: Fixing Your Force Couples).
Now that we have a basic understanding of the common postural flaws we see in our athletic populations, let’s look at how our bodies actually create stability.
Passive vs. Active Stability
Several years ago, I wrote this blog on the difference between passive and active stability.
And while I’m sure it has some good information in there, I’d like to summarize and expand on it here.
In an effort to run fast, lift heavy things, or simply be functional in everyday life, we rely on a balance between active and passive stabilizers in our body.
Passive stability is created via things like ligaments, joint capsules, approximation and compression of joints, etc.
It’s naive to think that someone will rely solely on passive stability, but when we rely excessively on passive stabilizers, it’s only a matter of time before we run into issues.
On the other side of the spectrum is active stability, which is created via the neuromuscular system.
Rather than relying on some passive structure in our body to create stability for us, we use our muscles to actively create stability so that we can plant and cut, lift heavy things, etc.
But as I sat here and thought about all this, that’s an incredibly black and white way of looking at things.
And as you know, I don’t like black and white!
The body simply isn’t cut and dry.
Instead, I think there are quite a few more options when it comes to how we actually create stability in sports or lifting. Here are just a few that have come to mind:
- Truly Passive Stability.
- Flawed Active Stability (Program-Based).
- Flawed Active Stability (Alignment-Based).
- Truly Active Stability.
Let’s look at each of these a bit more in-depth, because this is where we can really start to figure out how this affects ourselves (or our clients), and what strategy we need to take to fix them up.
#1 – Truly Passive Stability
 This is the person you train that has zero athletic ability, zero muscle tone, and is incredibly loose and floppy.
This person is literally hanging on their ligaments, joints capsules, and joint surfaces to try and create stability for their body since their muscles simply cannot (or will not) do it.
Luckily, I’ve only trained a handful of these people in my lifetime. They are incredibly complex cases because they tend to have very poor kinesthetic awareness, and little to no athletic background.
The Training Fix
These people are challenging, because you’re not only trying to teach them basic movement skills, but how to move well at the same time.
Obviously good coaching and cuing is imperative, but I’ve found slowing down the tempos to be the single-most effective tool in your toolbox.
Whether it’s slow eccentrics, slow concentrics, or even static holds placed at the midpoint of the movement, slowing down the tempo will effectively target the muscle fibers (versus connective tissues) while simultaneously improving kinesthetic awareness and body control.
#2 – Flawed Active Stability
(Program-Based)
This is the centerpiece of our arch vs. brace argument.
There are essentially two reasons that someone would try to use this stabilization strategy when squatting, deadlifting or O-lifting:
- They don’t know any better, and this is simply how their body is aligned (more on this in the next section), or
- They are being actively coached to stabilize in this fashion.
Teaching someone to “arch hard” is forcing them into using passive stabilizers, via a poor/suboptimal motor program.
When you cue someone to arch hard, you’re telling them to maximally engage their paraspinals/spinal erectors to develop spinal stability.
There are more than a few problems with this, though.
When you actively extend (shorten) the muscles on the back side of the joint, you are actively lengthening the muscles on the front side of the joint, in this case your abdominals.
Doing this puts an incredible amount of compressive stress on the posterior elements of the lumbar spine (facet joints, posterior disc, etc.), effectively crushing them in an effort to create stability.
And I use the term crush for a reason – I want it to be a strong visual.
If you want to lift heavy things for an extended period of time, I wouldn’t suggest crushing your spine.
Furthermore, think about how you’re crushing the joint when attempting to arch.
If you can optimally align a joint and then compress it, that compression force is balanced more evenly across the entire joint.
This will not only improve and maximize joint congruency (i.e. stability), but decrease wear and tear on the joint as well.
On the other hand if you have a joint that is out of alignment and compress it, that compression force will not be balanced evenly across the joint.
This will increase wear and tear on specific areas of the joint, promoting more rapid changes in joint and soft-tissue degeneration.
This helps explain why people wear out one hip joint versus the other, one compartment of their knee versus the other, or one specific spinal-level before another.
Quite simply, they are putting too much stress/load on that area when compared to surrounding areas.
Here’s the bottom line on this:
When you arch hard you’re placing all the stress on the backside of your facet joints and lumbar discs.
This actually came up in a discussion I had with our interns last week. Young Conor has trained around some high-level powerlifters, and his question was on-point:
“But can’t you get really strong by arching hard?”
In a word? Absolutely.
But here’s the thing – I look at things from a long-term perspective. I don’t want to simply lift heavy things now, but for many years to come.
I feel if I optimize my biomechanics with regards to mobility, stability, alignment and movement, then I can minimize or offset any joint and wear and tear that will naturally come with lifting heavy things for extended periods of time.
Even with all that being said, there are some incredibly strong guys that would whole-heartedly disagree with my arguments here (along with scoffing at the weights I deem “heavy”).
And I’m ok with that. To each his own.
This is simply my philosophy on the matter, and you’re always free to agree or disagree with my opinions.
The Training Fix
The goal here is simple:
You want to move from the “arching” mindset to the “bracing” mindset.
If you have good posture and alignment, you may be able to skip immediately to #4.
However, if you have specific movement limitations (which I’m assuming most of you will), simply read up on the point below.
#3 – Flawed Active Stability
(Alignment-Based)
The second type of flawed stability is a little bit different than our situation above.
In this case, let’s assume the athlete we’re coaching knows what position they want to get into.
They don’t want to arch hard – instead, they want to keep the ribs down and actively brace the core or midsection.
But what happens when you simply can’t get there?
You know all the rights things to do, but from a biomechanical perspective you simply cannot get into a biomechanically neutral alignment?
I’ve seen this numerous times with clients and athletes. They want to extend their hips, or internally rotate their shoulders, but they physically cannot due to biomechanical limitations.
This is going to require a bigger picture “fix,” but ultimately, I think it leaves our clients far better off.
The Training Fix
In this case, you’re going to need some “corrective” programming.
Without seeing someone move, I can’t tell them exactly what to do.
However, with a comprehensive movement assessment, I can determine what this clients’ specific movement limitations are, and create a program to help eliminate those issues.
Keep in mind, this isn’t as simple as foam rolling pre-workout and throwing in a couple of mobility exercises to get you warmed up.
You might move and feel better, but this isn’t a long-term solution.
 Instead, a truly corrective program addresses your movement limitations at every single level of the program.
Everything from your foam rolling to your energy systems training (and everything in between), must be geared towards addressing your specific movement limitation(s).
This is something I actively address in my upcoming Bulletproof Athlete program.
If you can’t get your body into a biomechanically “neutral” position, not only will you be more likely to get injured, but you won’t be able to produce optimal performance either.
In lay terms, that means more back and knee pain, smaller weights on all the cool exercises like squats and deadlifts, and slower 40’s or lower vertical jumps.
All that equals a less awesome version of you, which I’m simply not ok with!
#4 – Truly Active Stability
This is what we should all be striving for.
Optimal alignment, combined with an optimal stabilization pattern.
When someone has optimal alignment, a lot of the magic should happen on it’s own. A well-aligned body will reflexively move better, without as much need for active coaching or cuing.
Let’s go back to our diaphragm and pelvic floor again.
In our scissored posture, your diaphragm and pelvic floor aren’t facing each other.
You take that big breath in to brace your midsection, but since you don’t have abs on the front, and you’re in a poor alignment to boot, you have no choice but to push the abs out and hang on your lower back for stability.
But, if you’re in an optimal alignment and you take that deep breath, now your diaphragm descends…
…and if your pelvic floor is aligned directly beneath it, it presses back…
…which all means you have a ton of pressure and stability throughout your core and midsection, allowing you to maximize performance.
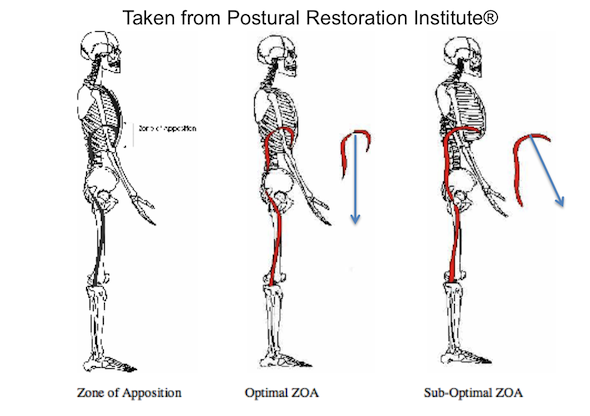
(Photo Courtesy of the Postural Restoration Institute)
And keep in mind, this isn’t just muscular tension or bracing. Sure you have those things, but most importantly you have that solid canister of intra-abdominal pressure to support and stiffen your spine as well.
This is how you not only maximize performance, but minimize injury risk at the same time.
As you can imagine, there’s really no training fix for this one. If you’re well aligned, all you have to do is maintain your requisite mobility, stability and movement patterns and you’re good to go.
Summary
So there you have it.
In my estimation, the coaching cue of “brace” is superior to the cue “arch” because it gets you in a proper biomecahnical position to display awesome amounts of speed, strength or power.
In that same breath, bracing with a good alignment will simultaneously reduce the likelihood of injury to your lower back, both in the short and long-term.
At the end of the day, the choice is yours.
There are plenty of strength athletes who have lifted ridiculous weights using both methods.
But if your goal is to lift heavy things for as long as possible, optimize posture and alignment and then brace whenever lifting maximally and you’ll be stronger and safer to boot.
Stay strong
MR
P.S. – If you’re interested in learning more about our approach to assessing clients and athletes, you still have 1 day to register for Diagnosis Fitness and save $300.
Learn all about Diagnosis Fitness here