 Every single client or athlete I train uses push-ups in their programming.
And why not?
They are simply a fantastic lift, whether your goal is to get stronger, burn more body fat, or become more athletic.
Let’s start our journey by reviewing just a few of the reasons you might want to include push-ups in your next training program.
Benefits of Performing Push-ups
There are numerous reasons you should be including push-ups in your programming, but here’s just a short list.
Upper Body Strength
While push-ups don’t get the acclaim that the bench press does with regards to upper body strength, there’s no doubt they can help.
The bench press is superior if the only goal is pure, upper body strength. That’s hard to argue. But if you’re looking at the ability to use your body holistically, or to move your entire body through space effectively, then the push-up may be a better choice in that regard.
And when you factor in all of the various progressions with regards to load, instability and leverages, there are tons of push-up variations to help you get there.
Core Stability
It’s rare that I see a client or athlete whose core strength and stability are sufficient. Most are woefully bad, whether they’re a young client starting out or even a professional athlete.
Therefore I’m always looking for ways to get more core training into their programming, beyond just the typical core training exercises thrown in at the end of their session.
By using various push-up variations and progressions, I can challenge the core more frequently during the workout, and therefore get a faster response.
Unifies the Core, Upper and Lower Body
Taking the previous point a step further, push-ups do a great job of integrating the upper body, core and lower body all into one movement.
As mentioned above while the bench press includes the core to a degree, in the push-up, the core (when weak or unstable) can become a limiting factor if not brought up to par.
Furthermore, athletes don’t just need upper body strength, but the ability to demonstrate or express upper body strength strength while stiffening the core and lower body. In this regard, I actually find the push-up superior to the bench press.
And while we’re on the topic…
Alternative to Benching
Whether it’s due to a bum shoulder, or a sheer avoidance of the lift for any reason, the push-up can be a viable alternative to bench pressing.
I have more than a handful of athletes who are unstable through the shoulder, and it’s more due to passive/structural issues than active instability. Unless they get a surgery (which is entirely unnecessary for performance in their sport), bench pressing shouldn’t be a focus in their program.
As such, these athletes will use push-up variations instead.
Learn How to Reach
Last but not least, one of the key reasons I might choose a push-up over a bench press is because it teaches my clients and athletes how to reach.
In a bench press, the goal is to lock the shoulder blades back and down to increase stability. And while this is great for a bench press, it’s not necessarily ideal for our shoulder mechanics.
Instead, a push-up can teach someone how to reach using their serratus anterior. When tied together with proper breathing, this can really open up the back side of the body, including the upper back (or posterior mediastinum).
Now that we’ve covered a few of the benefits of including push-ups, let’s walk step-by-step through the set-up and performance of the lift.
How To Set-up
Lie on Floor and Set Hands
The first part is easy – you just lie on the floor with your hands just outside of shoulder width apart.
If you go too wide it’s going to put excessive strain on the shoulders, while going too narrow is going to really jam you up and make the lift feel awkward. There may be a small piece of individual variation here, but start just outside of shoulder width and then adjust from there.
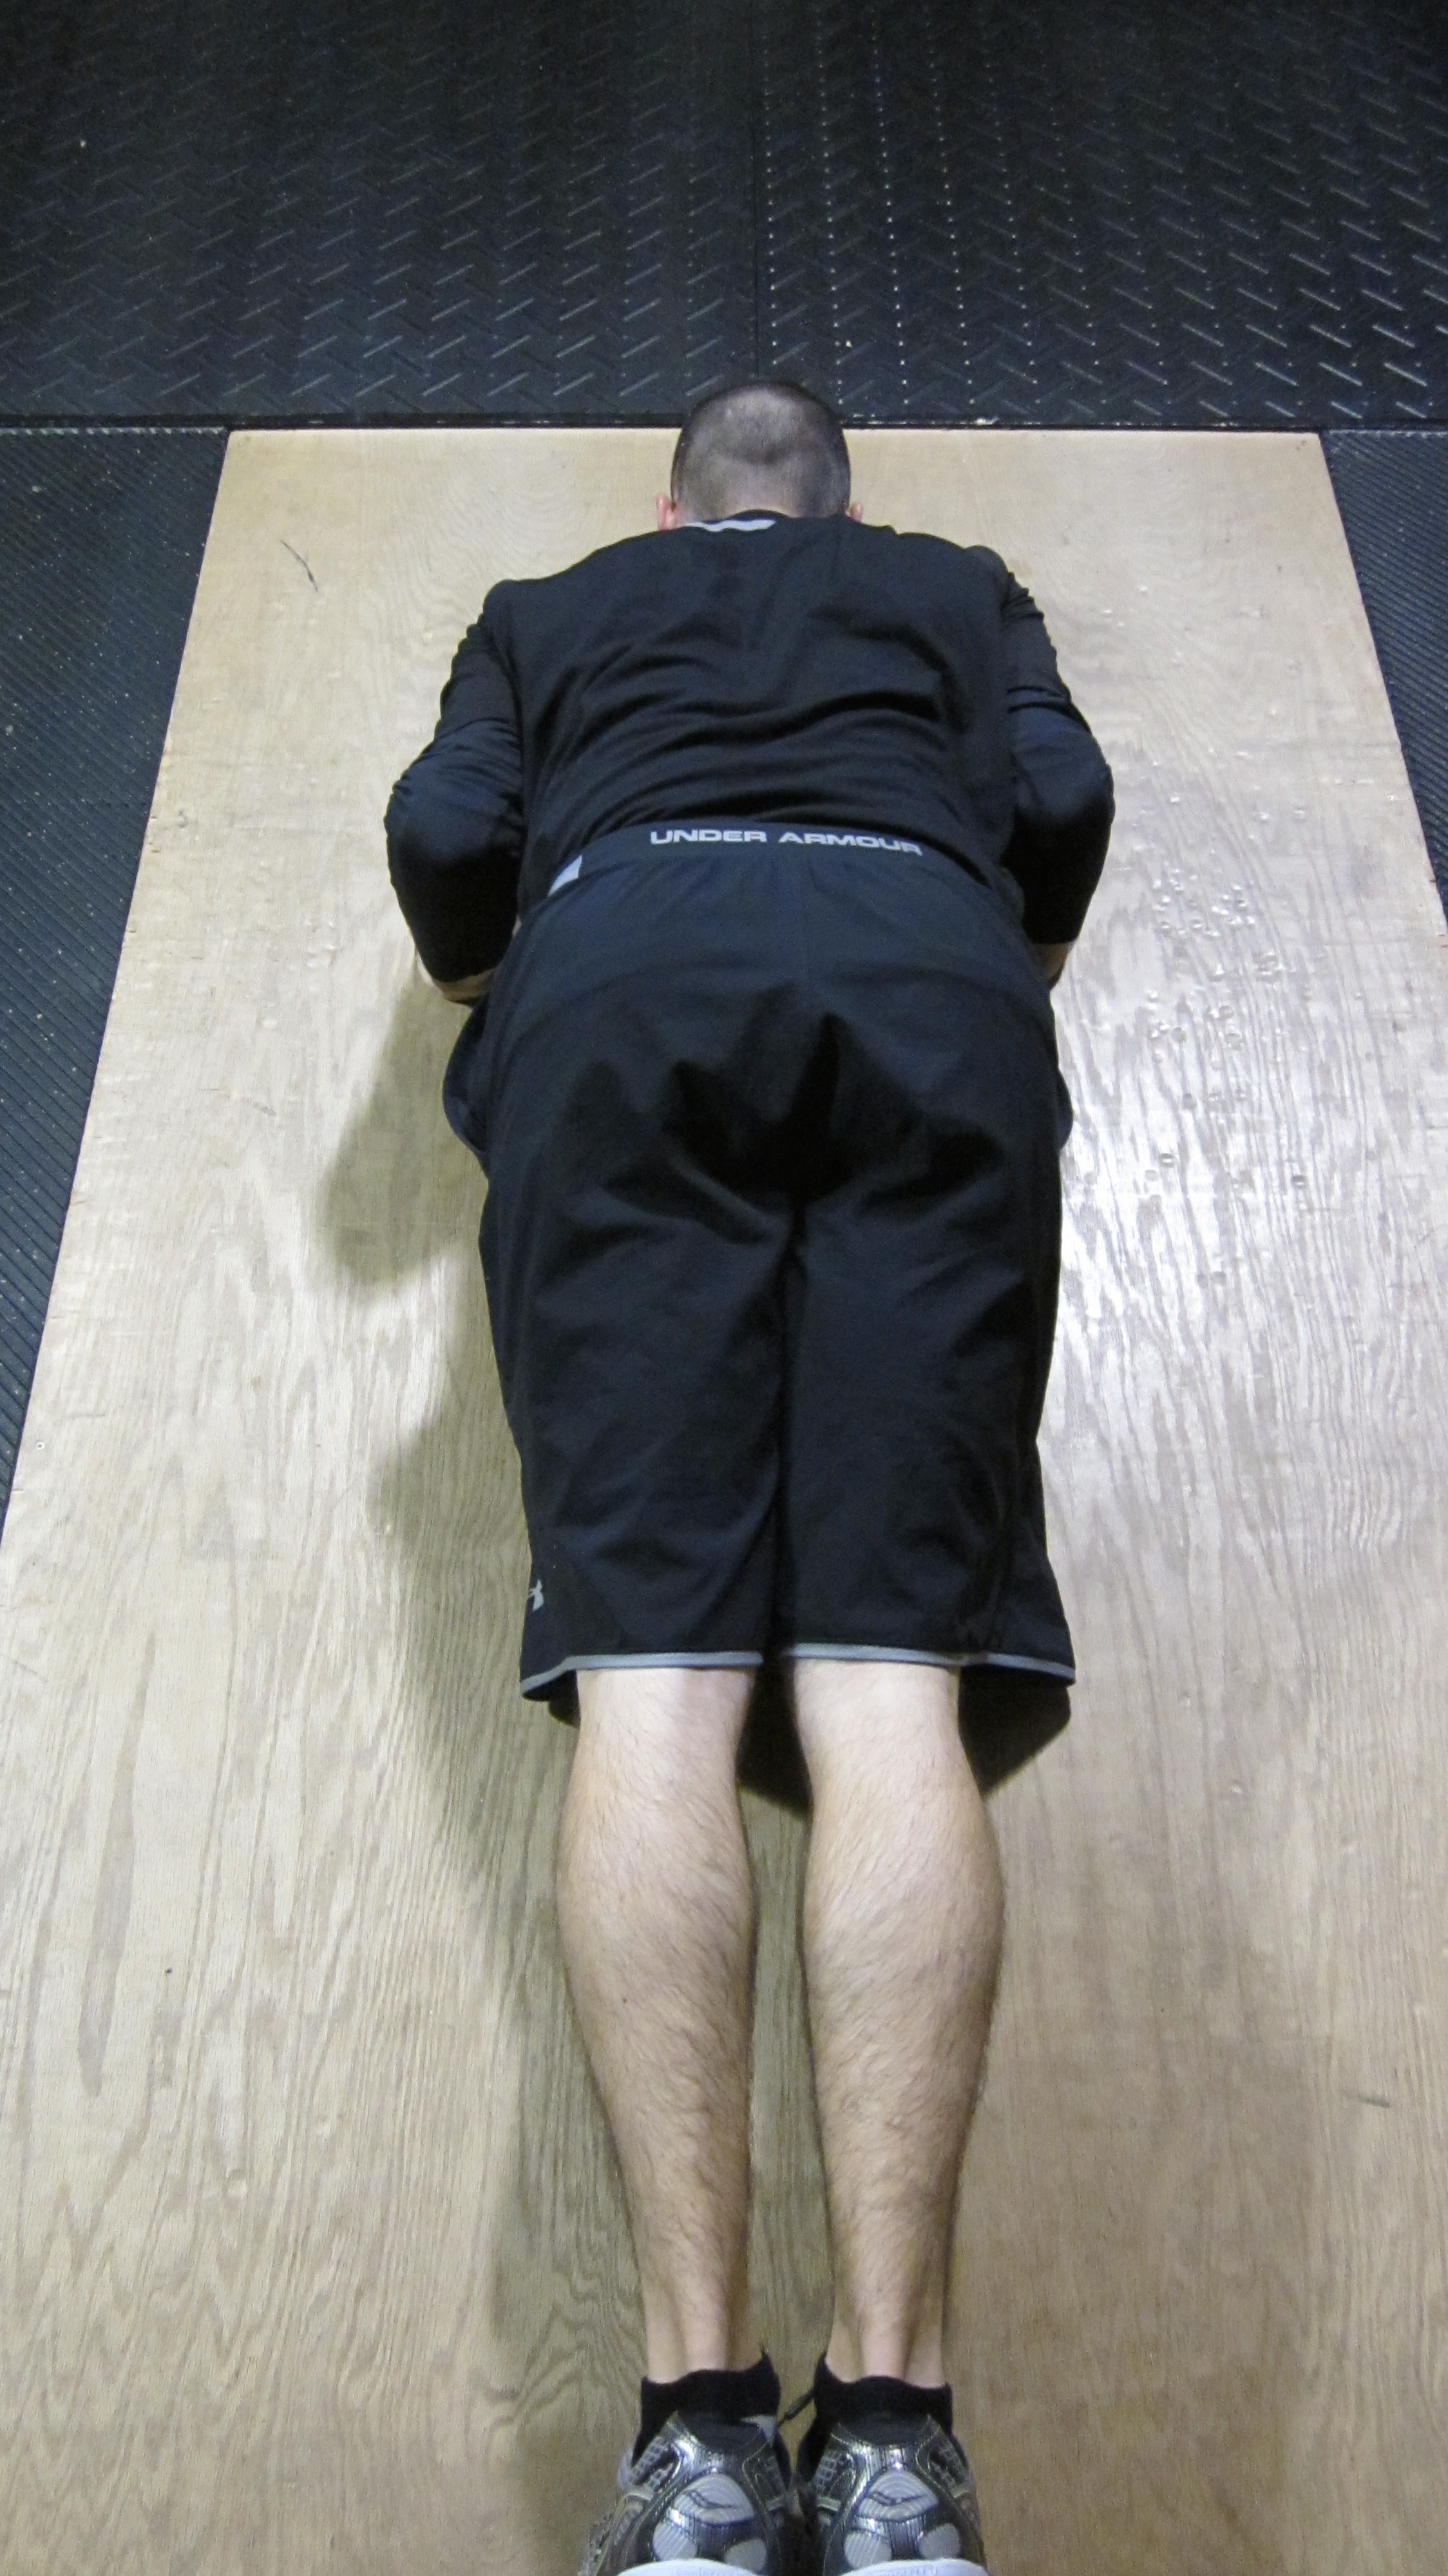
Get Neutral in the Top Position
The next step is to actually get up into the starting position, with the arms outstretched and up on the toes.
In the top position you should have a neutral spinal alignment – in other words, three points of contact which include:
- The back of the head,
- The upper back, and
- The buttocks/sacrum.
Here’s a quick overview in case you’re unfamiliar with this concept.
One other thing to reference here is lower back position. While holding that three points of contact with the PVC pipe, you should also have a small curve in the lower back.
When coaching, I’ll try to slide my fingers in between the PVC pipe and the lower back. If they’re in a good position, I can slide my hand in to about my knuckles. Anything more than that and they need to get tighter through the abdominals and midsection (more on this later).
Knees Straight
This is as easy as it sounds. Once you’re in a neutral spinal position, you also want to neutralize the pelvis and knees.
Make sure to lock the knees prior to initiating the movement. It may help to think of making your body a board from top to bottom, and making everything tight so it will move seamlessly together.
Inhale and Reach
At this point you’re pretty well set-up, and may want to go ahead and start cranking out reps.
However, while this next part is probably a bit different from what you’ve done in the past, but be sure to give it a shot.
In the top position, think about reaching long through your arms, and then inhale. The goal with the inhale is to pull air into the upper back. I’ll often cue my athletes to think about “making their arms long,” or “pushing as far away from the ground as possible.”
Exhale and Get Tight
Last but not least, it’s time to get that extra air out of the body. Exhale fully and work on getting the abdominals tight. This will really lock in the core, and help tie the upper and lower body together.
Now that we’ve detailed the set-up, let’s look at how to perform a proper push-up.
Push-up Performance
Lower towards ground
To initiate the movement, simply start lowering yourself down to the ground.
Back in the day I used to cue my athletes to pull with the lats, or to actively squeeze/pinch their shoulder blades back together.
Looking back, I don’t think that was a great idea. What ends up happening when you cue the lats is you keep the elbows in too tight to the body, and certain clients start to get anterior humeral glide through the shoulders (often causing anterior shoulder pain).
And on the flip side cuing someone to actively squeeze back when going down makes the movement unnatural and can also put undue strain on the shoulders.
In a nutshell, simply start lowering and you should be good to go.
Make the Arrow
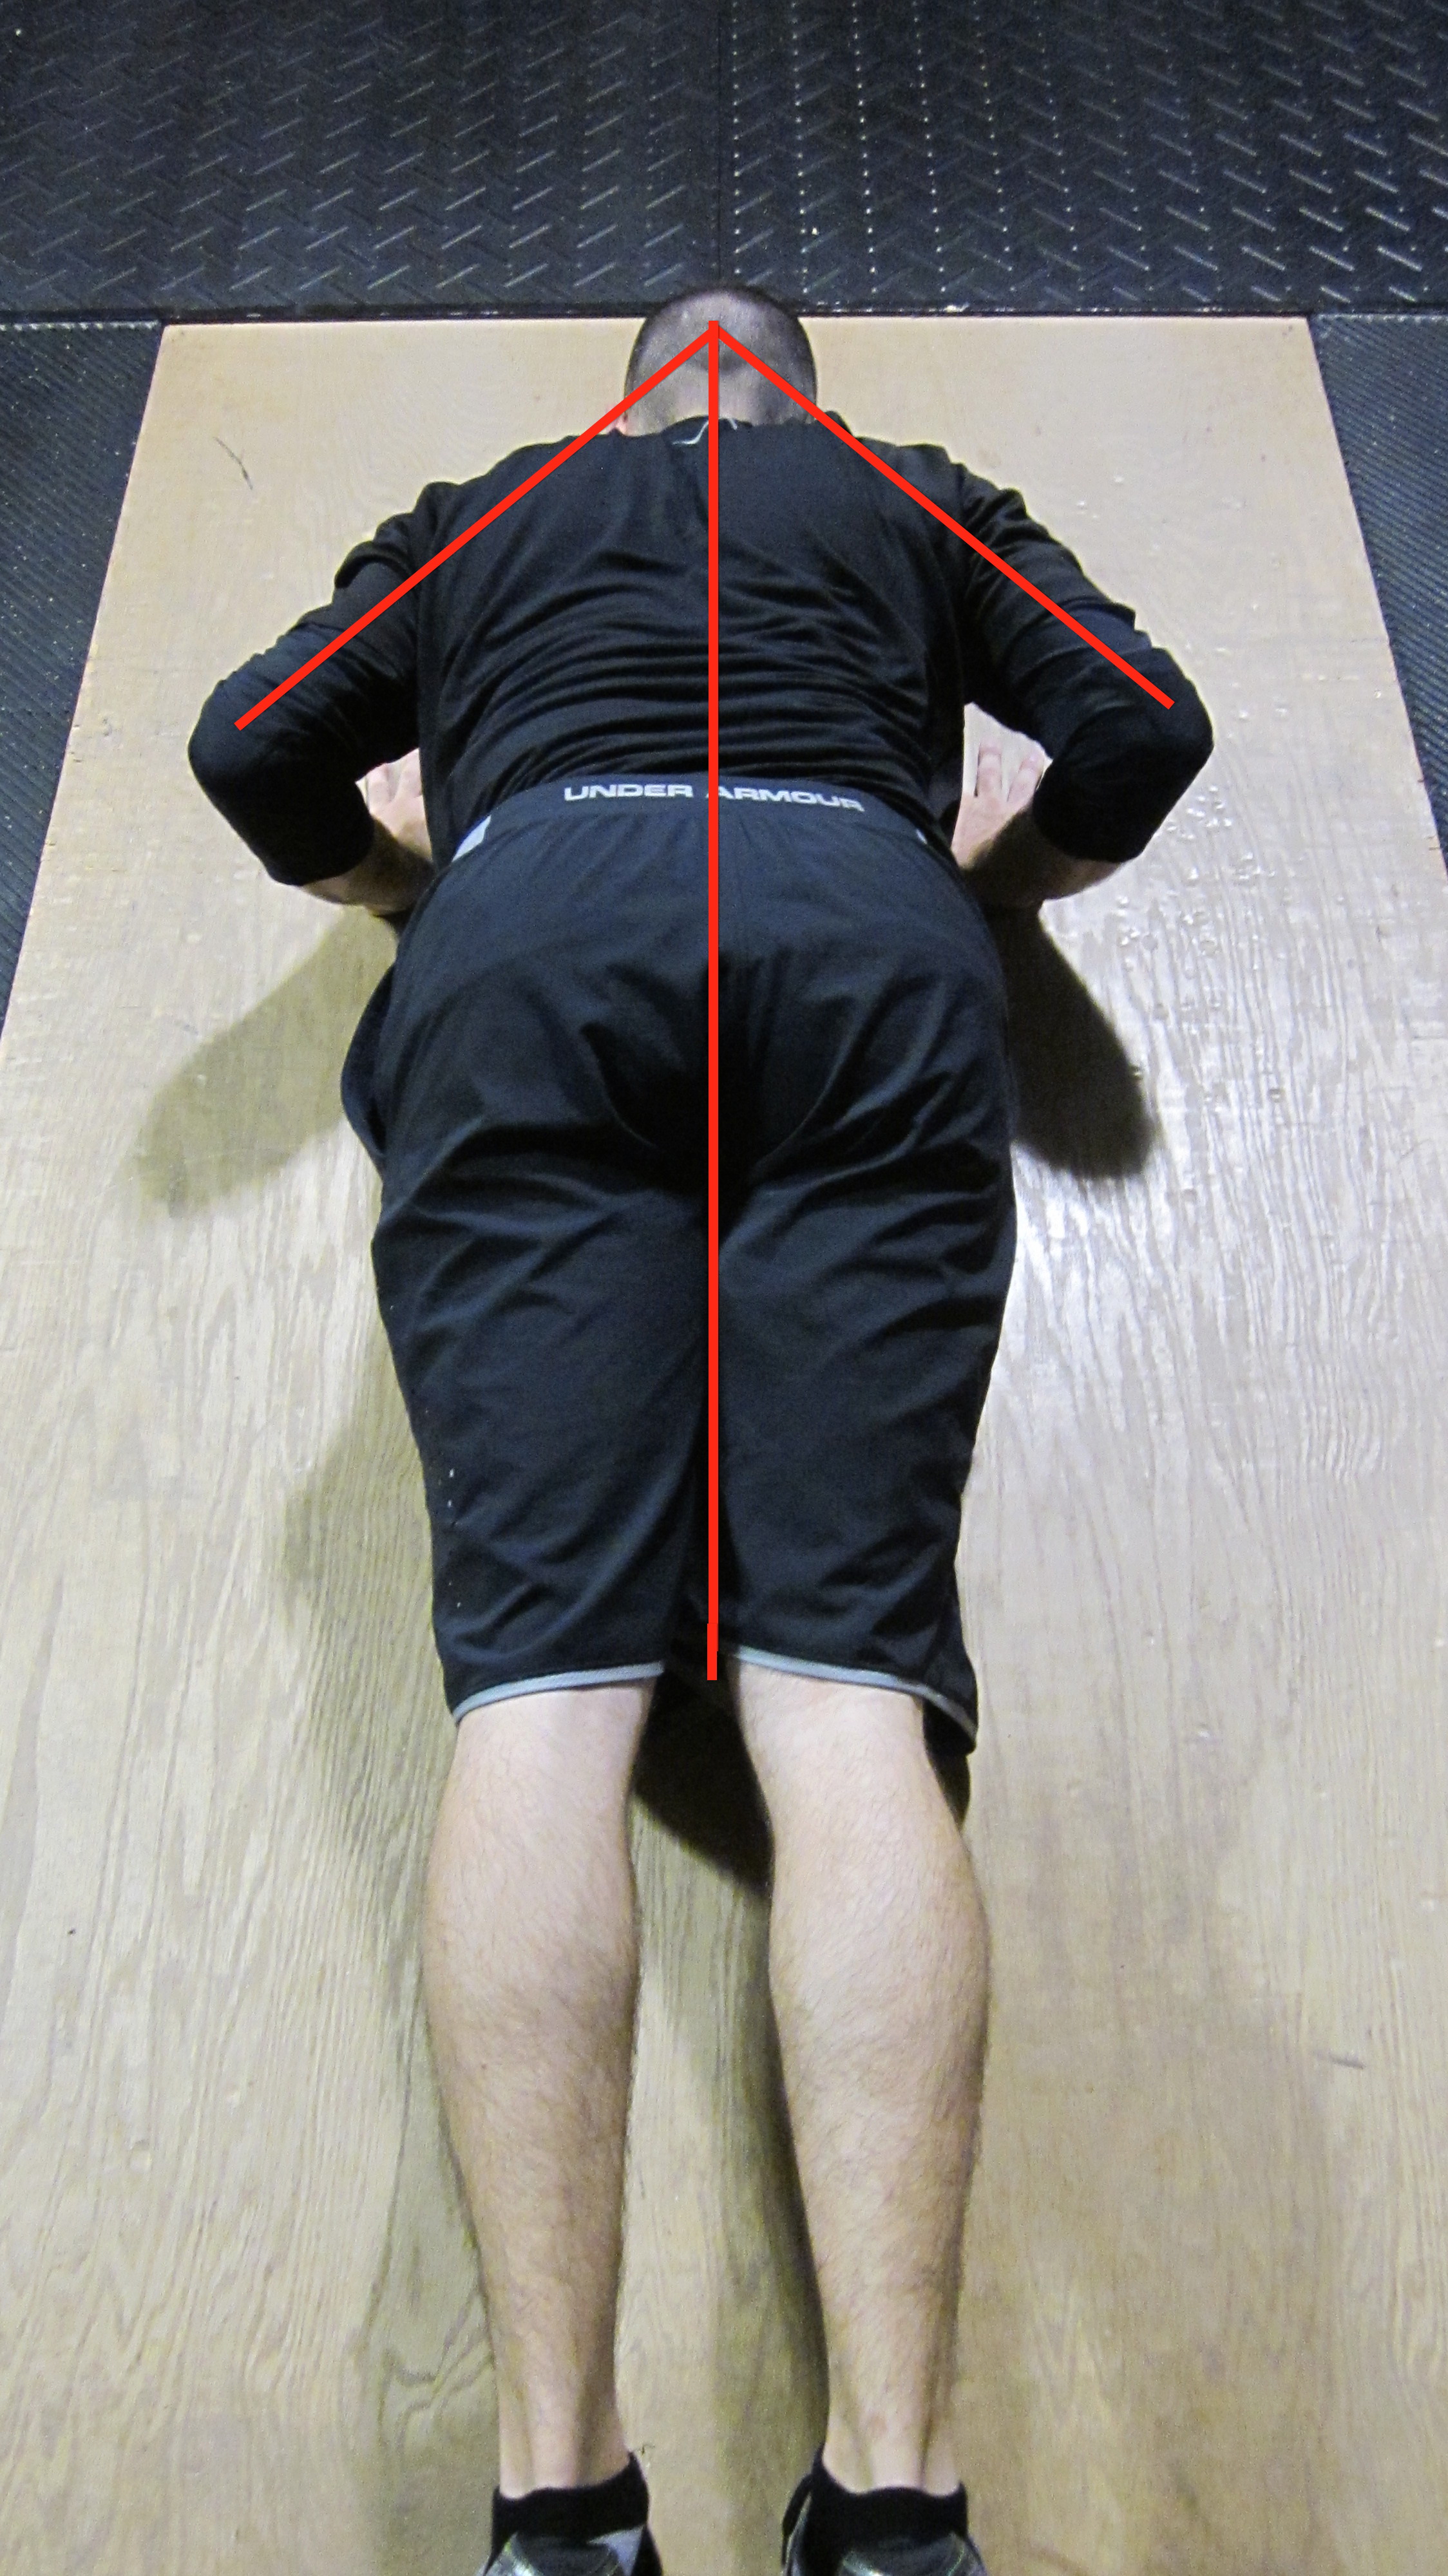 This goes hand-in-hand with the point above – when lowering you want approximately a 35 or 45-degree angle relationship between the elbows and torso.
(Don’t worry – you can thank me later for the awesome graphic to the right. And yes, I did make that arrow myself, thank you very much.)
If the elbows are flared quite wide (such as a 90-degree angle), this puts a ton of torque and strain on the shoulders, which we know isn’t a good thing.
However, tucking too much is similar to “pulling” with the lats, and can often drive the humeral head forward, causing anterior shoulder pain.
I heard this a while back and it works – think about making an Arrow when viewed from above. Your torso and legs are the straight line, and your upper arms make up the sides.
Use Your Functional Range
I’m a big believer in what I call “functional range.” If you don’t have the mobility or stability to go through a full range of motion yet, that’s fine.
But do the exercise correctly!
In the case of the push-up, focus on keeping the core tight and the body rigid like a board throughout. Do not let the core sag or get loose at any point during the lift. If you can’t go through a full range of motion yet, either stop short or regress the exercise.
Push Up
Go the point where you feel as though you might lose your core or neutral spine position, and then start to push back up. This is different for everyone, so don’t feel the need to touch your nose the floor on every repetition.
Keep Things Tight
As you’re pressing up, try and focus on maintaining all the good stuff you’ve done up to this point. The elbows should be approximately 35-45 degree angles, core tight, neutral spine, etc.
Reach at the Top – Then Repeat
At the top, at the very least you need to think about actively reaching. Keep the chest up/out, and don’t round the upper back.
From there, go through the breathing cycle again (inhale while reaching, then exhale fully before starting again), and repeat for as many repetitions as you so desire.
Push-up Variations
Now that we’ve covered proper push-up performance, let’s look at some of the variations and progressions we have at our disposal.
Obviously, just doing a standard, body weight push-up wouldn’t keep us motivated or engaged for too long. As such, here are a ton of different variations you can use to make the push-up more challenging and fun for years to come.
Standard Push-ups
Here’s a video of the standard push-up. Nothing fancy here, but when done appropriately, gives you a huge return on investment.
And the best part about this? You can do these almost anywhere, with no equipment whatsoever.
Feet Elevated Push-ups
An easy way to progress the push-up is to simply elevate the feet. This increases the relative body weight, and overloads the upper body and core.
Another benefit to this variation is that it increases upward rotation through the scapulae a bit, which often feels quite good for some of your clients that have a tendency to lock their shoulder blades back and down.
The more you elevate the feet, the more of your body weight you’re forced to push-up, so start off small. At IFAST we’ll start with a 4-6″ box and then progress from there.
X-Vest Push-ups
Another simple tweak to the standard push-up is adding some form of external load.
And while you can obviously just drop a plate on someone’s back, that can often be cumbersome and awkward.
Instead, a weighted vest is easy to set-up with, and keeps the resistance the same throughout. Adding chains and bands looks cool and they use accommodating resistance to overload the top, but this may not be necessary (especially early-on).
Regardless, adding an external load like an x-vest is a great way to make the standard push-up more challenging.
Chain-Resisted Push-ups
Now we’re moving into our band/chain resisted variations. If you’ve ever done a push-up you know the easiest portion of the lift is the top, as your leverages are the best.
Basically if you can get out of the bottom, you can finish at the top. So how do we make this more challenging?
Or better accommodate our natural strength curves?
Easy – we use implements that overload the top portion of the lift!
In a chain-resisted push-up, the chain piles up as you lower yourself down, effectively reducing the load. But then, as you press back up, it comes back off the ground and overloads the top portion of the lift.
Last but not least, any time you’re using chains testosterone, aggressiveness, and awesomeness are increased 27.8653%. This is proven, scientific fact.
Band-Resisted Push-ups
Much like the chain-resisted variation, band-resisted push-ups use accommodating resistance to overload the top portion of the lift.
However, while the chain-resisted variation is a bit more subtle in it’s transition/resistance, the band variation tends to be a bit more aggressive with regards to overload.
In other words, err on the side of caution here. Even a small band can make a big difference with regards to extra load at the top.
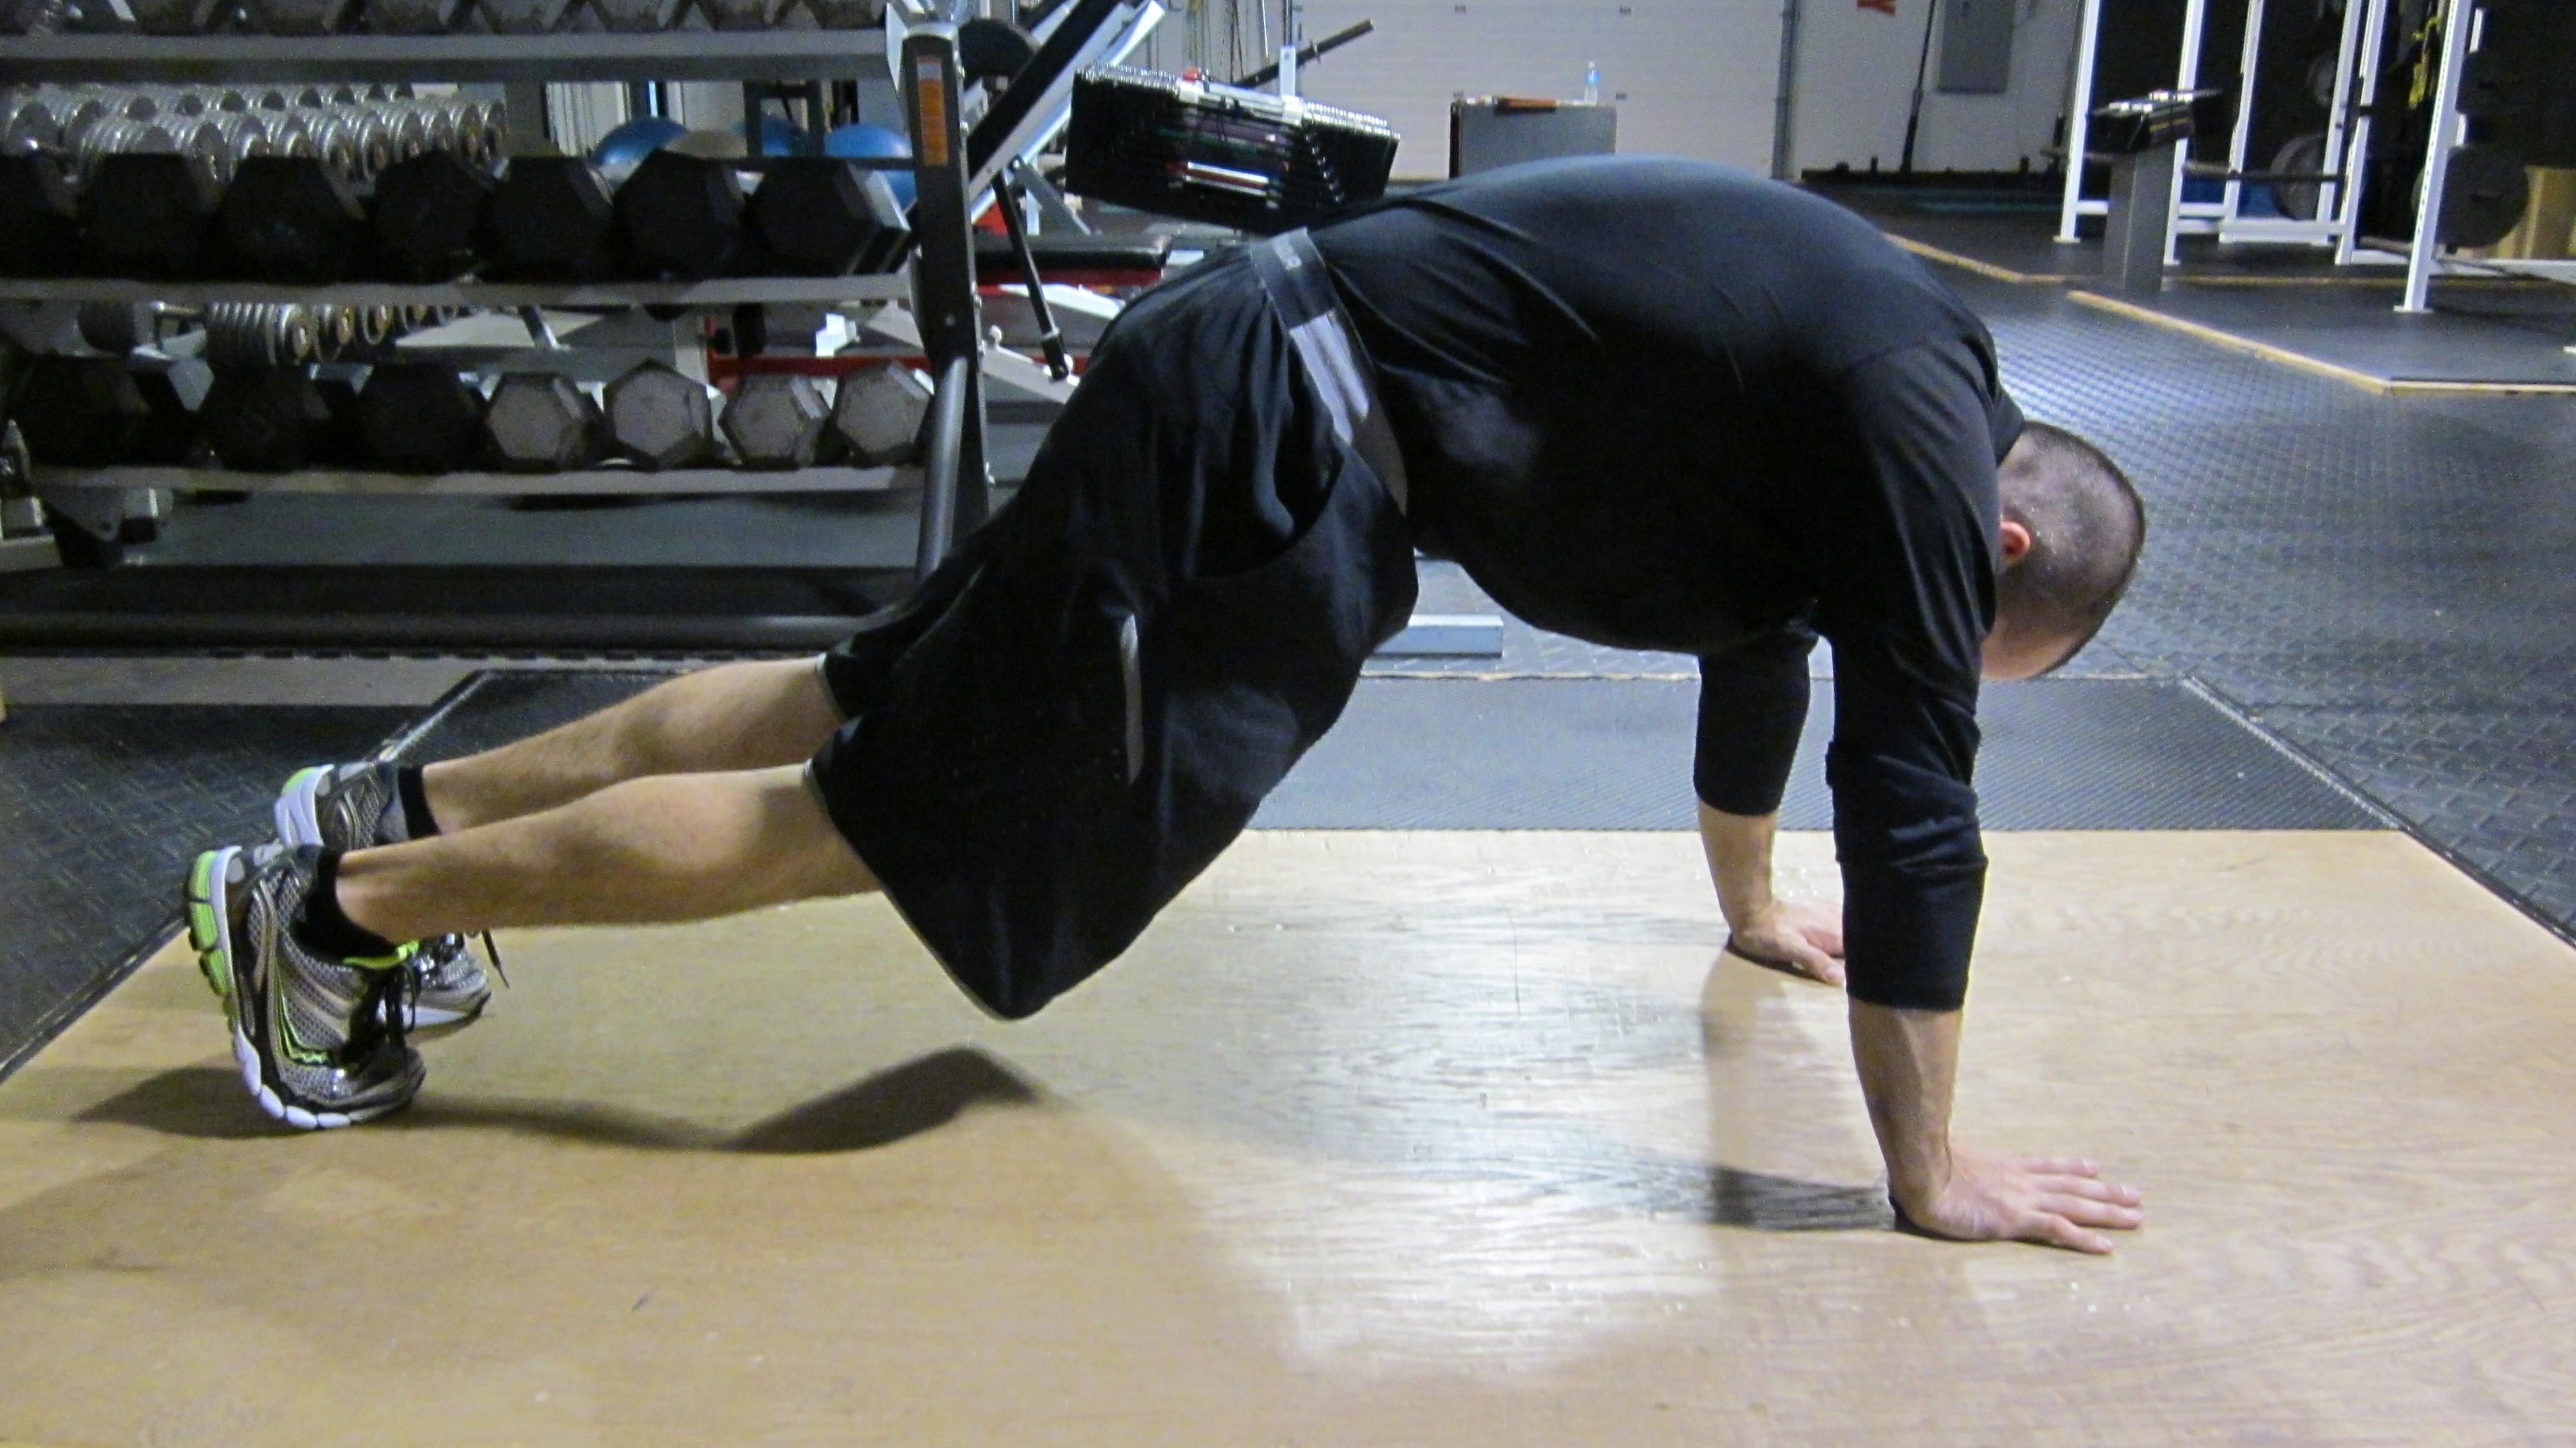
Push-up To Downward Dog (PUTDD)
Yep, I’ve gone and done it – I’m now featuring yoga poses on my website!
In all seriousness, you don’t have to rock Lululemon to enjoy the benefits of this awesome exercise.
In the PUTDD you get all the benefits of push-ups, but two more ancillary benefits:
- When pushing back, you drive upward rotation of the scapulae and even more reaching mechanics. This often feels great on the shoulders and upper back.
- When pushing up to the top position, this works as an amazing stretch/mobilization for the entire posterior chain. If you work with athletes that are locked in extension (like I do), then driving some system flexion is bound to feel great.
As far as coaching goes, it’s pretty simple. Drive up to the top position, but instead of coming all the way up pike the hips back so that you make a “V.”
In the top position I’ll cue my clients to still think about actively reaching/pushing away from the floor, and trying to straighten the knees and push the heels towards the ground.
This may not be 100% in-line with how a yoga instructor would teach it, but hopefully I don’t get a slew of hate mail based on how I coach it. I love the movement and feel it’s a great exercise, either in the training or warm-up sections of an exercise routine.
Inclined Push-ups
Did you know that we don’t perform “Girl” push-ups at IFAST?
First off, I think the term is degrading. I know plenty of boys and men who can’t perform a traditional push-up correctly, so am I going to tell them they have to do “Girls” push-ups instead?
Absolutely not.
Second, I think they are a horrible exercise to coach. When you put someone on their knees (instead of their toes) you effectively shorten the lever and lose some of the core stability demands.
And last but not least, I just think it’s really hard to get someone in an ideal neutral spine/pelvis position with the “on-knees” variation, so I’ve dumped it by the wayside.
I always use an incline to coach push-ups. I think it’s easier to coach and cue, and ridiculously easy to progress as well. All you have to do when someone gets stronger and more stable is lower the pins a few notches and you’re good to go!
The art form here as a coach is getting your athlete to set-up with the feet at an appropriate distance back from the rack. I want them to lower to a point where their lower chest touches the bar, but they’re still up on their toes and exhibiting a neutral spine position.
One final note here: Since this is the one variation where you’re grabbing a bar, I often start all my clients with the pinkies on the power ring, and then adjust in or out from there.
Push-ups To Single-Arm Support
We all know that single-leg training can be hugely beneficial, but what about single-arm training?
In this case, moving to a single-arm support provides a handful of benefits:
- Increases loading on the working arm/shoulder,
- Increases stabilizer activation through the mid-back and shoulder (especially the rotator cuff),
- Increases the demands on core and trunk stability, etc.
The set-up of the movement here is identical to a standard push-up, with the subtle adjustment of moving your feet out a bit wider than usual to increase your base of support.
At the start/finish of the movement, you’re going to remove one hand from the bar/ground. In this case, we’ll often try and associate it with a breath as well – so take the hand off, inhale while reaching/pushing away from the ground, exhale and restore the hand, and then perform the next repetition with both hands on the ground.
Unstable Surface Trainer Push-ups
Staying with the theme of “stability” versus “strength,” unstable surface trainer push-ups take stability and control to the next level.
Set-up as though you’re going to do a standard push-up, but this time place your hands in the handles of an unstable surface trainer (we use Blast Straps, TRX’s and Jungle Gym’s at IFAST).
Performance of the movement is identical to a standard push-up, it’s just a heckuva of a lot harder because you’re shaking all over the place!
We’ll often start our clients up higher so that the torso/body angle looks more like an inclined push-up, and then work them back down over time.
Med Ball Push-ups
Our final push-up variation is an oldie but a goodie. Here, again, the theme is more focused on stability and control versus brute strength.
Much like the unstable surface trainer variations, any time you have an unstable surface underneath you it’s going to increase the demands on stabilizer function. In this case, you’re definitely going to feel these a ton in the core and shoulders.
Set-up in a standard push-up position, but instead of placing the hands on the ground, you’re going to set them on top of equally sized medicine balls. Performance of the movement is identical from there on out.
If two med balls is too much instability, try only using a ball under only one hand to begin with. Perform half of the repetitions for your set, and then switch hands at the midpoint.
Push-up Technique Errors:
Flaws and Cues
Now that we’ve covered a ton of different push-up variations, let’s break down the form and technique errors that we see most often in the gym.
Lack of Neutral Spine
Lack of a neutral spinal alignment is one of the biggest issues we see when training clients or athletes. Sometimes they never get there to begin with, and others lose it at some point during the set.
Here are some of my favorite coaching cues to make sure someone gets (and stays!) where you want them, depending on where they’re breaking down.
The Neck
 My first option whenever someone is breaking down is to put the PVC pipe on their back. This gives them immediate feedback and allows them to correct the issue.
You’ll often see someone’s head and/or neck “drift” forward during a set, especially when they fatigue. I like to use the cue of “pulling” the head and/or neck back, whichever works  for their client.
Another cue that may work is “long neck,” as this often allows them to both pull the head back, and also get it re-aligned with the rest of the spine.
The Upper Back
The biggest issue I see with the upper back is when people either fail to finish the movement, or when they reach inappropriately (both of which are covered in more depth below).
Too often, people associate reaching with the arms with significantly rounding the upper back. These are not one and the same!
 When most people reach they just end up rounding the upper back. Instead, think about maintaining a more neutral/slightly kyphotic upper back position, and then reaching using the arms and serratus.
Again, the PVC pipe can work wonders here so if you have someone who consistently only has the pipe on their upper back, teach them how to reach.
The Lower Back
 Again, the PVC can do wonders here, but let’s assume you’ve got them fairly neutral but the core/abs look saggy. Now what?
The best cue to use here is to teach them to exhale hard, or exhale fully. This naturally engages the core and abdomen, and reduces the lumbar curve/lordosis. From there, it’s just a matter of keeping that core engagement throughout.
If you need more cues in the arsenal, I’ll also cue them to exhale and bring the ribs down, and/or to exhale and pull the pelvis up.
Not Starting and Finishing Correctly
 Perhaps the biggest issue I see with regards to the upper back is when clients/athletes fail to finish the movement.
You’ll often see people who always look like their shoulder blades are always pinched back and together, and this is not what we want.
The cue or thought process here is simple – you want to maintain a neutral spinal alignment, but you also want them to “push” themselves away from the ground.
Here are a handful of different cues you can use to get this working:
- Reach,
- Push away,
- Push away from the ground,
- Make your arms long, etc.
Now some clients/athletes may be doing everything you want, but it never looks quite right. If that’s the case, you may need correctives in their programming that allow them to push air into the back side of their body and fill their posterior mediastinum (i.e. the upper back).
Knees Bent
Another common issue is allowing the knees to bend. In this case, the fix is simple – cue the client to extend the knees while maintaining the neutral spine/pelvis alignment.
Too Much Lat Recruitment
 We went through a phase where bigger and better lats were the name of the game.
And while lats definitely have their role, I don’t want to recruit them on every single-lift. (If you want an overview, read this: Lats – Friend or Foe?)
Over-recruiting the lats is most commonly seen when the elbows are crammed in super tight to the body when lowering yourself to the ground.
Instead, think about keeping a slight flare to the elbows throughout. Again, a 35 to 45 degree angle relative to the body should suffice.
Too Much Elbow Flare
 Just as you don’t want the elbows pinned to the sides, you don’t want them flared out to 90-degree angles, either.
I don’t care what the 70-year-old bodybuilder* in your gym told you – this might help you recruit your pecs and delts, but it’s coming at the expense of your long-term shoulder health. Find a happy medium for those elbow angles and you’ll be good to go.
(*Side note: I’ll be impressed if I get a slew of hate mail from 70-year-old bodybuilders. Please don’t hate me forever!)
“Pulling” the Scaps Together
Much like over-recruiting the lats can cause shoulder issues, so too can teaching clients to “pull” the shoulder blades back and together to start the lift.
The premise here isn’t totally wrong – I understand coaching or cuing the dominant function, or cuing a concentric movement to promote an eccentric movement.
The issue is how most people do this.
Instead of gently allowing their shoulder blades to fall together as they go down, what ends up happening is clients immediately slam their shoulder blades together right off the bat, and essentially run out of room before the get to the bottom of the lift.
You’ve maximally retracted the scapulae, and the rest of the range of motion ends up coming from passive restraints around the shoulder (gleno-humeral) joint.
If I see someone doing this, my cue is simple: Be athletic. You may laugh, but it works 9 times out of 10.
This person is typically thinking about pulling the shoulder blades together, so if I cue them to relax, stop thinking and be athletic, it typically cleans right up.
Increased Lordosis in the Bottom
While someone’s core and lumbar spine position may look great initially, it’s not uncommon to see them lose this position, especially in the bottom position.
We talked about exhaling fully above, but sometimes people just need flat-out stronger abs to be able to hold this position throughout the course of a set.
The article below covers some of my favorite core exercises, and if you need some rudimentary core work it should work wonders. Just make sure to give the exercises a fair shot, and perform them exactly as I describe.
Shrugging vs. Reaching
We talked about this a bit above, but let’s dig in a bit deeper here.
At the top of the lift I want my clients and athletes reaching – the goal here is to maintain a neutral spinal alignment, while allowing the scapulae to glide around the sides of the back.
 However, if someone is week through the serratus, or simply doesn’t understand how to perform this motion, it’s not uncommon to see them “shrugging” up with their shoulders instead of reaching.
To fix this, I’ll start by stopping the exercise and pulling them aside. I’ll describe what I want the motion to feel like, and show them while they are standing up. This could be as simple as having them reach long and asking them if they feel their serratus while keeping the chest up.
Once they know the feeling I’m looking for, we’ll try the exercise again. If they know the feeling but can’t do it while loaded, we need to reduce the load and/or regress the exercise.
This is where the inclined push-up is your friend. It mimics the movement almost identically, but reduces the load.
When in doubt use the PVC pipe to reinforce neutral spinal alignment, and then force them to reach at the top. If they shrug the pipe will come off their buttocks, so you may need to spend some time just working the top position until they figure it out.
Push-up Modifications
Unfortunately, not everyone can jump right into push-ups on the floor for various reasons. Here are a few quick and dirty modifications we use at IFAST to help our clients get the most out of this awesome exercise.
Inclined vs. Standard
The most obvious modification or tweak we need to make occurs if someone isn’t strong enough to perform a push-up from the ground. In this case, I prefer to use an inclined push-up versus one from the knees.
Not only does this allow for seamless progression over time (i.e. you simply work the client/athlete down the rack), but it more closely mimics the core stability demands we’re chasing as well.
Push-up Bars
 One other modification we use with a degree of regularity are push-up bars.
Some clients have shoulder rotation issues, elbow issues, or wrist issues that don’t allow them to do standard push-ups without discomfort.
Push-up bars not only allow us to externally rotate the shoulders and get us into a neutral grip through the upper extremity (neutral grip = palms facing each other), but they also get us into a more neutral wrist position as well.
Standard push-ups put a ton of extension through the wrist, and this can be problematic for many clients/athletes. By simply switching to push-up bars more often than not we reduce any pain or discomfort through the wrist, and get them back to doing push-ups with regularity.
Programming Push-ups
Up to this point we’ve covered how to perform push-ups, tons of variations you have at your disposal, and of course the biggest errors I see when coaching the push-up.
All we have left to cover is how to put this awesome exercise into your program and you should be good to go!
When I’m writing a program, the first question I ask is: What is the primary goal of this program?
From there you can break it down into muscle gain, fat loss, strength or power development, etc.
Much further down this list is what exercises I choose. However, since I train a ton of athletes the push-up finds its way into numerous programs because it covers so many training bases.
The big question I ask myself when including the push-up is this:
What do I want this person to get out of using push-ups in their programming?
Typically there are one of two answers:
- I want them to use the push-up to develop upper body/total body strength, or
- I want them to use the push-up to develop upper body/total body stability.
This is a key distinction, and it’s going to help me determine which exercise to choose, as well as what set/rep scheme I’m going to employ.
If someone is chasing strength-focused gains, I’m going to keep the repetitions lower (4-8 repetitions). This may not seem low to the powerlifters or strength-athletes reading this, but keep in mind the push-up isn’t the best choice for heavy singles, doubles or triples.
On the other hand if I’m chasing stability and control, I’ll typically go a bit higher on the rep ranges (6-12). However, keep in mind that you don’t have to get too crazy here – if you choose an exercise like a UST or med-ball push-up, you’re going to toast your stabilizers regardless of how many reps you do!
Last but not least, if your goal is to burn body fat, chances are you want to perform more reps per set (typically in the 8-15 range). Just make sure that the quality of movement stays high as fatigue starts to set in.
Summary
So there you have it, just about everything you need to know about push-ups.
Posts like these take a ton of time and effort, so if you enjoyed it all that I ask is that you please help spread the word.
Whether it’s sharing it on Facebook, Tweeting it to your peoples, or just forwarding the link on to a friend, anything you can do to help promote it would be greatly appreciated.
Have a great day and go crank out some push-ups!
All the best
MR